
Table of Contents
IoTチームの岡嵜です。
年明けからAWS Amplifyを使っていろいろな検証をしています。今回はその検証から得られた知見の一つとして「Functionsで作ったLambdaからAPI(GraphQL)を利用する方法」についてまとめようと思います。
やりたいこと
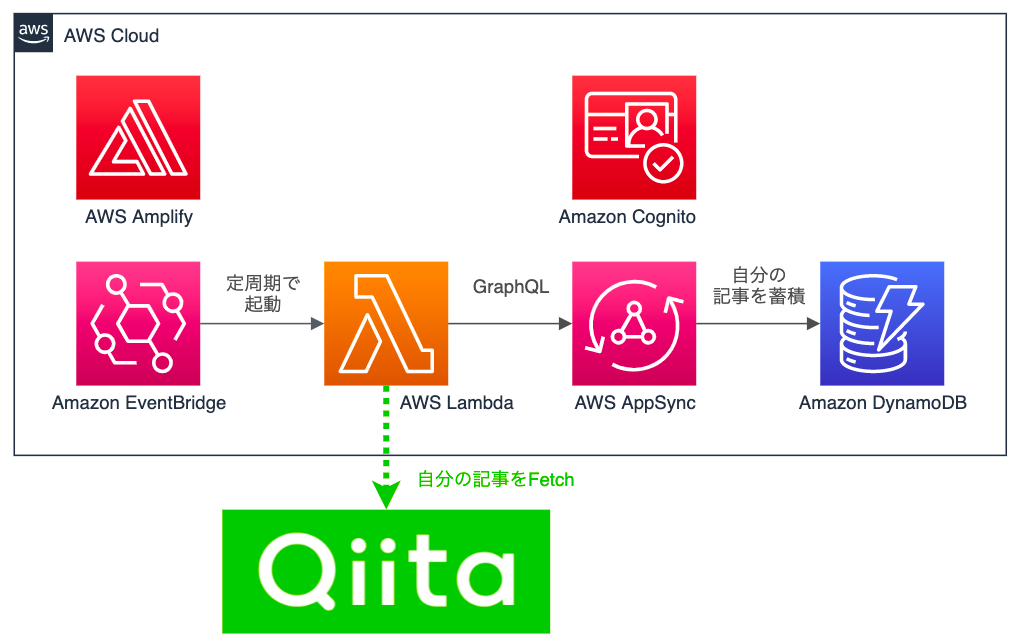
AWS Amplify FunctionsでLambda関数を作成し、AWS Amplify APIで作成したAPI(GraphQL)を実行します。

実際のユースケースとしては「QiitaやFusic Tech Blogから自分が執筆した記事を定期収集し、自身のポートフォリオサイトに表示する」といったものでした。AWS Amplify Functionsはcronのように簡単に定周期起動ができるので、外部システムのポーリングやバッチ処理に活用できます。
API Keyによる認証ではダメなのか?
amplify functions schedule api のようなキーワードで検索すると以下のドキュメントが見つかります。
- GraphQL from Lambda
API Keyで認証してLambda関数からAppSyncの認証をし、API(GraphQL)を実行しています。まさに今回やりたいこととマッチしているのですが、「AppSyncのAPI Keyは有効期限が最長1年」という点が運用上ネックとなります。これは基本的には手動でしか更新ができず、自動化するとしてもそれなりに大変です。
AWSをある程度知っている人であれば「それってIAM Roleで何とかなるのでは?」と疑問を持つはずです。自分もそのように考え、調べたところ実現方法を見つけ出すことができました。
作業のポイント
作業のポイントとしては以下3点です。
amplify add functionを実行したときにAPIへのアクセス権を付与するschema.graphqlで適切にアクセスを許可する- Lambda関数で、関数に付与されているRoleからcredentialsを作る
Amplifyの導入
まずは適当なディレクトリを作って amplify init します。
$ mkdir amplify-function-api
$ cd amplify-function-api
$ amplify init
? Enter a name for the project (amplifyfunctionapi)                   # 適当な名前をつける
? Initialize the project with the above configuration? (Y/n)          # 「Yes」を選択
? Select the authentication method you want to use: (Use arrow keys)  # 「AWS profile」を選択
? Please choose the profile you want to use fusic-sandbox             # 使用するプロファイルを選択
API(GraphQL)を作る
続いて、 amplify add api することでAPIを作成します。選択肢が多いので適当に選んでしまいがちですが、それぞれ何を問われているのかを理解した上で適切に選択するようにしましょう。
$ amplify add api
? Select from one of the below mentioned services: (Use arrow keys)  # 「GraphQL」を選択
? Here is the GraphQL API that we will create. Select a setting to edit or conti
nue (Use arrow keys)                                                 # 「Authorization modes」を選択
? Choose the default authorization type for the API (Use arrow keys) # 「IAM」を選択 ※「API Key」を選ばないよう注意
? Configure additional auth types? (y/N)                             # 「No」を選択
? Here is the GraphQL API that we will create. Select a setting to edit or conti
nue (Use arrow keys)                                                 # 「Continue」を選択
? Choose a schema template: (Use arrow keys)                         # 「Single object with fields」を選択 ※お好みで
? Do you want to edit the schema now? (Y/n)                          # 「Yes」を選択
? Choose your default editor                                         # 「Visual Studio Code」を選択 ※お好みで
ここまで入力すると、選択したエディタで schema.graphql が開かれます。今回はQiitaの記事情報を扱いたかったので以下のように入力します。
# This "input" configures a global authorization rule to enable public access to
# all models in this schema. Learn more about authorization rules here: https://docs.amplify.aws/cli/graphql/authorization-rules
input AMPLIFY { globalAuthRule: AuthRule = { allow: public } } # FOR TESTING ONLY!

type Article
  @model
  @auth(
    rules: [
      { allow: private, provider: iam, operations: [read, create] }
    ]
  ) {
  id: ID!
  title: String!
  body: String!
  image: String!
  link: String!
  publishedAt: AWSDateTime!
}
@auth ディレクティブの記述が、API KeyなしでLambda関数からAPIを実行できるようにするポイントです。
Function(Lambda Layer)を作る
次に amplify add function することでFunctionを作成します。
GraphQLクライアントを使おうとするとLambda関数のサイズが大きくなり、AWS Console上でのコード編集ができなくなったり、デプロイが生じたりといった不便が生じるので、先にLambda レイヤを作成します。Lambdaレイヤで必要なパッケージをインストールしておくことで、複数のLambda関数でパッケージを共用しやすいというメリットもあります。
$ amplify add function
? Select which capability you want to add: (Use arrow keys) # 「Lambda layer」を選択
? Provide a name for your Lambda layer: (layer10bded7e)     # 「npmlayer」とします
? Choose the runtime that you want to use: (Use arrow keys) # 「NodeJS」を選択
? The current AWS account will always have access to this layer.
Optionally, configure who else can access this layer. (Hit \<Enter\> to skip) (Pre
ss \<space\> to select, \<a\> to toggle all, \<i\> to invert selection)  # どれも選択せずEnter
生成されたディレクトリへ移動して、Lambda関数で使用するnpmをインストールします。
$ cd amplify/backend/function/amplifyfunctionapinpmlayer/lib/nodejs
$ npm install aws-appsync axios graphql-tag node-fetch@2.6.0 ogp-parser
Function(Lambda関数)を作る
Lambda Layerの準備ができたので、Lambda関数を作成します。設定項目が多いので間違えないようにしましょう。
$ amplify add function
? Select which capability you want to add: (Use arrow keys)                               # 「Lambda function」を選択
? Provide an AWS Lambda function name: (amplifyfunctionapi27f9c477)                       # 「fetchqiita」とします
? Choose the runtime that you want to use: (Use arrow keys)                               # 「NodeJS」を選択
? Choose the function template that you want to use: (Use arrow keys)                     # 「Hello World」を選択
? Do you want to configure advanced settings? (y/N)                                       # 「Yes」を選択
? Do you want to access other resources in this project from your Lambda function? (Y/n)  # 「Yes」を選択
? Select the categories you want this function to have access to. (Press \<space\> to select, \<a\> to toggle all, \<i\> to invert selection)     # 「api」をスペースキーで選択
? Select the operations you want to permit on amplifyfunctionapi (Press \<space\> to select, \<a\> to toggle all, \<i\> to invert selection)     # 「Query」と「Mutation」をスペースキーで選択
? Do you want to invoke this function on a recurring schedule? (y/N)                      # 「Yes」を選択
? At which interval should the function be invoked: (Use arrow keys)                      # 「Minutes」を選択
? Enter the rate in minutes:                                                              # 「10」とします
? Do you want to enable Lambda layers for this function? (y/N)                            # 「Yes」を選択
? Provide existing layers or select layers in this project to access from this function (pick up to 5):  # 先ほど作成した「amplifyfunctionapinpmlayer」を選択
? Do you want to configure environment variables for this function? (y/N)                 # 「No」を選択
? Do you want to configure secret values this function can access? (y/N)                  # 「No」を選択
? Do you want to edit the local lambda function now? (Y/n)                                # 「Yes」を選択
? Choose your default editor: (Use arrow keys)                                            # 「Visual Studio Code」を選択
? Press enter to continue                                                                 # Enter
特に重要なのは以下の点です。これらを設定することで、Lambda関数にアタッチされるIAM Roleへ適切なPolicyが設定されます。
Do you want to access other resources in this project from your Lambda function?でYesを選択Select the categories you want this function to have access to.で先ほど作成したAPIを選択Select the operations you want to permit on amplifyfunctionapiでQueryとMutationを選択
ここまでの手順が終わるとエディタで index.js が開かれているはずなので、Lambda関数の中身を実装します。ソースコードが長いので、当該ファイルへのリンクを貼っておきます。
最後に重要なポイントとして、自分の環境だとこのLambdaは処理に30秒程度がかかりました。このためLambdaのタイムアウトを25秒→1分に伸ばしておきます。CloudFormationを変更する必要があるので、こちらのソースコードを参照ください。
デプロイする
以上で準備は完了ですので amplify push してデプロイします。
$ amplify push
? Are you sure you want to continue?                                                        # 「Yes」を選択
? Would you like to create an API Key? (y/N) ›                                              # 「No」を選択
 Do you want to use the default authentication and security configuration? (Use arrow keys) # 「Default configuration」を選択
 How do you want users to be able to sign in? (Use arrow keys)                              # 「Email」を選択
 Do you want to configure advanced settings? (Use arrow keys)                               # 「No」を選択
? Would you like to create an API Key? (y/N) ›                                              # 「No」を選択
? Accept the suggested layer version configurations? (Y/n)                                  # 「Yes」を選択
? Do you want to generate code for your newly created GraphQL API (Y/n)                     # 「No」を選択
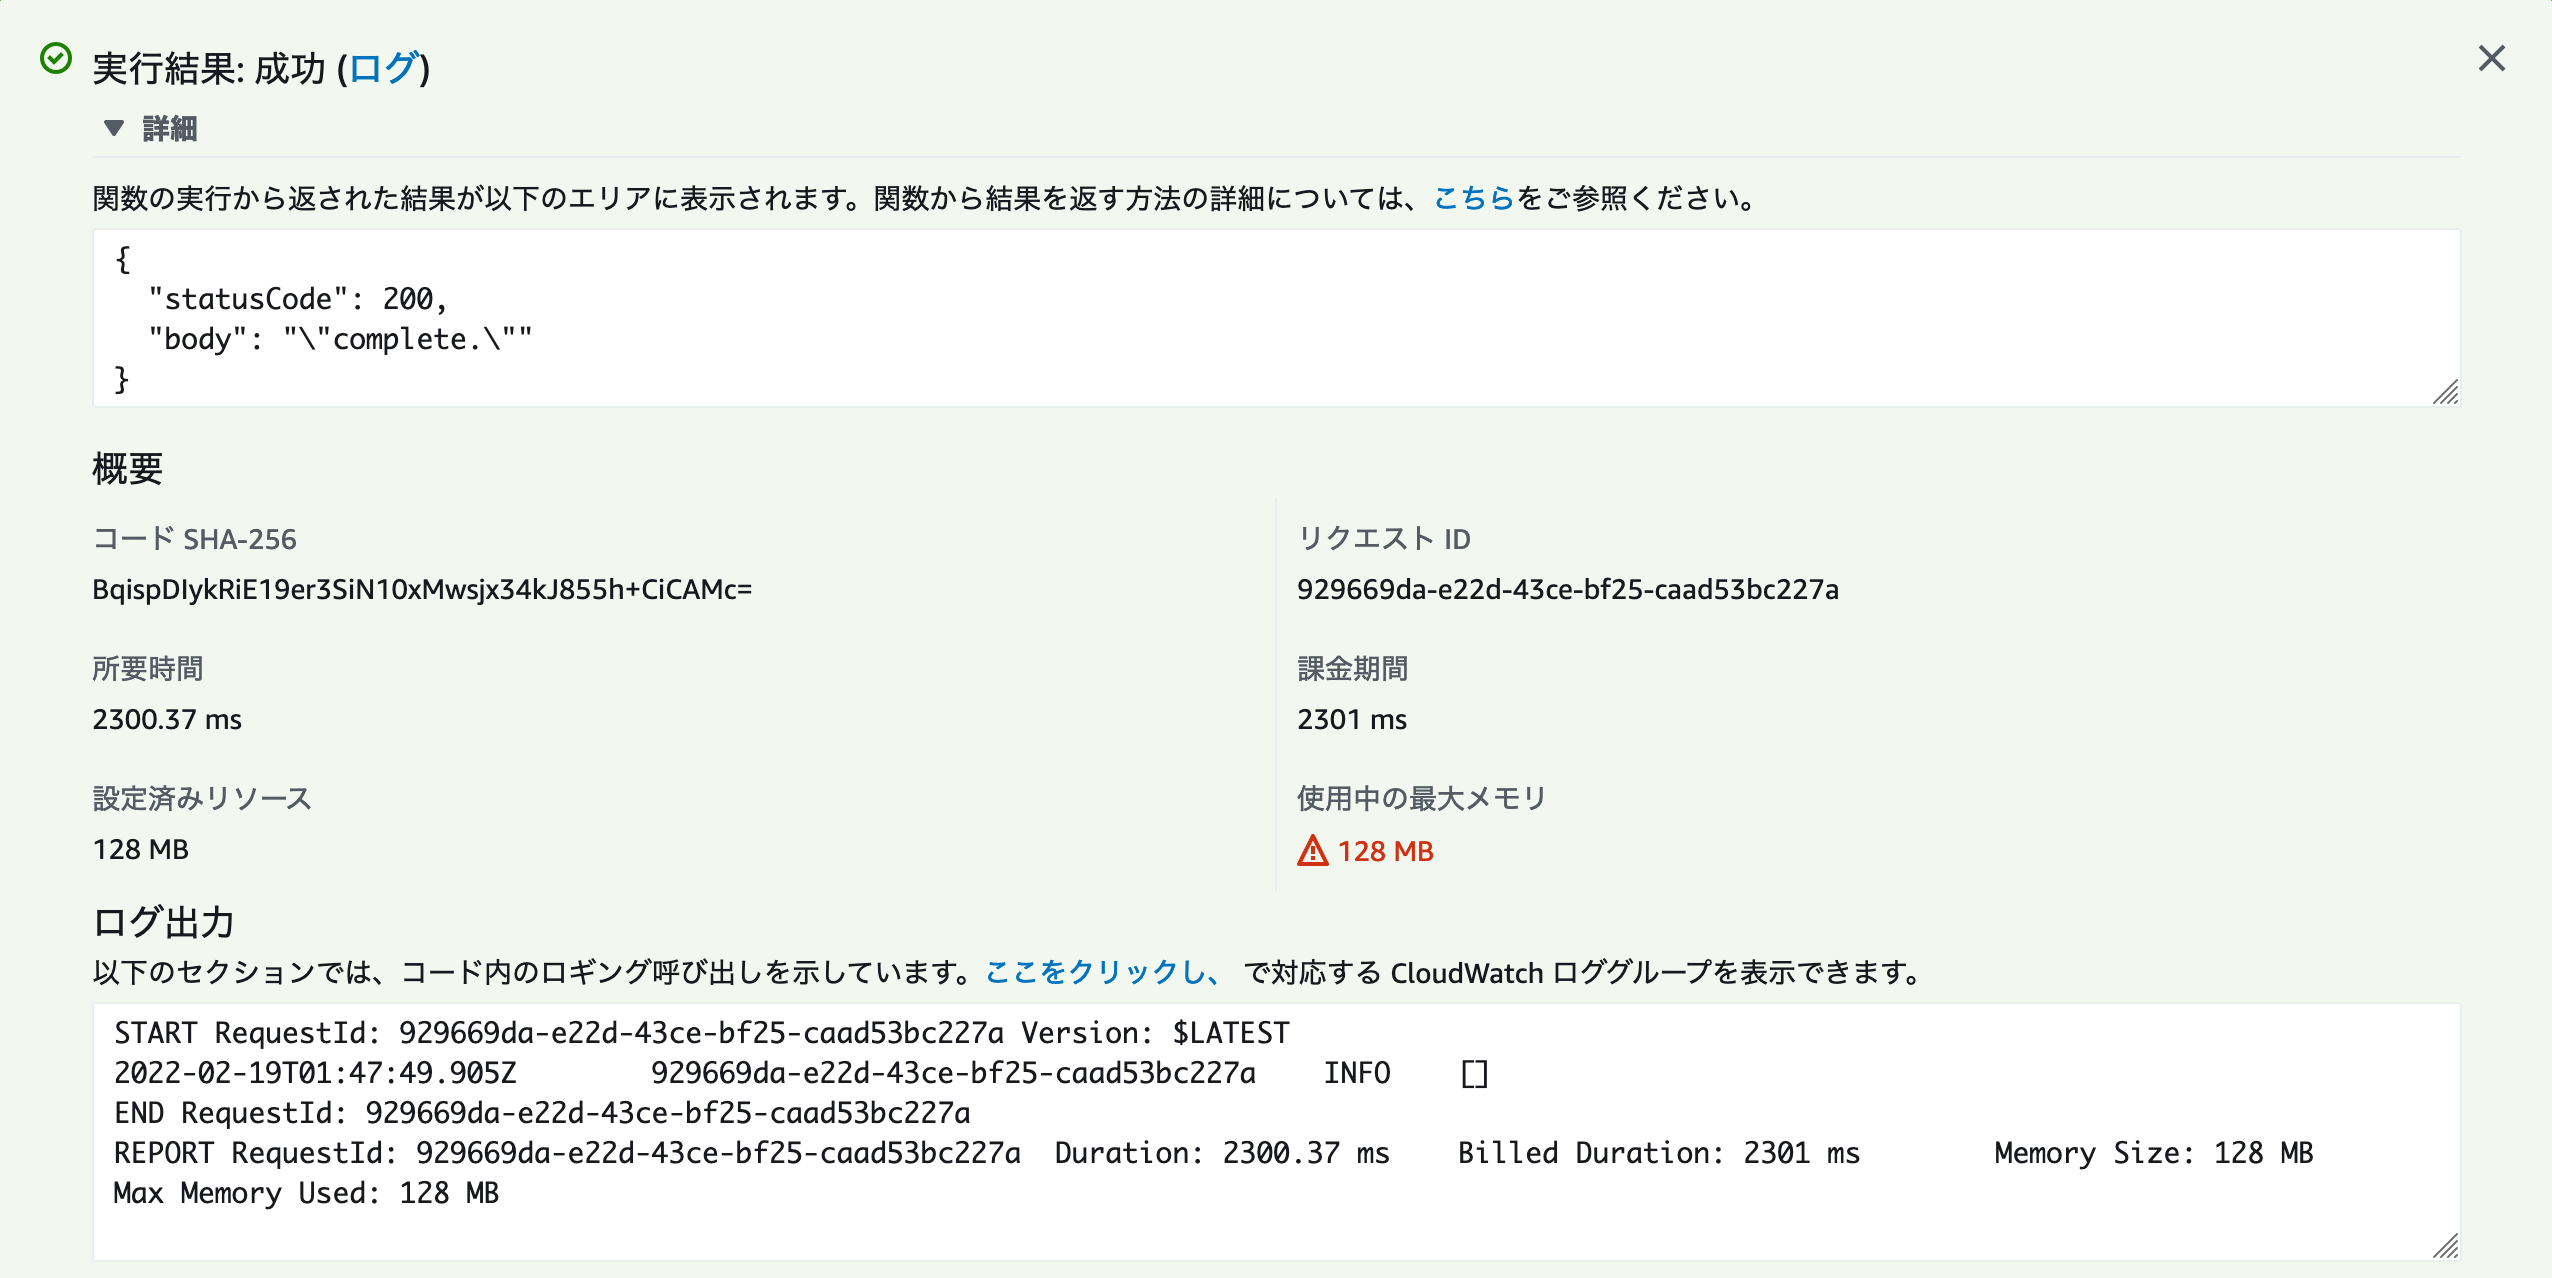
デプロイが完了したら動作確認してみましょう。Lambda関数は10分周期で起動するようにしていますが、10分待つことはできないので手動でテストします。AWS Consoleにログインし、Lambda関数 fetchqiita-dev を見つけます。
以下のようなテストイベントを作成し、テストを実行します。

テストを実行すると以下のような結果が表示されます。
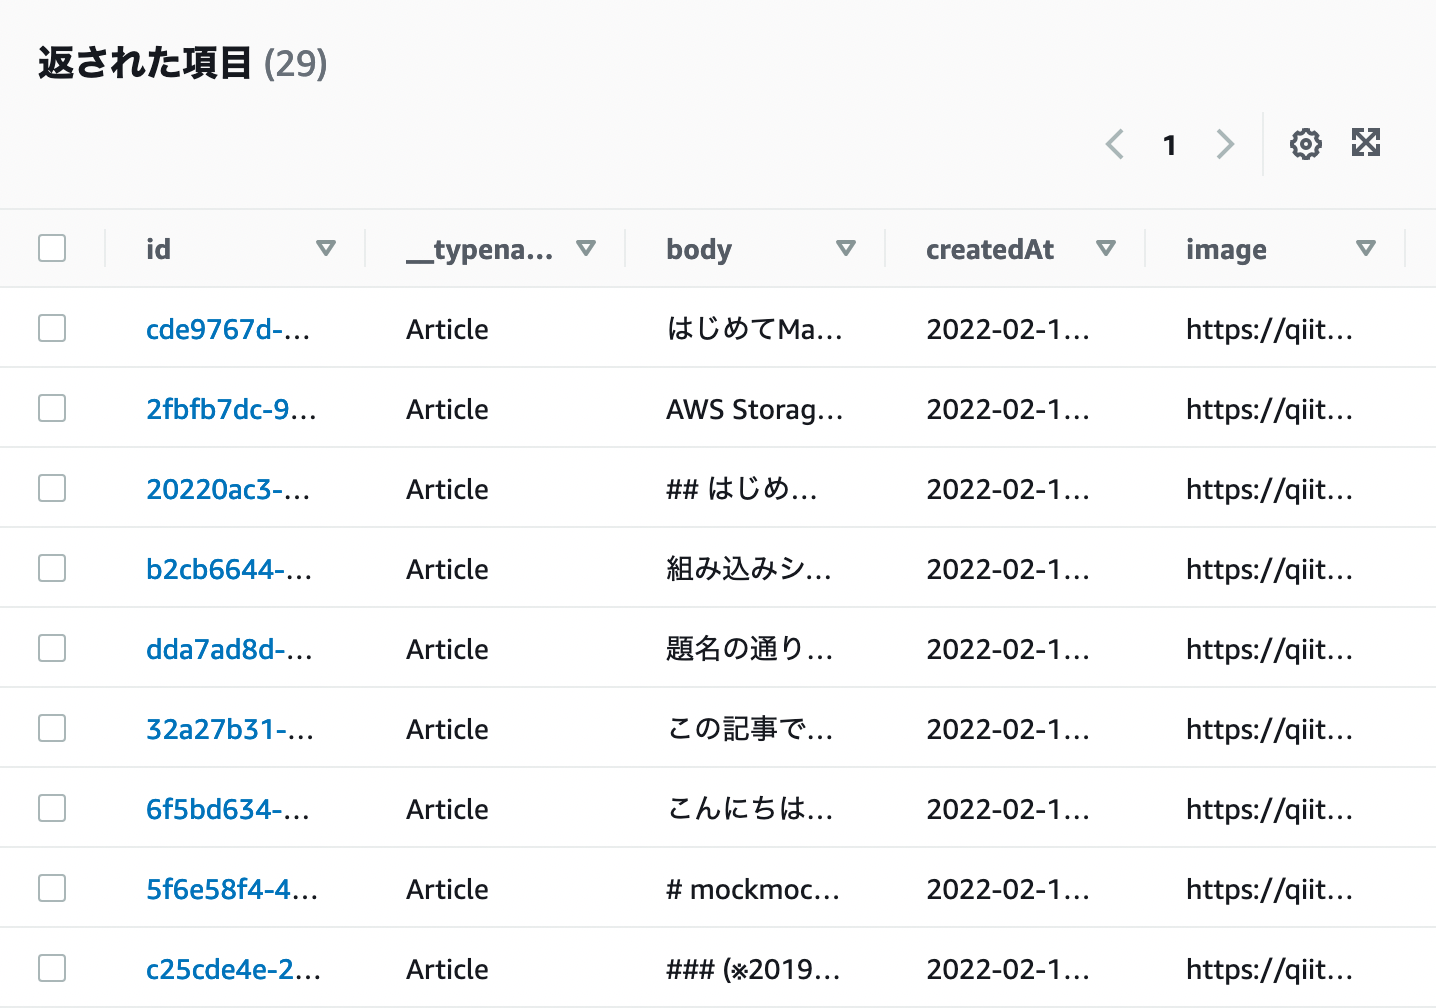
DynamoDBのArticlesテーブルを参照すると、Qiitaから取得した記事の情報が無事格納されています。
まとめ
こういった定周期処理はEC2でcron実行することが多かったのですが、AWS Amplifyを使う場合はEventBridgeをトリガーとしたLambda関数を作ることで実現できそうですね。設定が複雑なのが難点ですが、サーバーレスでこれらを実現できるのはリソースや運用にかかるコストを下げるという意味で有用そうです。
参考

Yuhei Okazaki
2018年の年明けに組込み畑からやってきた、2児の父 兼 Webエンジニアです。 mockmockの開発・運用を担当しており、組込みエンジニア時代の経験を活かしてデバイスをプログラミングしたり、簡易的なIoTシステムを作ったりしています。主な開発言語はRuby、時々Go。