
こんにちは。IoTチームの岡部です。
IoTシステムの構築を考えると、 デバイスからデータもらってどこかに投げる だけのことも、デバイスの通信はどのプロトコルに対応しているか/証明書は置けるのか/いつ・どこに置くのか/100万台あるけど…など、ハードが絡むと考えなければならないことが増えます。
今回は「証明書が使えないデバイスを採用する」というお題で、 AmazonMQ を使い mqtts で pub/sub してみたいと思います。
AWSでIoTというとまず考えるのは AWS IoT Core ですが、証明書設置が必須なので断念です。
AmazonMQはMQTTS通信に証明書がなくても利用できます。(ユーザー/Password認証は必要)
こんな構成
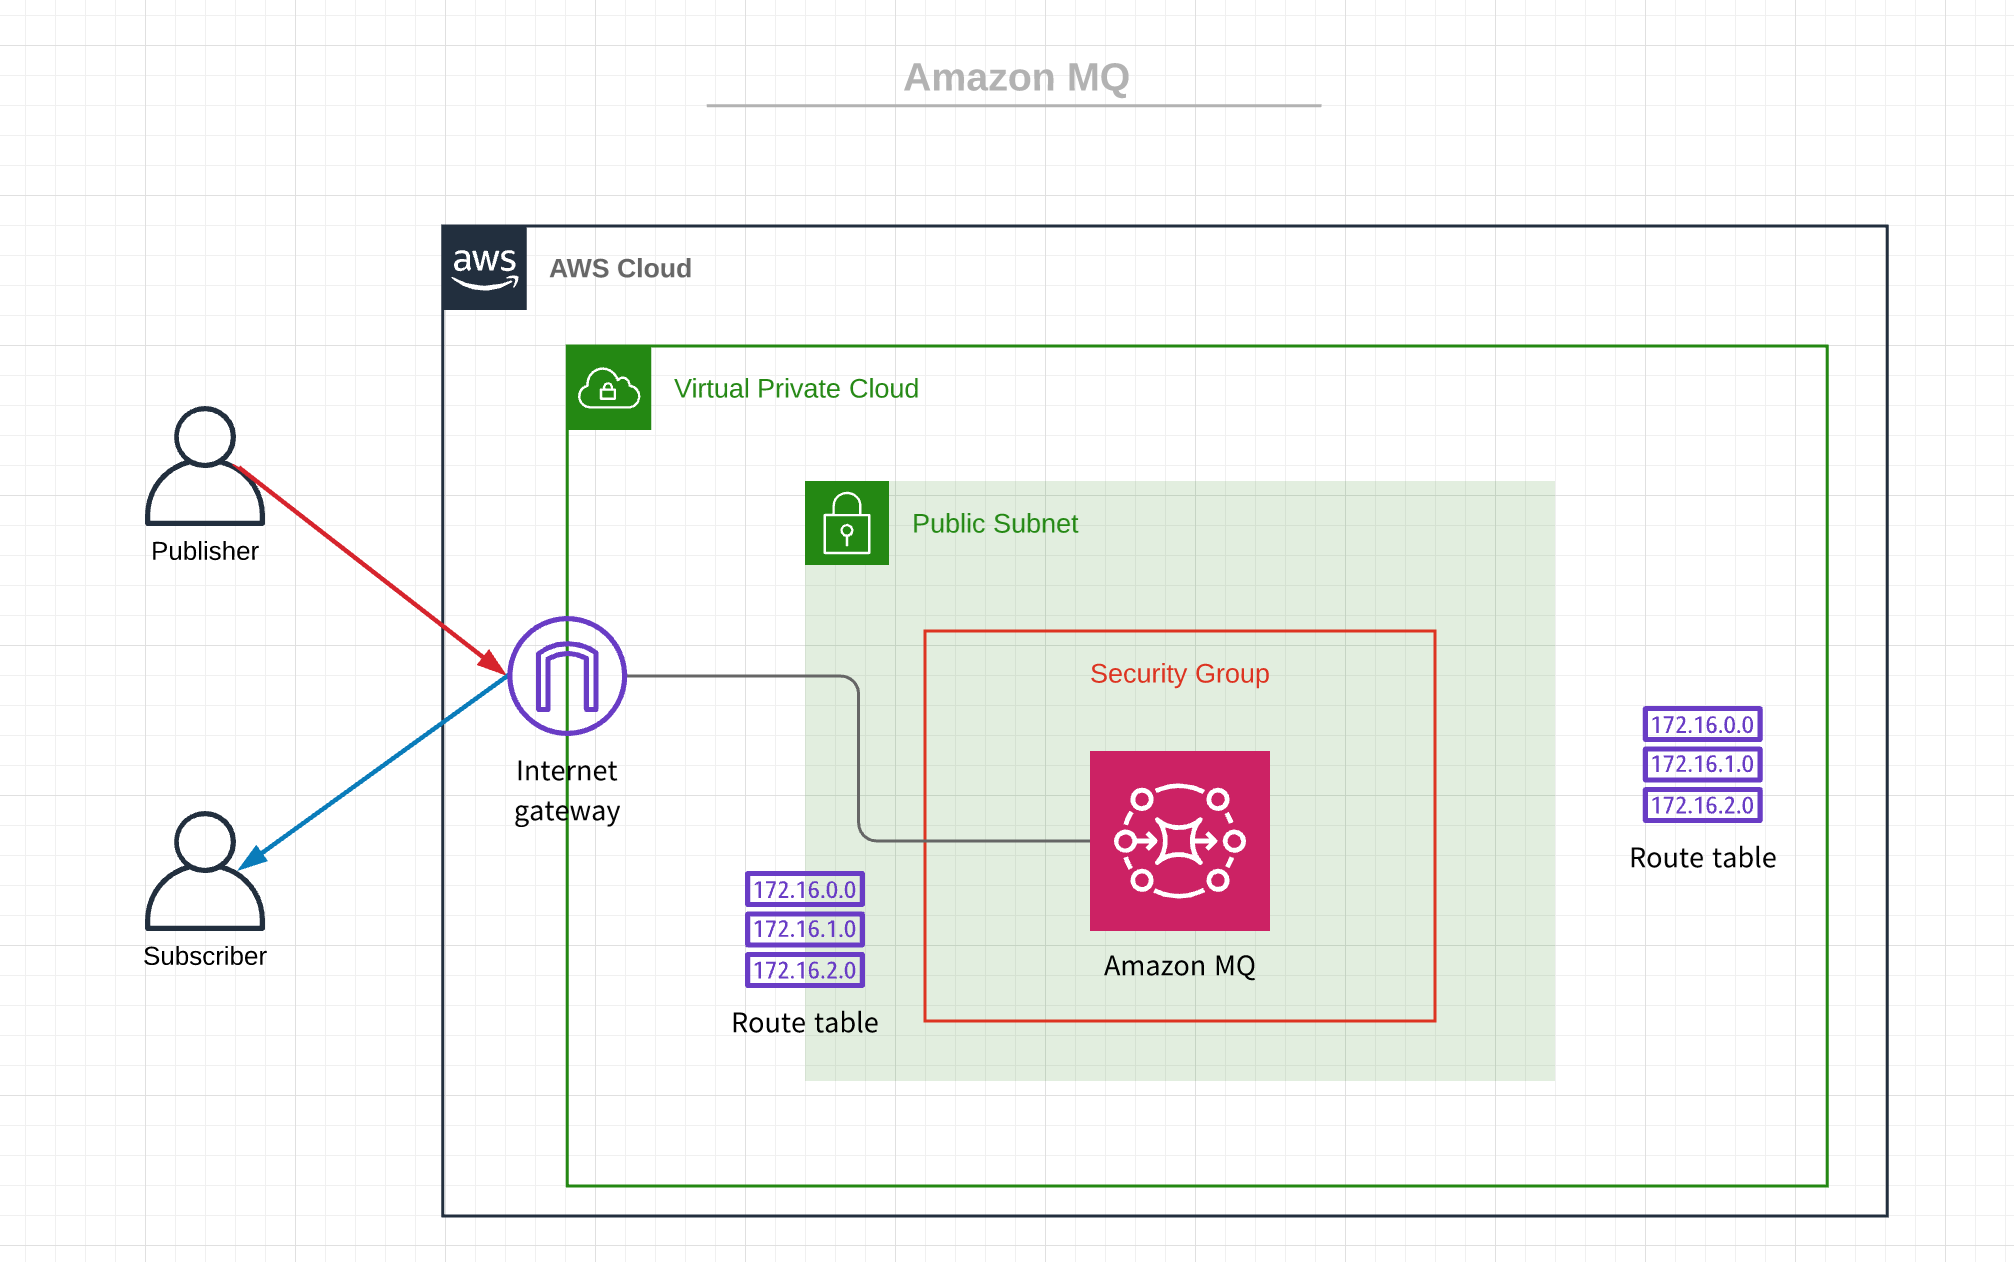
AmazonMQはVPCに置く必要があるので、最小構成は図のようになります。
画面ポチポチの場合は、MQを作成するだけでVPC等はいい感じに作成してくれます。
SAM
今回はSAMで作成しました。(このあとLambdaと連携予定だったので、、)
SAMはサーバーレスアプリケーション構築用のフレームワークで、CloudFormationのラッパーでCloudFormationの構文もそのまま利用できます。
SAM CLIも用意されており、CloudFormationよりも敷居が低いと思います。
AWSTemplateFormatVersion: "2010-09-09"
Transform: AWS::Serverless-2016-10-31
Description: TechBlogMq

Parameters:
  YourIpAddres:
    Type: String
  MqUsername:
    Type: String
  MqPassword:
    Type: String
    NoEcho: true

# More info about Globals: https://github.com/awslabs/serverless-application-model/blob/master/docs/globals.rst
Globals:
  Function:
    Timeout: 10

Resources:
  MqVPC:
    Type: AWS::EC2::VPC
    Properties:
      CidrBlock: 10.0.0.0/16
      EnableDnsHostnames: true
      EnableDnsSupport: true
      Tags:
        - Key: Name
          Value: tech-blog-mq-vpc
  MqInternetGateway:
    Type: AWS::EC2::InternetGateway
    Properties:
      Tags:
        - Key: Name
          Value: tech-blog-mq-igw
  MqAttachGateway:
    Type: AWS::EC2::VPCGatewayAttachment
    Properties:
      VpcId: !Ref MqVPC
      InternetGatewayId: !Ref MqInternetGateway
  MqRouteTable:
    Type: AWS::EC2::RouteTable
    DependsOn: MqAttachGateway
    Properties:
      VpcId: !Ref MqVPC
      Tags:
        - Key: Name
          Value: tech-blog-mq-rtb
  MqRoute:
    Type: AWS::EC2::Route
    DependsOn: MqAttachGateway
    Properties:
      RouteTableId: !Ref MqRouteTable
      DestinationCidrBlock: 0.0.0.0/0
      GatewayId: !Ref MqInternetGateway
  MqSubnet:
    Type: AWS::EC2::Subnet
    Properties:
      AvailabilityZone: !Select
        - 0
        - Fn::GetAZs: !Ref "AWS::Region"
      VpcId: !Ref MqVPC
      CidrBlock: 10.0.1.0/24
      Tags:
        - Key: Name
          Value: tech-blog-mq-subnet
  MqSubnetARouteTableAssociation:
    Type: AWS::EC2::SubnetRouteTableAssociation
    Properties:
      SubnetId: !Ref MqSubnet
      RouteTableId: !Ref MqRouteTable
  MqSecurityGroup:
    Type: AWS::EC2::SecurityGroup
    Properties:
      GroupName: mptt-broker-sg
      GroupDescription: "MQTTSecurityGroup"
      VpcId: !Ref MqVPC
      SecurityGroupIngress:
        - IpProtocol: "tcp"
          FromPort: 8883
          ToPort: 8883
          CidrIp: !Ref YourIpAddres # 自分のIPのみ許可する
      Tags:
        - Key: Name
          Value: tech-blog-mq-sg
  MqBroker:
    Type: AWS::AmazonMQ::Broker
    Properties:
      AutoMinorVersionUpgrade: true
      BrokerName: tech-blog-mq-broker
      DeploymentMode: SINGLE_INSTANCE
      EngineType: ACTIVEMQ
      EngineVersion: 5.16.2
      HostInstanceType: mq.t3.micro
      PubliclyAccessible: true
      SecurityGroups:
        - !Ref MqSecurityGroup
      SubnetIds:
        - !Ref MqSubnet
      Users:
        - Username: !Ref MqUsername # パラメーターのユーザー名をセット
          Password: !Ref MqPassword # 同パスワードをセット
pub/sub
python強化月間のため、pythonで書くことに。
こちらを参考にさせていただきました。ありがとうございます 🙏
ひたすら現在時刻を送りまくる人と
import ssl
from datetime import datetime as dt
from time import sleep
import paho.mqtt.client as mqtt # MQTTのライブラリ

def on_connect(client, userdata, flag, rc):
  print("Connected with result code " + str(rc))

def on_disconnect(client, userdata, rc):
  if rc != 0:
     print("Unexpected disconnection.")

def on_publish(client, userdata, mid):
  print("publish: {0}".format(mid))

def main():
  client = mqtt.Client()
  context = ssl.create_default_context()
  client.tls_set_context(context=context)
  client.on_connect = on_connect
  client.on_disconnect = on_disconnect
  client.username_pw_set("ユーザー名","パスワード")
  client.on_publish = on_publish
  client.connect("xxxxxxxxxxx.mq.ap-northeast-1.amazonaws.com", 8883, 60)  # AmazonMQのMQTTエンドポイント
  client.loop_start()

  while True:
    tdatetime = dt.now()
    client.publish("/messages/1", f"hello {tdatetime.strftime('%Y/%m/%d %h:%M:%S')}") # トピック名をmessagesとする
    sleep(2)

if __name__ == '__main__':
  main()
を受け取る人。
import paho.mqtt.client as mqtt # MQTTのライブラリ
import ssl

def on_connect(client, userdata, flag, rc):
  print("Connected with result code " + str(rc))
  client.subscribe("/messages/#")  # トピックを合わせる

def on_disconnect(client, userdata, rc):
  if  rc != 0:
    print("Unexpected disconnection.")

def on_message(client, userdata, msg):
  print("Received message '" + str(msg.payload) + "' on topic '" + msg.topic + "' with QoS " + str(msg.qos))


# MQTTの接続設定
client = mqtt.Client()
context = ssl.create_default_context()
client.tls_set_context(context=context)
client.on_connect = on_connect
client.on_disconnect = on_disconnect
client.on_message = on_message
client.username_pw_set("ユーザー名","パスワード")
client.connect("xxxxxxxxxxx.mq.ap-northeast-1.amazonaws.com", 8883, 60)  # AmazonMQのMQTTエンドポイント
client.loop_forever()
これで準備完了です。
デプロイ
sam deploy コマンドでデプロイできます。
sam build
sam deploy --guided
--guided をつけると、案内を表示してくれますので、案内に沿って入力していけばOKです。
samコマンドでデプロイしたものはAWS コンソール上、CloudFormationの画面で進捗が確認できます。
設定を保存しておけば(これも案内出る)2回目以降のデプロイは--guidedを外してOK!よりサクッと進みます。

IPアドレス、ユーザー名、パスワードをパラメーターとして渡すようにします。
Pub/Sub
参考記事にあったようにpahoを利用しました。
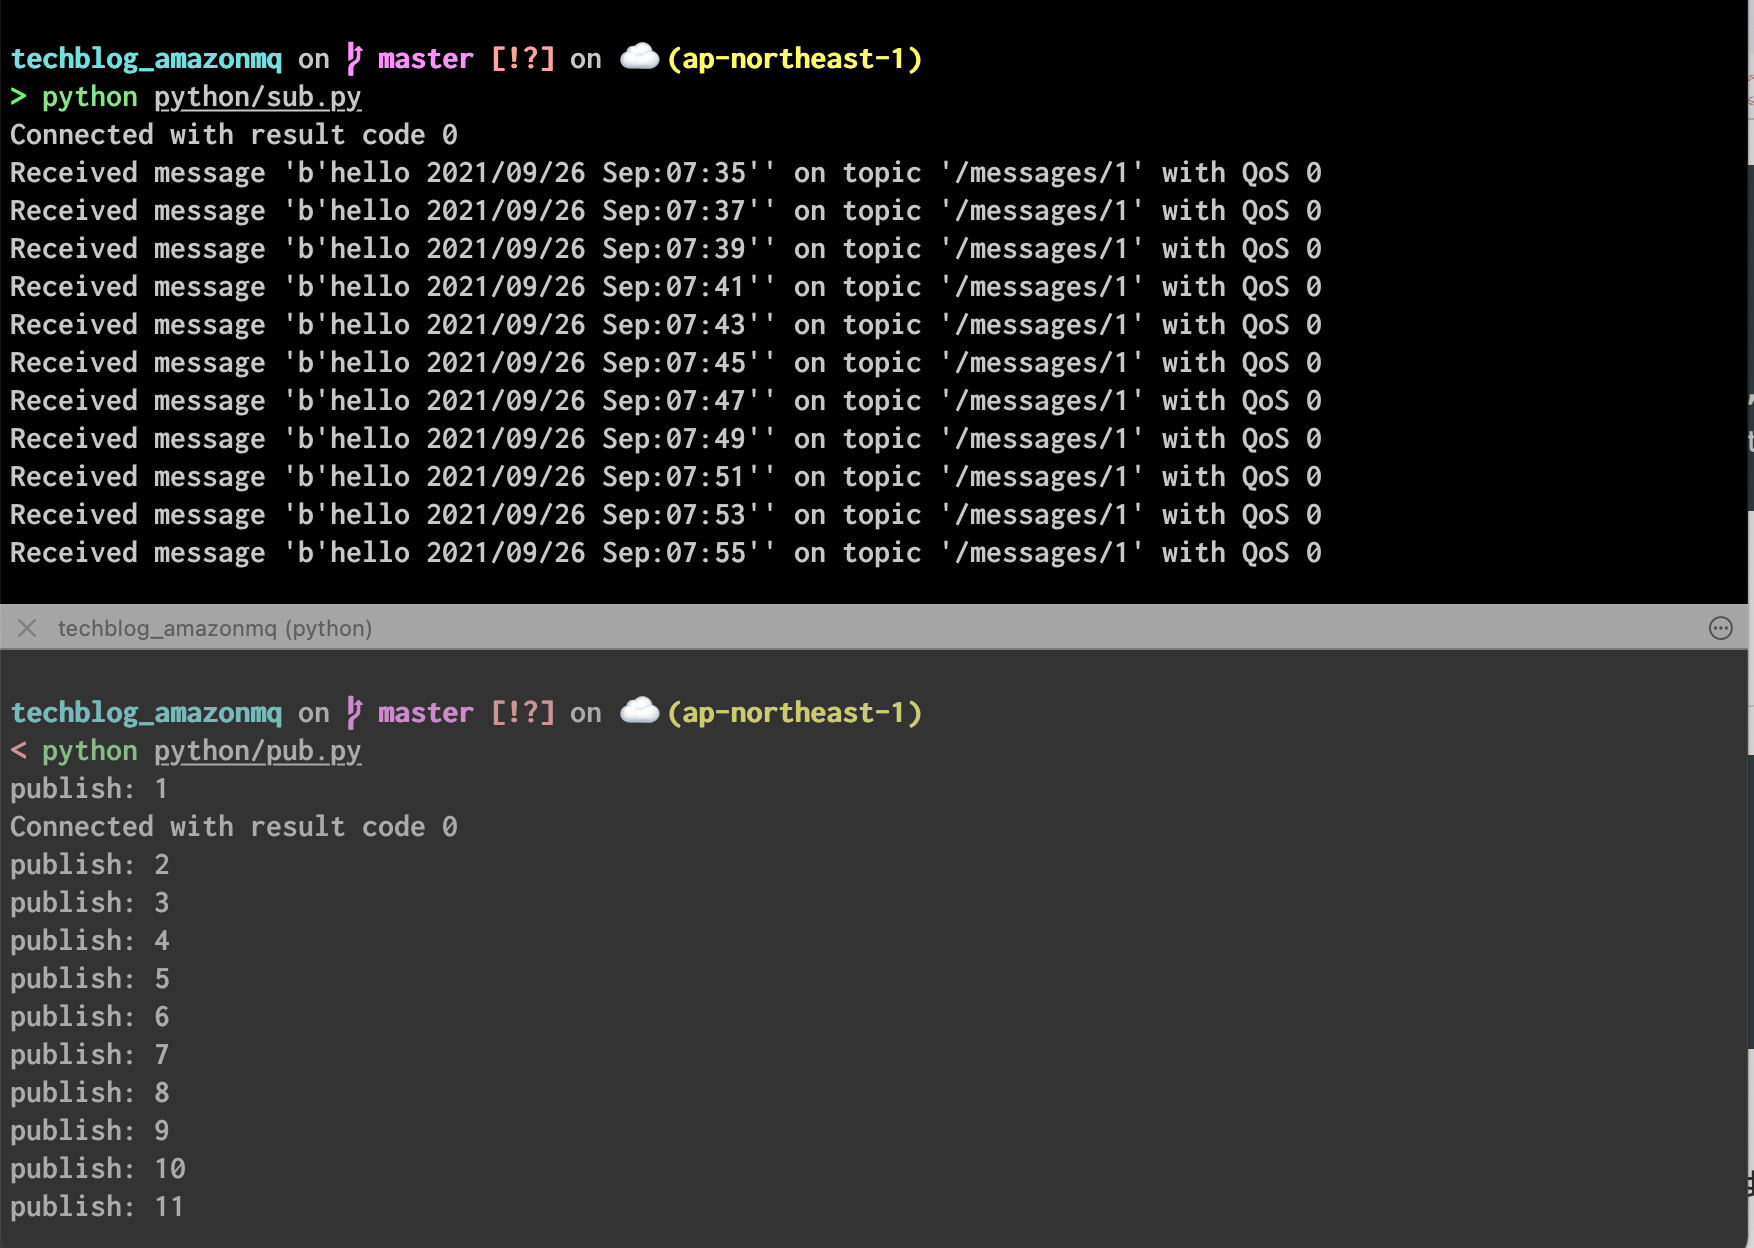
ターミナルを2つ用意してpub.py、sub.pyそれぞれ実行すると、送るし受け取れています。
おわり
AmazonMQはあまり利用されないのか記事も少なめでした。(ちょっと高いのでSQSでいいじゃんとなるらしい)
今回は証明書問題がある場合は選択肢の一つとして考えられます。しかし、ユーザー/パスワードのみの認証となるので、セキュリティ面バッチリ!とはいえなさそうです。
とりあえずは試せました。よし。

yukabeoka
カスタマーサポートからエンジニアにジョブチェンジ。脳の老化に抗いがんばる。最近はAzureにいじめられている。