
Table of Contents
Face APIとは
Microsoft AzureのFace API サービスは、画像やビデオに含まれている人の顔を分析するためのアルゴリズムを備えたクラウドベースのサービスです。 Face API には、属性による顔検出と顔認識の 2つの主要な機能があります。
料金表によると、¥112/1,000トランザクションで使えます。
1分あたり20件程度で良いのであれば月に30,000トランザクションまで無料で使えます。
※1トランザクション=1コール
Azure以外のクラウドサービスも顔認識APIをリリースしていますが、個人的には顔認識についてはAzureが一番強いのではと思っています。
日本国内の事例もありますし、100万人の顔を登録・判別可能と謳っており、かなり力を入れている印象です。
ただ、多機能かつ優秀な反面、使い方が少しわかりにくかったのでサンプルを使ってご説明しようと思います。
なお、以下ではLabeled Faces in the Wildの画像を使用します。
色々やってみる
Face Detect(顔検出)
この機能は最も基本となる機能です。写真の中に人が写っているか・写っている場合、どこに写っているか等の情報を返してくれます。
以下、ローカルにある写真1枚を対象にFace Detect APIを使ってみます。
import http.client
 import json
 import re
 from pathlib import Path

 dataset\_path = '\<データセットのパス\>'
 subscription\_key = '\<Azureのサブスクリプションキー\>'
 domain = 'japaneast.api.cognitive.microsoft.com' # APIのドメイン リージョンごとに変わる

 image\_path = Path(dataset\_path).joinpath('path-to-image')

 with open(str(image\_path), 'rb') as f:
 body = f.read()
 stream\_headers = {
 'Content-Type': 'application/octet-stream',
 'Ocp-Apim-Subscription-Key': subscription\_key,
 }

 try:
 conn = http.client.HTTPSConnection(domain)
 conn.request("POST", "/face/v1.0/detect", body, stream\_headers)
 response = conn.getresponse()

 # ステータスコードチェック
 if not re.match(r"^2", str(response.status)):
 print('Error', response.status, response.reason)
 else:
 data = response.read().decode("utf-8").split('\n')[0]
 result = json.loads(data)

 conn.close()
 except Exception as e:
 print("Error {0}".format(e))
以下のような結果が得られます。
[{'faceId': '2b16d16b-cdd7-4c72-ad50-22e5c95b3d81',
 'faceRectangle': {'height': 88, 'left': 98, 'top': 86, 'width': 88}}]
faceIdは送信した画像に対してAzureがふったユニークなIDです。このID情報はAzure内に24時間保持されます。
Face Detect APIを叩いてfaceIdを取得した後にそのfaceIdを使って他のAPIを使う、という機能もあるため、重要な情報です。
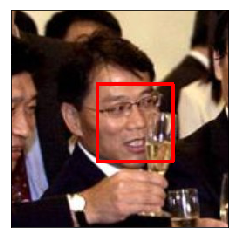
faceRectangleが認識した顔の位置です。画像で確認すると以下のような感じです。
その他、リクエストパラメータにreturnFaceLandmarks=Trueを指定すると検出した顔のパーツ(目・鼻・口等)の位置情報も取得できますし、returnFaceAttributesを指定すれば様々な属性情報(年齢・性別・感情・髪色・化粧しているか、等々)を取得できます。
Find Similar(似た顔の検索)
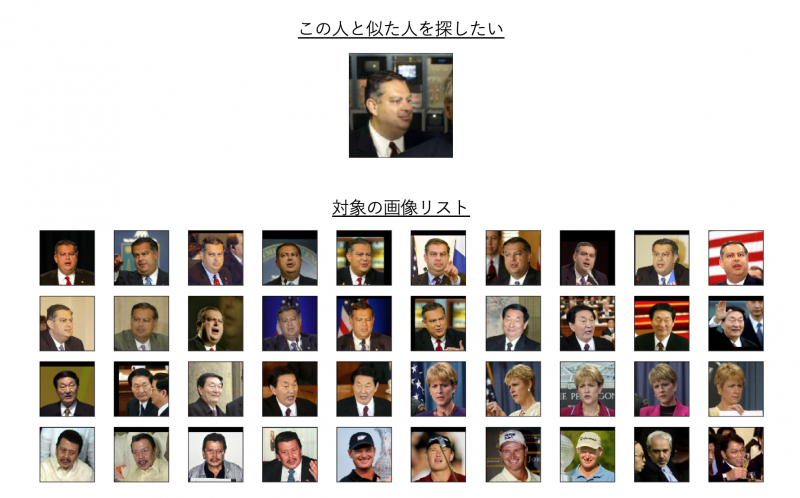
このAPIでは対象の画像リストの中から、探したい顔と似ている画像候補を提示してくれます。
以下のような画像で試してみます。
なお、探したい顔画像と対象の画像リストについて、それぞれ前述のfaceIdが必要です。今回はfaceIdは取得済として進めます。
target\_face\_id = '\<探したい顔画像のfaceId\>'
 face\_id\_list = '\<対象の画像リストのfaceIdリスト\>'

 body\_dict = {
 'faceId': target\_face\_id,
 'faceIds': face\_id\_list,
 "maxNumOfCandidatesReturned": 10, #返す候補数の上限値
 "mode": "matchPerson" #人単位で探すか似た顔(matchFace)を探すか
 }
 body = json.dumps(body\_dict).encode("utf-8")

 headers = {
 'Content-Type': 'application/json',
 'Ocp-Apim-Subscription-Key': subscription\_key
 }

 try:
 conn = http.client.HTTPSConnection(domain)
 conn.request("POST", "/face/v1.0/findsimilars", body, headers)
 response = conn.getresponse()

 # ステータスコードチェック
 if not re.match(r"^2", str(response.status)):
 print('Error', response.status, response.reason)
 else:
 data = response.read().decode("utf-8").split('\n')[0]
 result = json.loads(data)

 conn.close()
 except Exception as e:
 print("[Errno {0}] {1}".format(e.errno, e.strerror))
以下のようなリストが取得できます。
[{'confidence': 0.7276713, 'faceId': 'e1588c96-261a-4625-82dc-8cf67b8e2300'},
 ...
 {'confidence': 0.698393166, 'faceId': 'e12d1176-ce4a-4c90-925c-32cf49f5906d'}]
画像を確認してみます。

ちゃんと検索できてますね😊
Group(グルーピング)
簡単に画像をグルーピングすることもできます。さくっとやってみます。
face\_id\_list = '\<グルーピングしたい画像リストのfaceIdリスト\>'
 headers = {
 'Content-Type': 'application/json',
 'Ocp-Apim-Subscription-Key': subscription\_key,
 }


 body\_dict = {
 "faceIds": face\_id\_list
 }
 body = json.dumps(body\_dict).encode("utf-8")

 try:
 conn = http.client.HTTPSConnection(domain)
 conn.request("POST", "/face/v1.0/group", body, headers)
 response = conn.getresponse()

 # ステータスコードチェック
 if not re.match(r"^2", str(response.status)):
 print('Error', response.status, response.reason)
 else:
 data = response.read().decode("utf-8").split('\n')[0]
 result = json.loads(data)

 conn.close()
 except Exception as e:
 print("[Errno {0}] {1}".format(e.errno, e.strerror))
グルーピングされた結果が返ってくるので、画像で確認してみます。
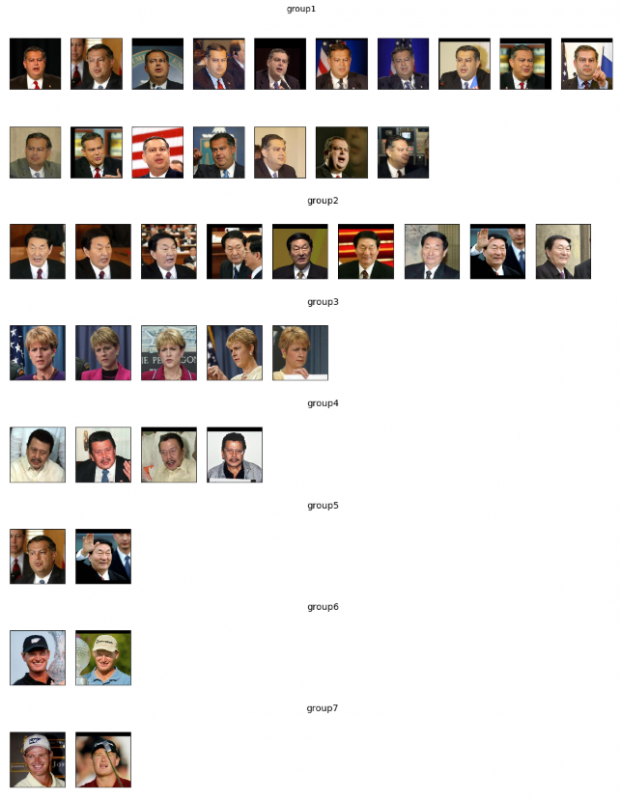
微妙に間違えているものもありますが、概ねグルーピングできています🎉
なお、グルーピングできなかったもの=リストの中に同一人物はいないと判断した結果も同時に返ってきています。

確かにこの2人は1枚しか含まれていませんでしたね。
PersonGroup(人の登録・学習・同一人物か判別)
より高い精度で判別したい場合、予め人(画像)を登録・学習させておくことができます。
先程のグルーピング結果のgroup1の最初の4枚を登録・学習させた上で、group1の5枚目の写真を判定させてみます。
以下、コード長くなるのでエラー処理等は割愛します。
register\_image\_paths = [] # 登録する画像リスト
 check\_face\_id = '\<チェックしたい画像のfaceId\>'
 person\_group\_id = 'person\_group\_test' # 適当なPersonGroupID

 headers = {
 'Ocp-Apim-Subscription-Key': subscription\_key,
 }

 json\_headers = {
 'Content-Type': 'application/json',
 'Ocp-Apim-Subscription-Key': subscription\_key,
 }

 stream\_headers = {
 'Content-Type': 'application/octet-stream',
 'Ocp-Apim-Subscription-Key': subscription\_key,
 }

 # PersonGroup作成
 body = json.dumps({'name': 'person\_group\_test\_name'}).encode("utf-8")
 conn = http.client.HTTPSConnection(domain)
 conn.request("PUT", "/face/v1.0/persongroups/%s" % person\_group\_id, body, json\_headers)
 \_ = conn.getresponse()

 # PersonGroupに人・画像を登録
 body = json.dumps({'name': 'person1'}).encode("utf-8")
 conn = http.client.HTTPSConnection(domain)
 conn.request("POST", "/face/v1.0/persongroups/%s/persons" % person\_group\_id, body, json\_headers)
 response = conn.getresponse()
 data = response.read().decode("utf-8").split('\n')
 data\_obj = json.loads(data[0])

 person\_id = data\_obj['personId']
 for path in register\_image\_paths:
 body = open(str(path), 'rb').read()
 conn = http.client.HTTPSConnection(domain)
 conn.request("POST",
 "/face/v1.0/persongroups/%s/persons/%s/persistedFaces" % (person\_group\_id, person\_id),
 body,
 stream\_headers)
 \_ = conn.getresponse()

 # PersonGroupを学習させる
 conn = http.client.HTTPSConnection(domain)
 conn.request("POST", "/face/v1.0/persongroups/%s/train" % person\_group\_id, "", headers)
 \_ = conn.getresponse()

 # 同一人物か判定してみる
 body\_dict = {
 "personGroupId": person\_group\_id,
 "faceIds": [check\_face\_id],
 "maxNumOfCandidatesReturned": 1, # 取得する最大候補数
 "confidenceThreshold": 0.5, # 同一人物と判定する信頼度の閾値
 }
 body = json.dumps(body\_dict).encode("utf-8")
 conn = http.client.HTTPSConnection(domain)
 conn.request("POST", "/face/v1.0/identify", body, json\_headers)
 response = conn.getresponse()
 data = response.read().decode("utf-8").split('\n')
 result = json.loads(data[0])

 # 不要になったPersonGroupを削除する
 conn = http.client.HTTPSConnection(domain)
 conn.request("DELETE", "/face/v1.0/persongroups/%s" % person\_group\_id, "", headers)
 \_ = conn.getresponse()
 conn.close()
結果は以下のようになりました。
[{'candidates': [{'confidence': 0.82992,
 'personId': '54d1de6e-19df-48ea-9643-d29f7fc1f575'}],
 'faceId': '6b4c61fb-d386-4a30-9237-73e988b4a2f2'}]
confidenceが0.82と高い精度で判別できていることがわかります。
なお、データ保持に料金がかかりますので、不要になったPersonGroupは削除しておきます。
以上となります!
いかがでしたでしょうか? Azure Face API、色々出来て面白いですよね。
こういったものも上手く使い、新しい価値を提供できるようになりたいなと思います。
参考リンク

shimao
福岡在住。機械学習エンジニア。AWS SAP・MLS。趣味はKaggleで、現在ソロ銀1。福岡でKaggleもくもく会を主催しているので、どなたでもぜひご参加ください。