Expo + Firebase Extensions(Gemini API)でバックエンド実装なしでAIチャットボットアプリを作る
2024/03/11
Table of Contents
はじめに
認証やデータベースなどバックエンドのサービスを提供しているFirebaseですが、Firebase Extensionsの1つにBuild Chatbot with the Gemini API というものが出てきたので、実際にモバイルアプリに組み込んでみます。
環境
- Expo SDK 50
- googlecloud/firestore-genai-chatbot@0.0.9 (Firebase Extension)
- Firebase SDK v10.8.1
- Node v20.0.0
Expoプロジェクト作成
npx create-expo-app --template

? Choose a template: › - Use arrow-keys. Return to submit.
    Blank
❯   Blank (TypeScript) - blank app with TypeScript enabled
    Navigation (TypeScript)
    Blank (Bare)

cd プロジェクト名
npm run start
Firebaseのセットアップ
次にFirebase SDKをインストール、設定値ファイルを作成します。
今回はFirebaseプロジェクトの作成については省略します。わからない方は以下を参考にしてみてください。
参考: https://docs.expo.dev/guides/using-firebase/#using-firebase-js-sdk
npx expo install firebase
firebaseConfig.tsを作成します。設定値はFirebaseコンソールから取得してください。
import { initializeApp } from 'firebase/app';
import { getFirestore }  from 'firebase/firestore'

const firebaseConfig = {
  apiKey: 'api-key',
  authDomain: 'project-id.firebaseapp.com',
  databaseURL: 'https://project-id.firebaseio.com',
  projectId: 'project-id',
  storageBucket: 'project-id.appspot.com',
  messagingSenderId: 'sender-id',
  appId: 'app-id',
  measurementId: 'G-measurement-id',
};

const app = initializeApp(firebaseConfig);
export const db = getFirestore(app);
Firebase Extensionのインストール
そして今回メインであるFirebase ExtensionのBuild Chatbot with the Gemini API を作成したFirebaseプロジェクトへインストールします。
「Install in Firebase console」をクリックします。

すると以下のような設定値などを入力する画面になります。
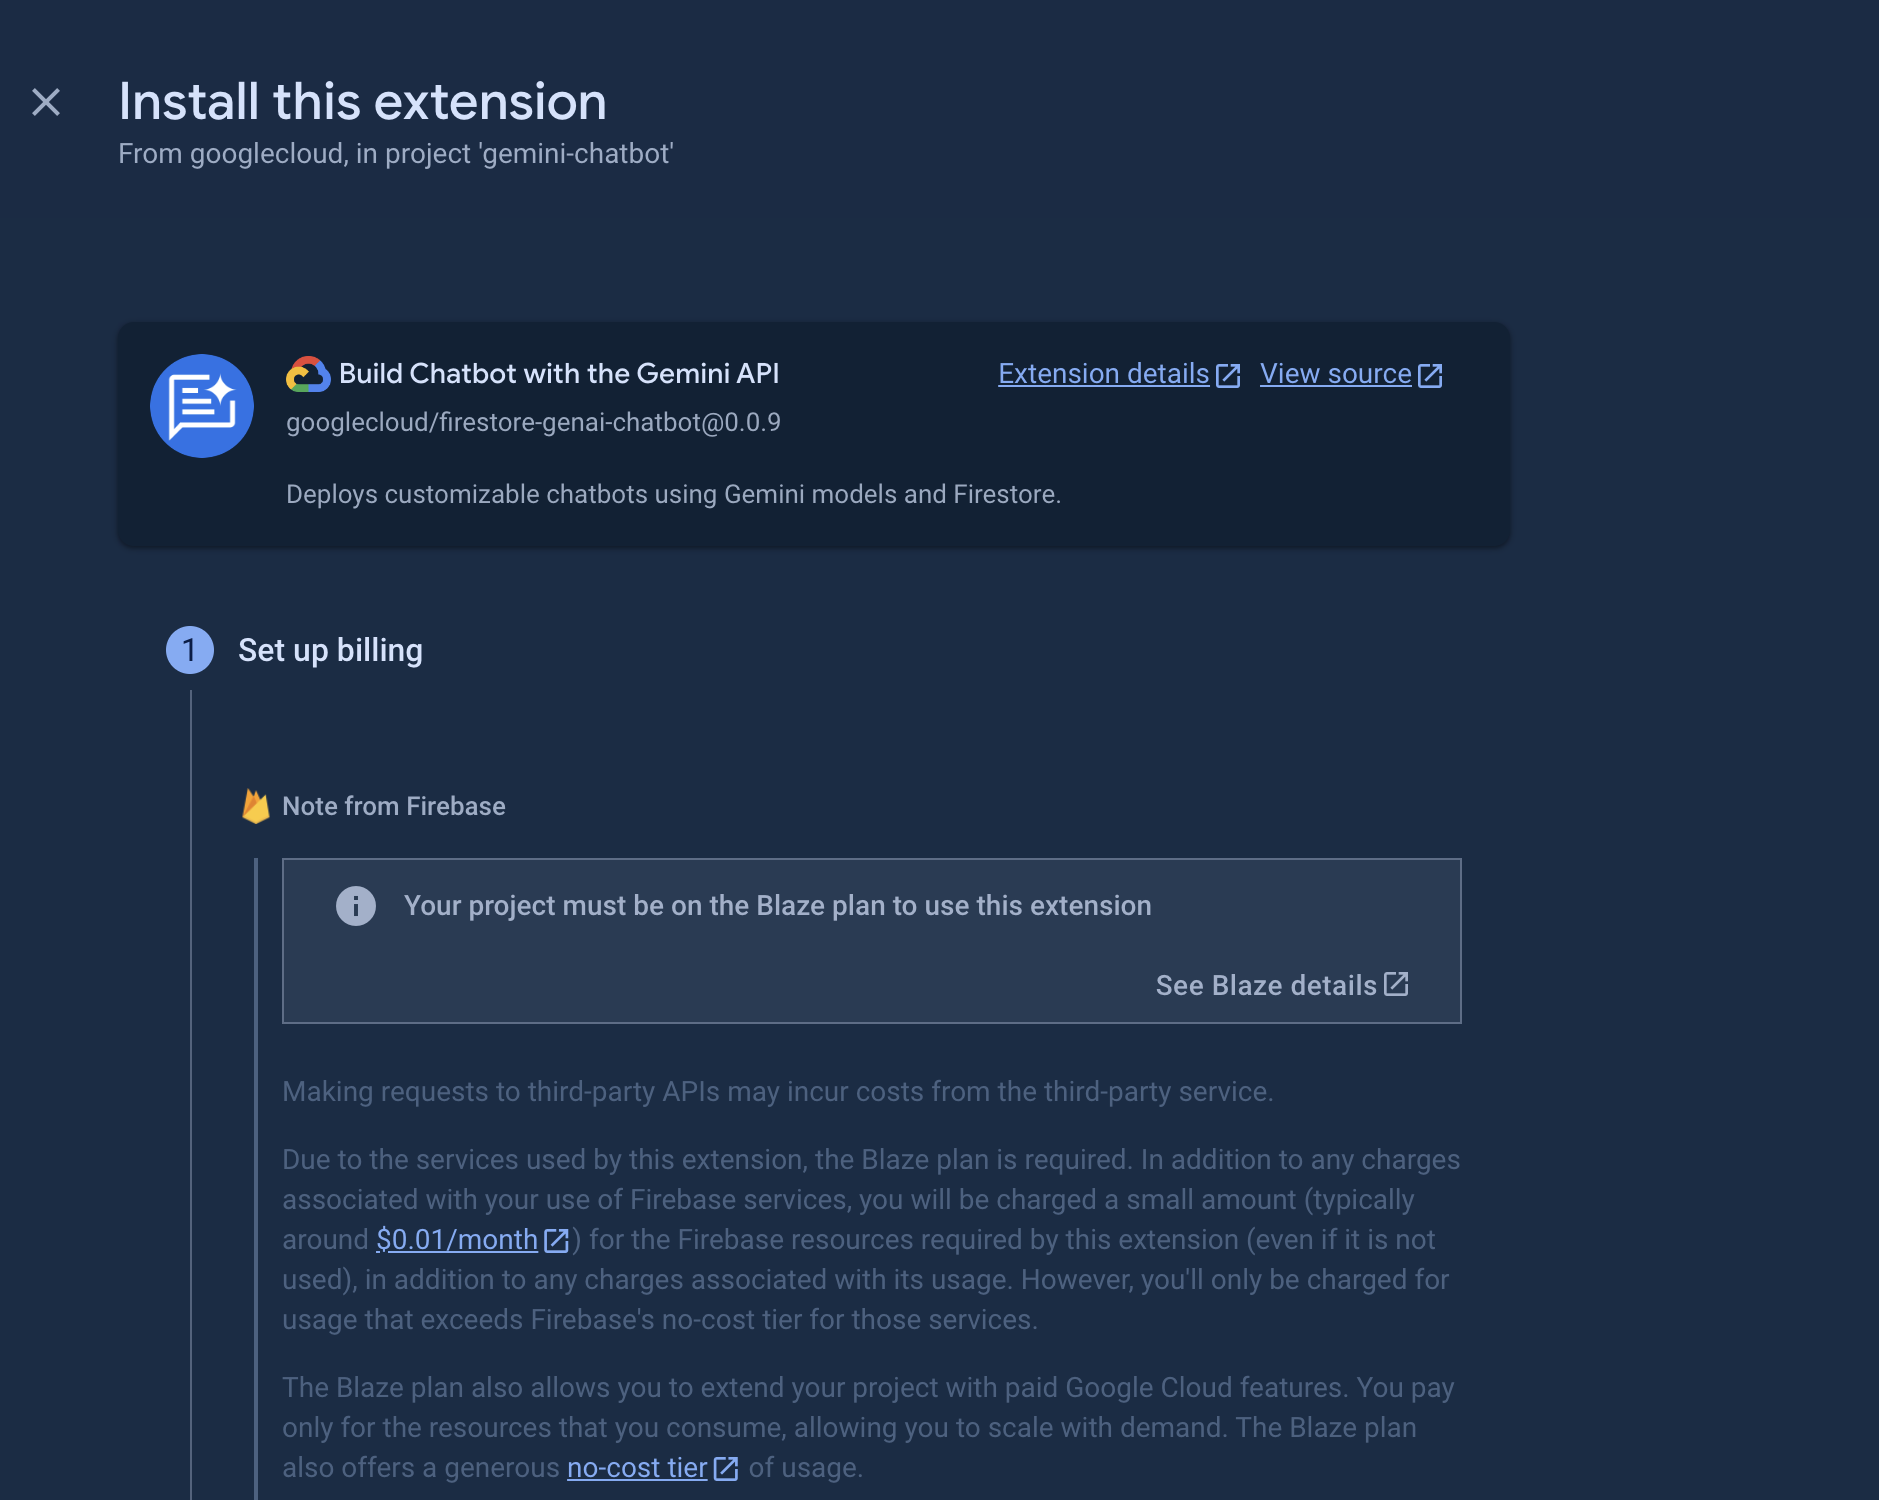
このExtensionを使用するにはBlazeプラン(有料)へのアップグレードが必要ですので注意が必要です。
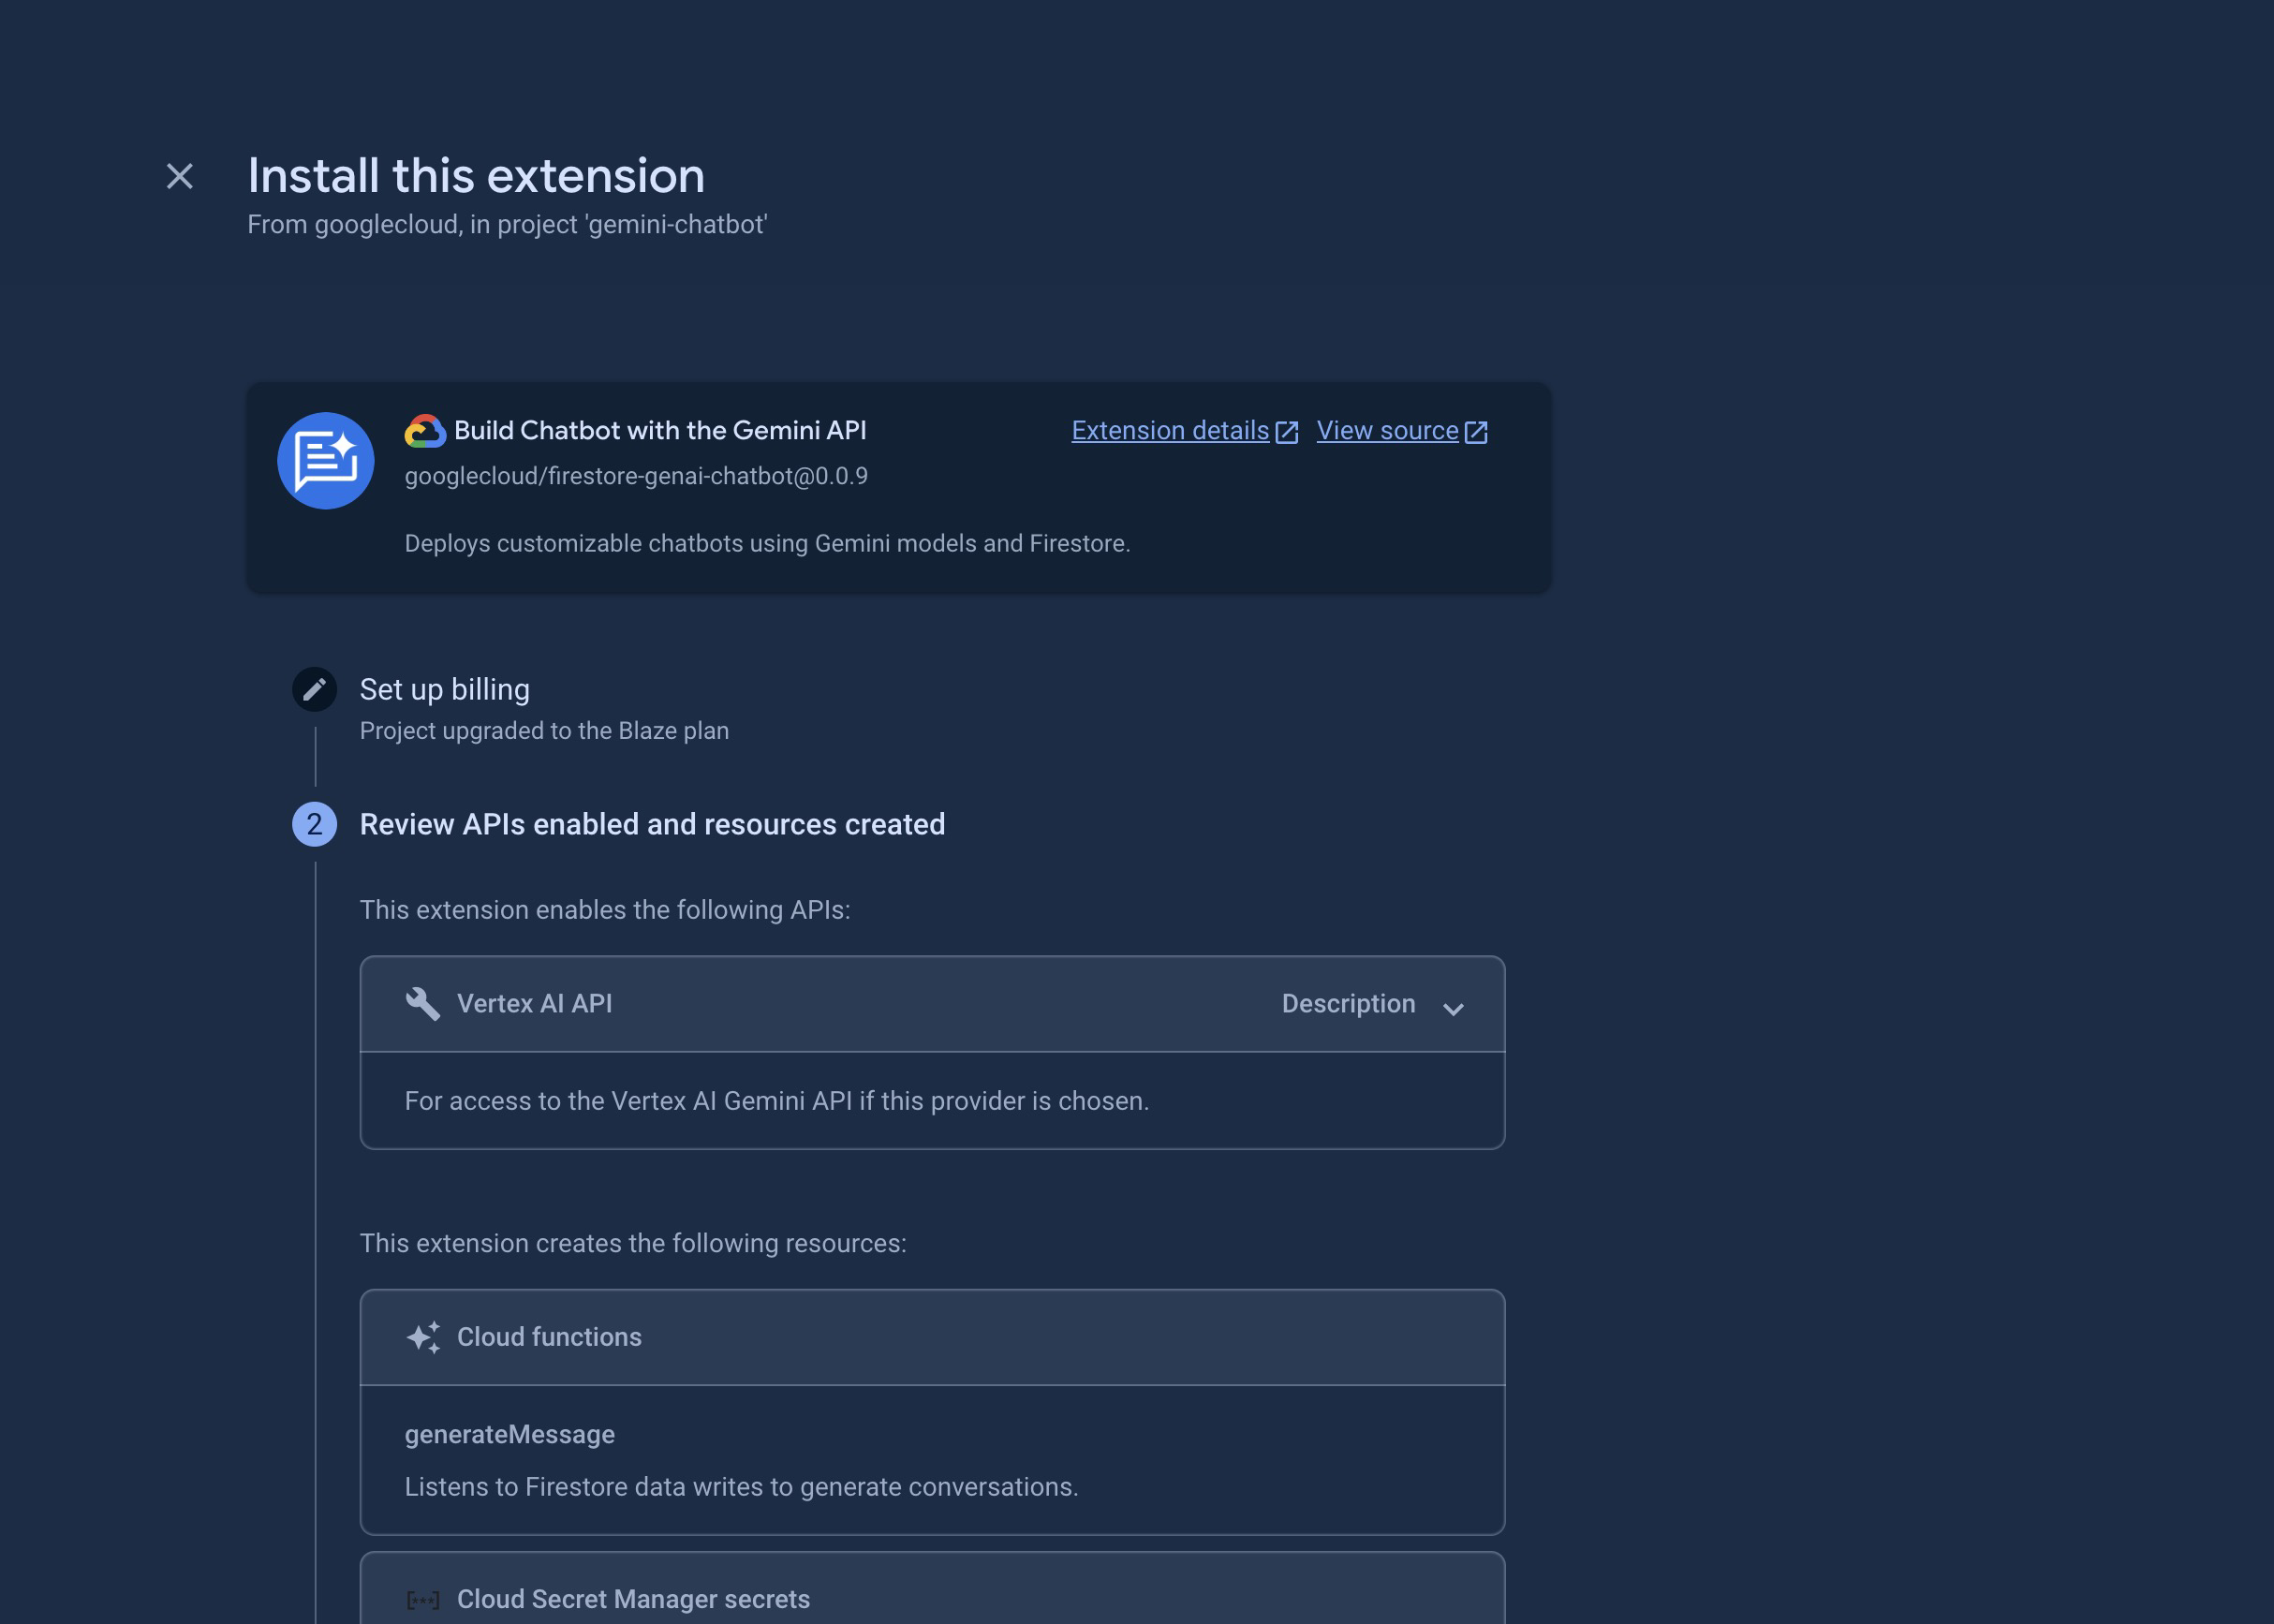
ここに書かれているGoogle AI API Keyはこのあと取得方法を説明します。
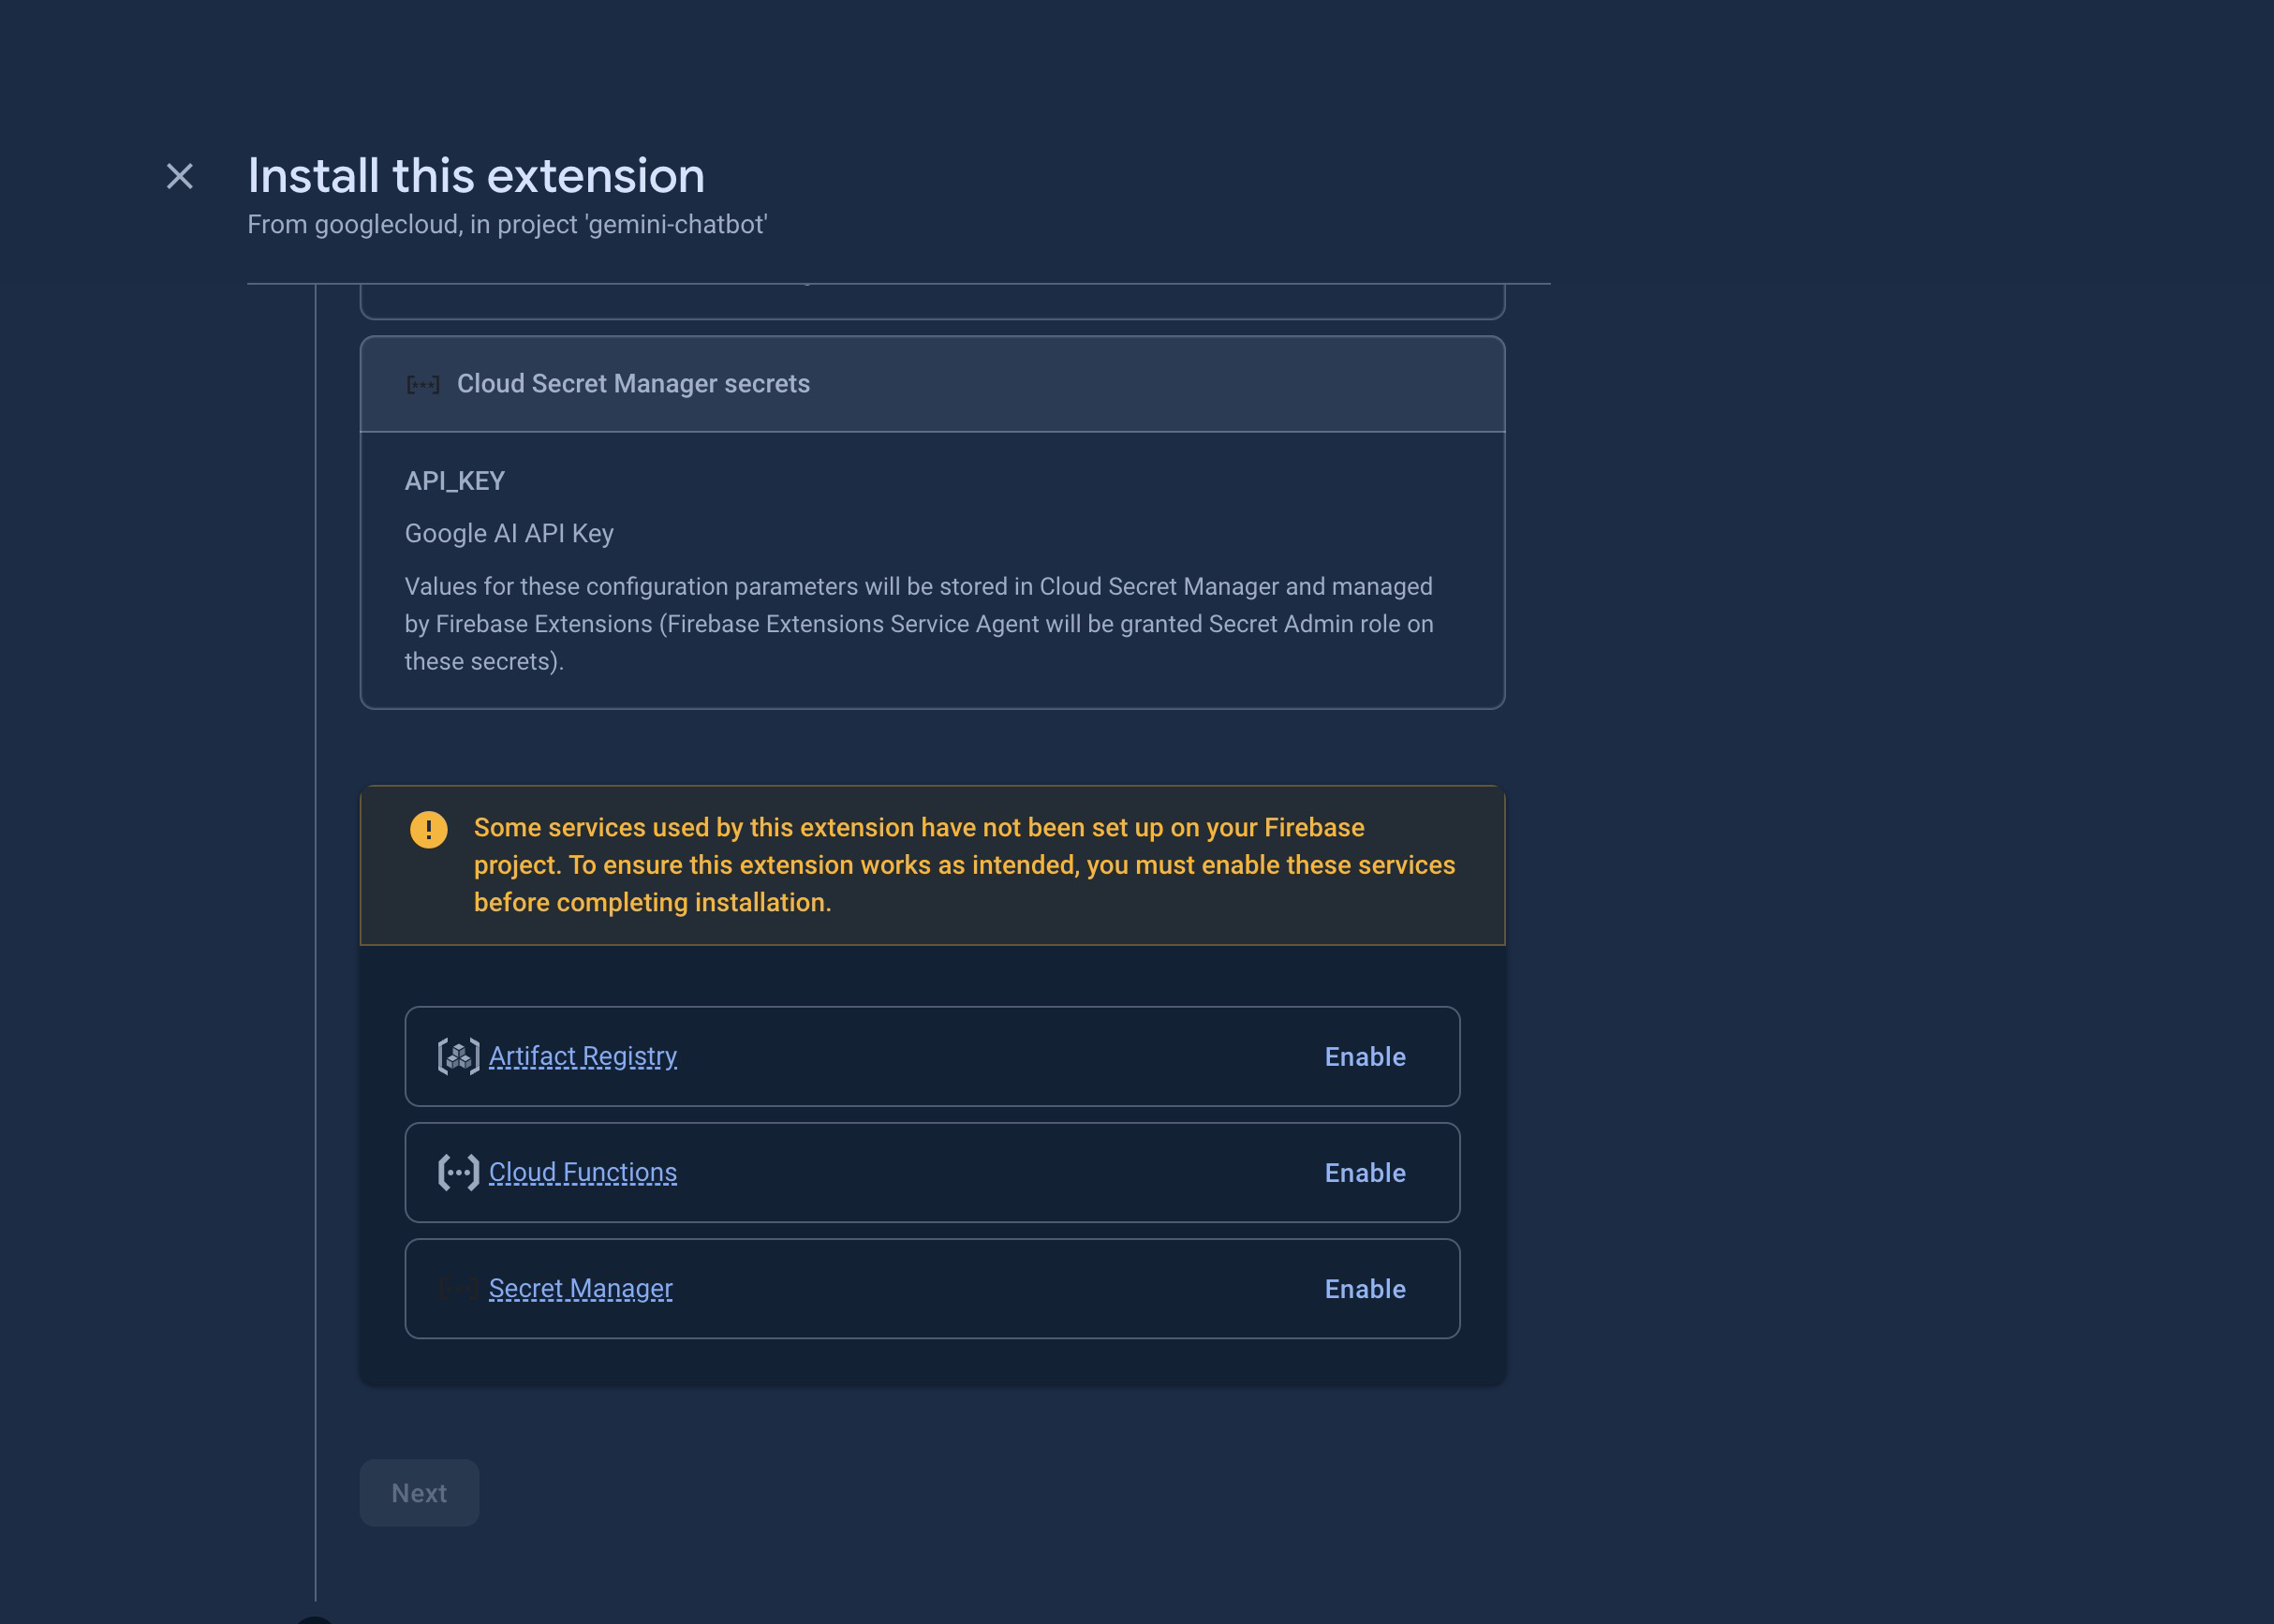
各サービスを有効化する必要がありました。有効化していない場合は「Enable」を押していけばOKです。
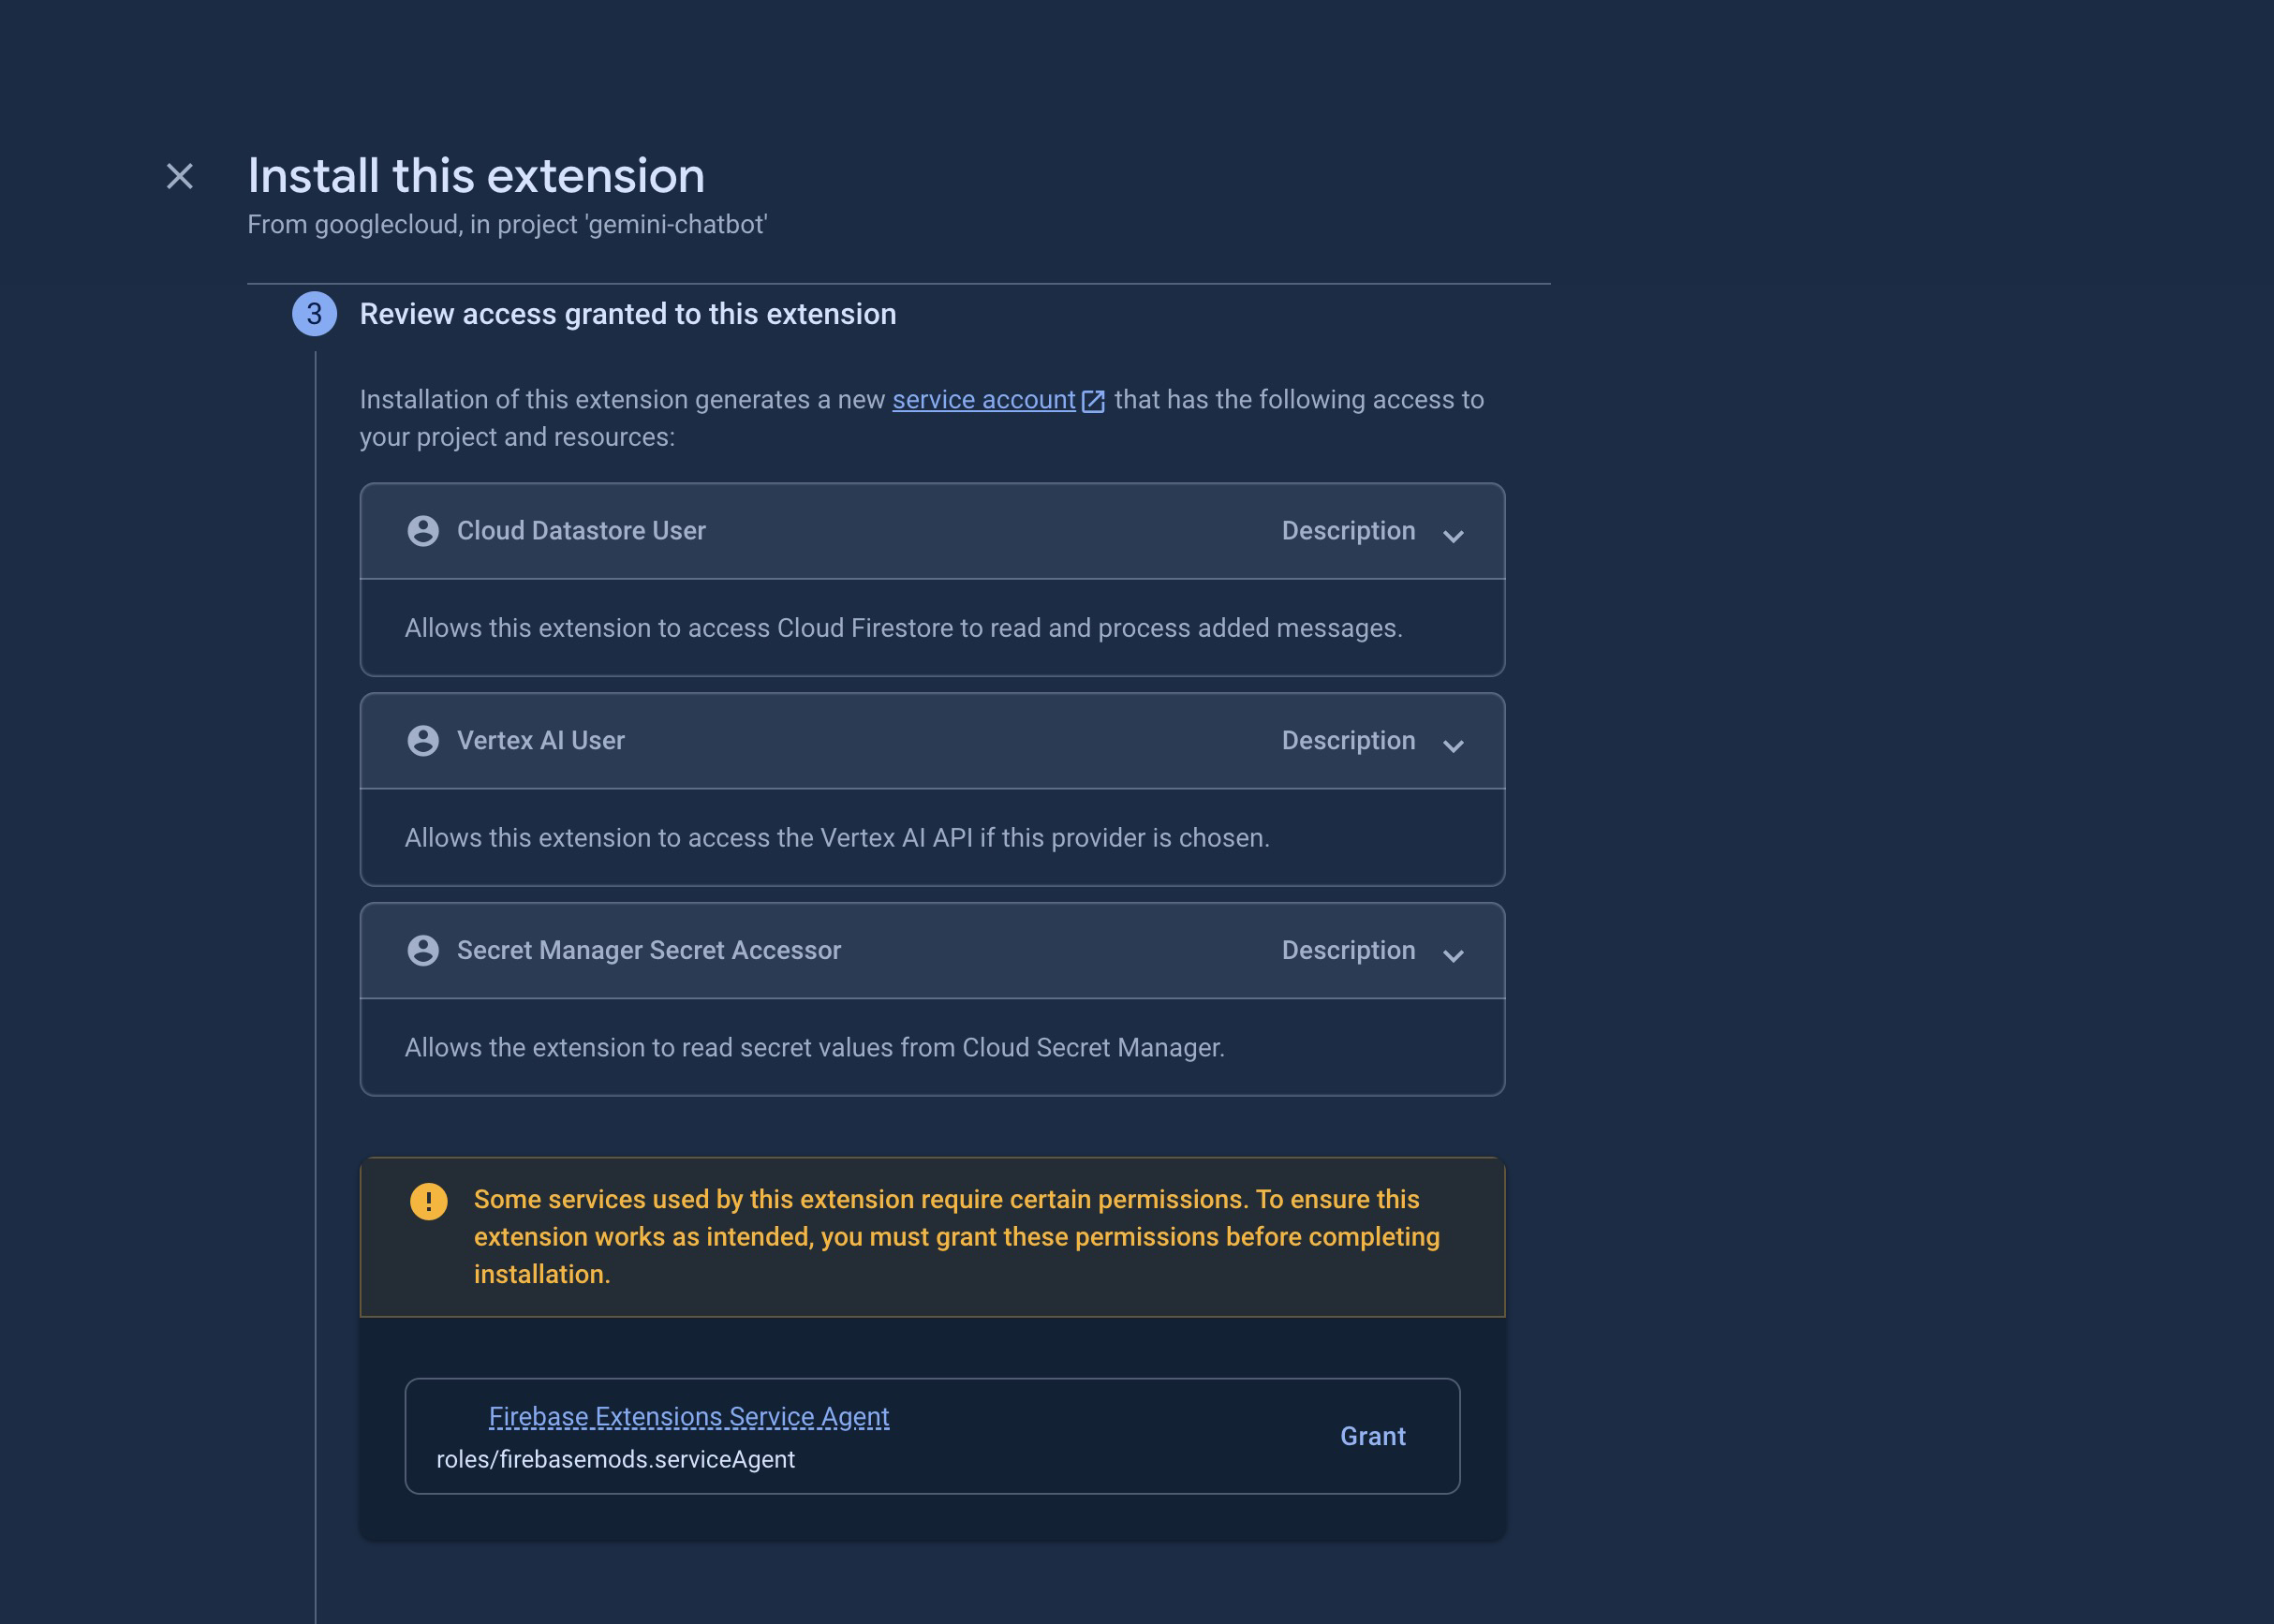
今回はProviderとしてGoogle AIを選択したので、Google AI API Keyが必要になります。API Keyは AI Studio で作成します。
あとで変更しますが、Firestore Collection Pathは一旦デフォルトのgenerateで良いです。
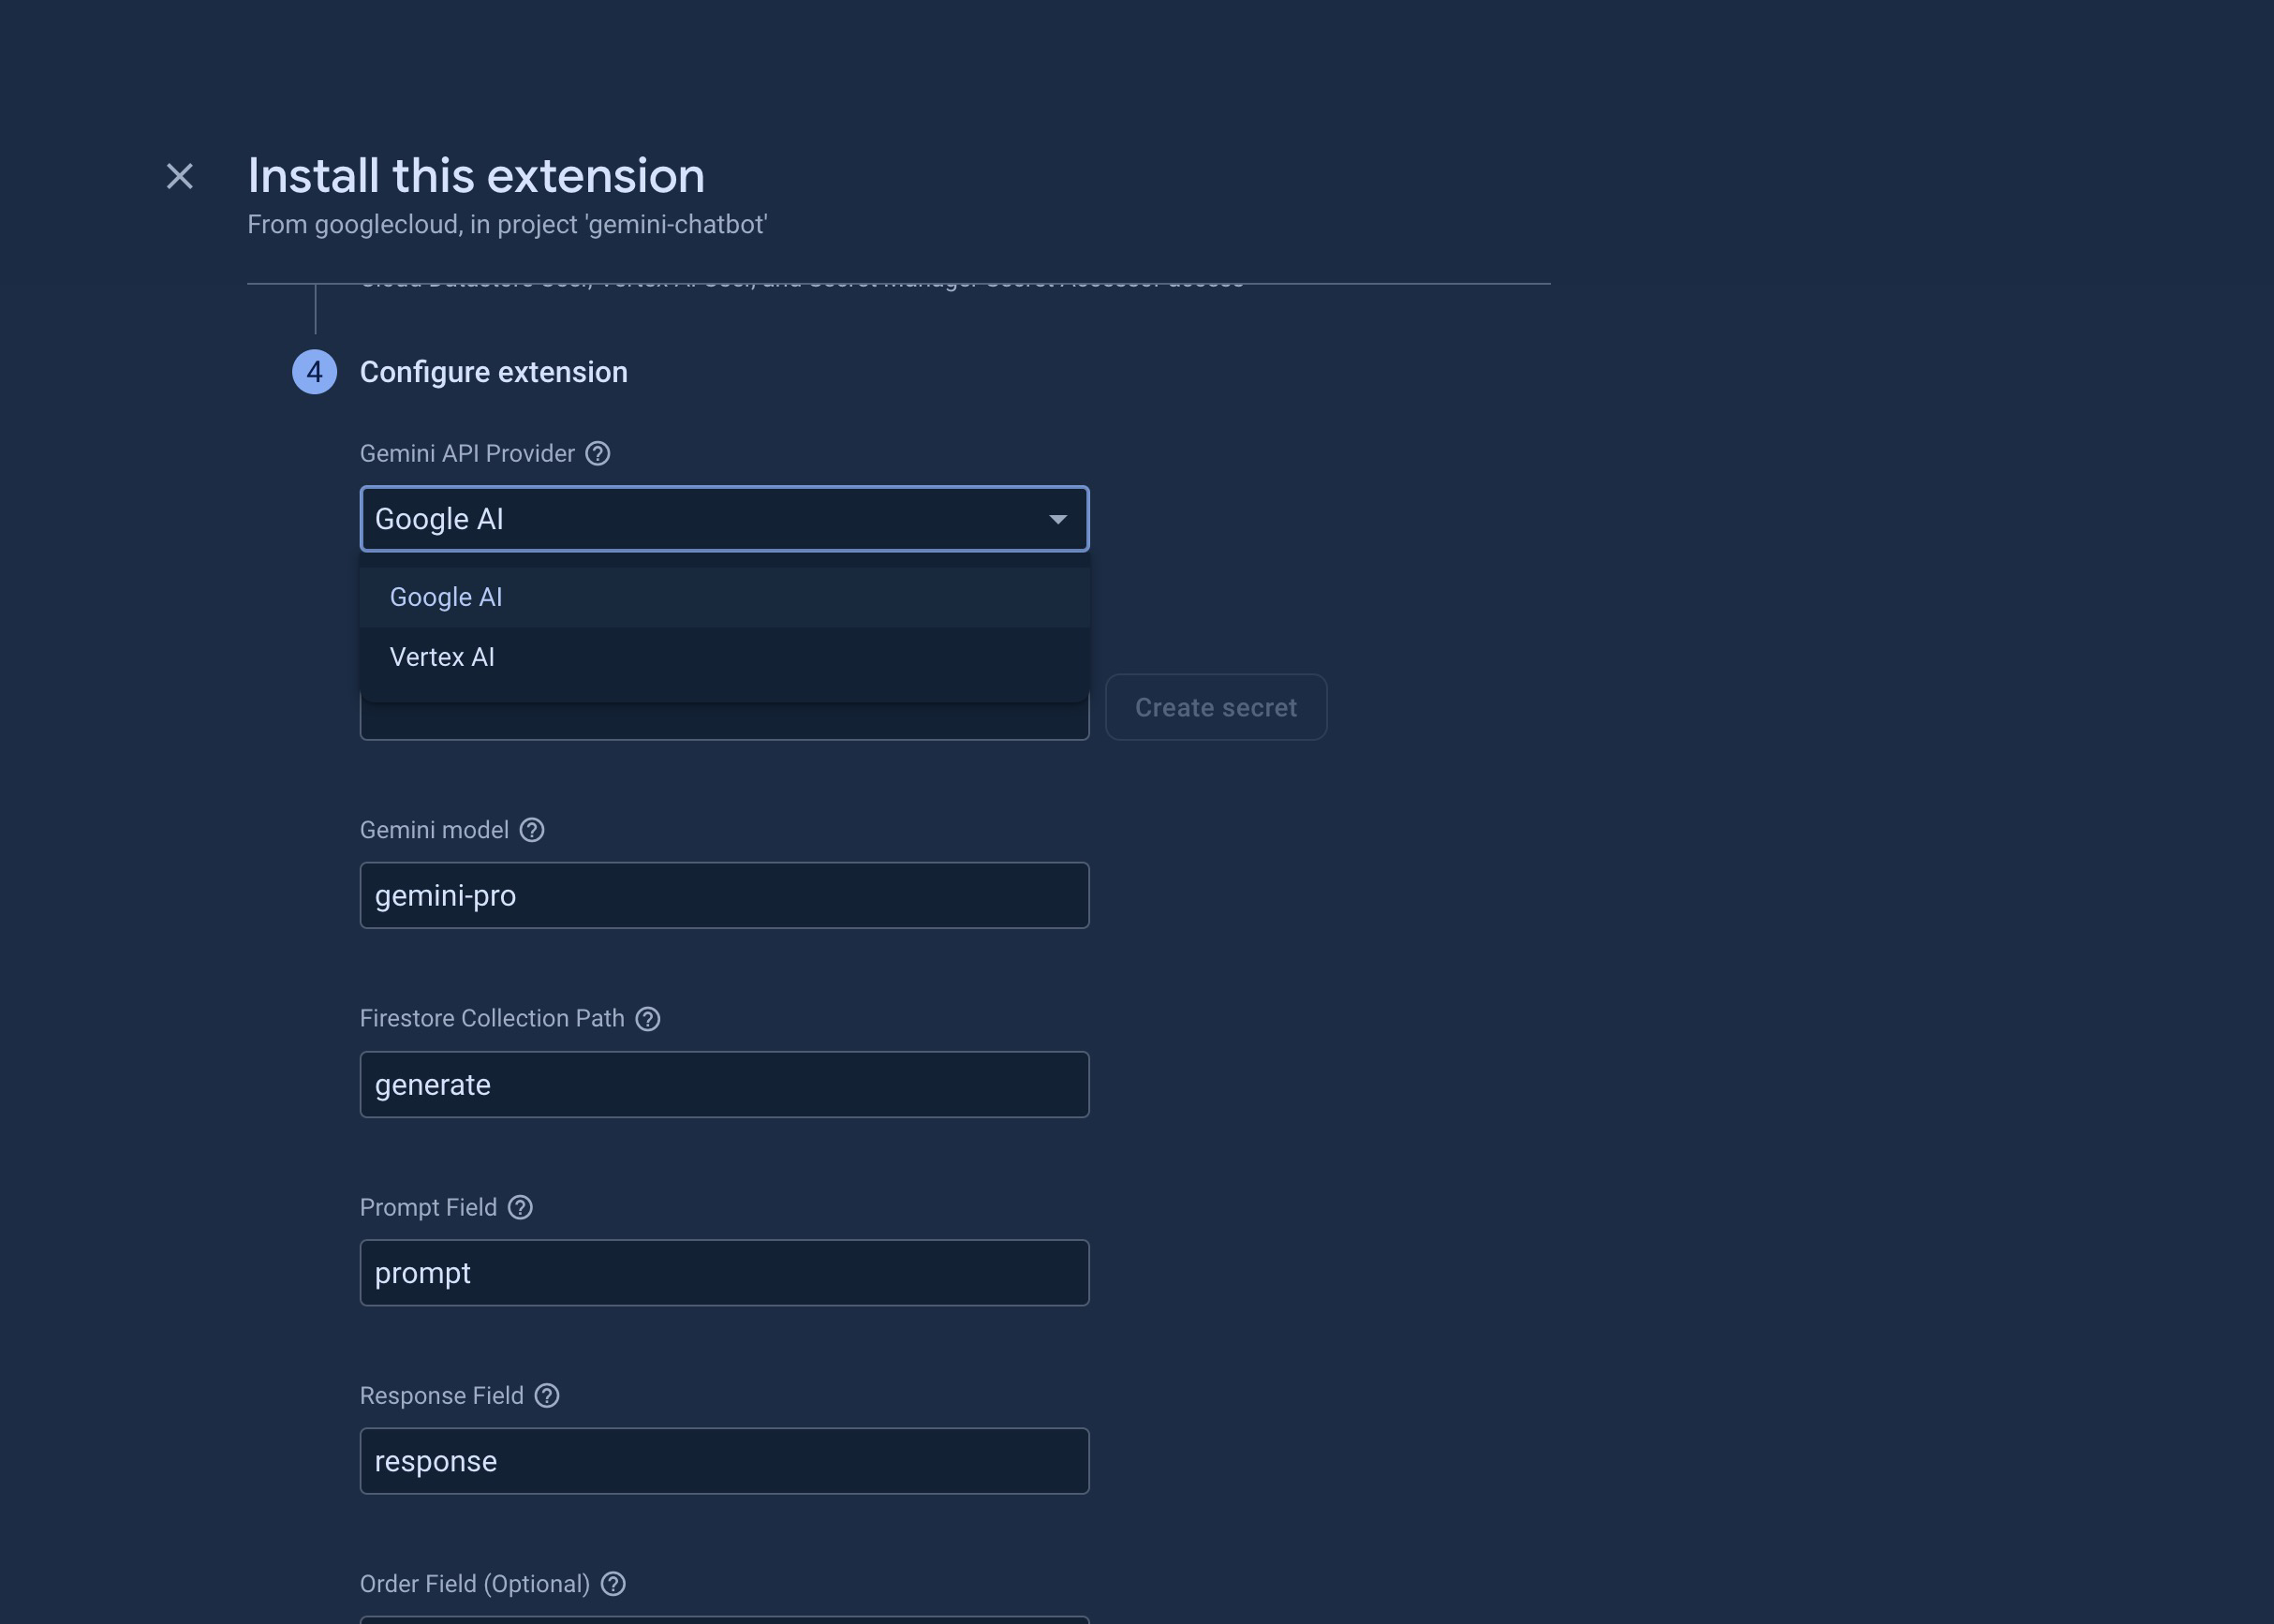
以下はGoogle AI Studioの画面になります。
今回はGoogle AI Studioについては書きませんが、これはWeb上でGoogleのAIモデルGeminiを試すことができるツールで、ChatGPTのようにチャットしたり、APIキーを発行できます。
詳しくはドキュメントを参照してください。
今回はAPIキーだけ必要なので、「Create API key」からAPIキーを発行します。
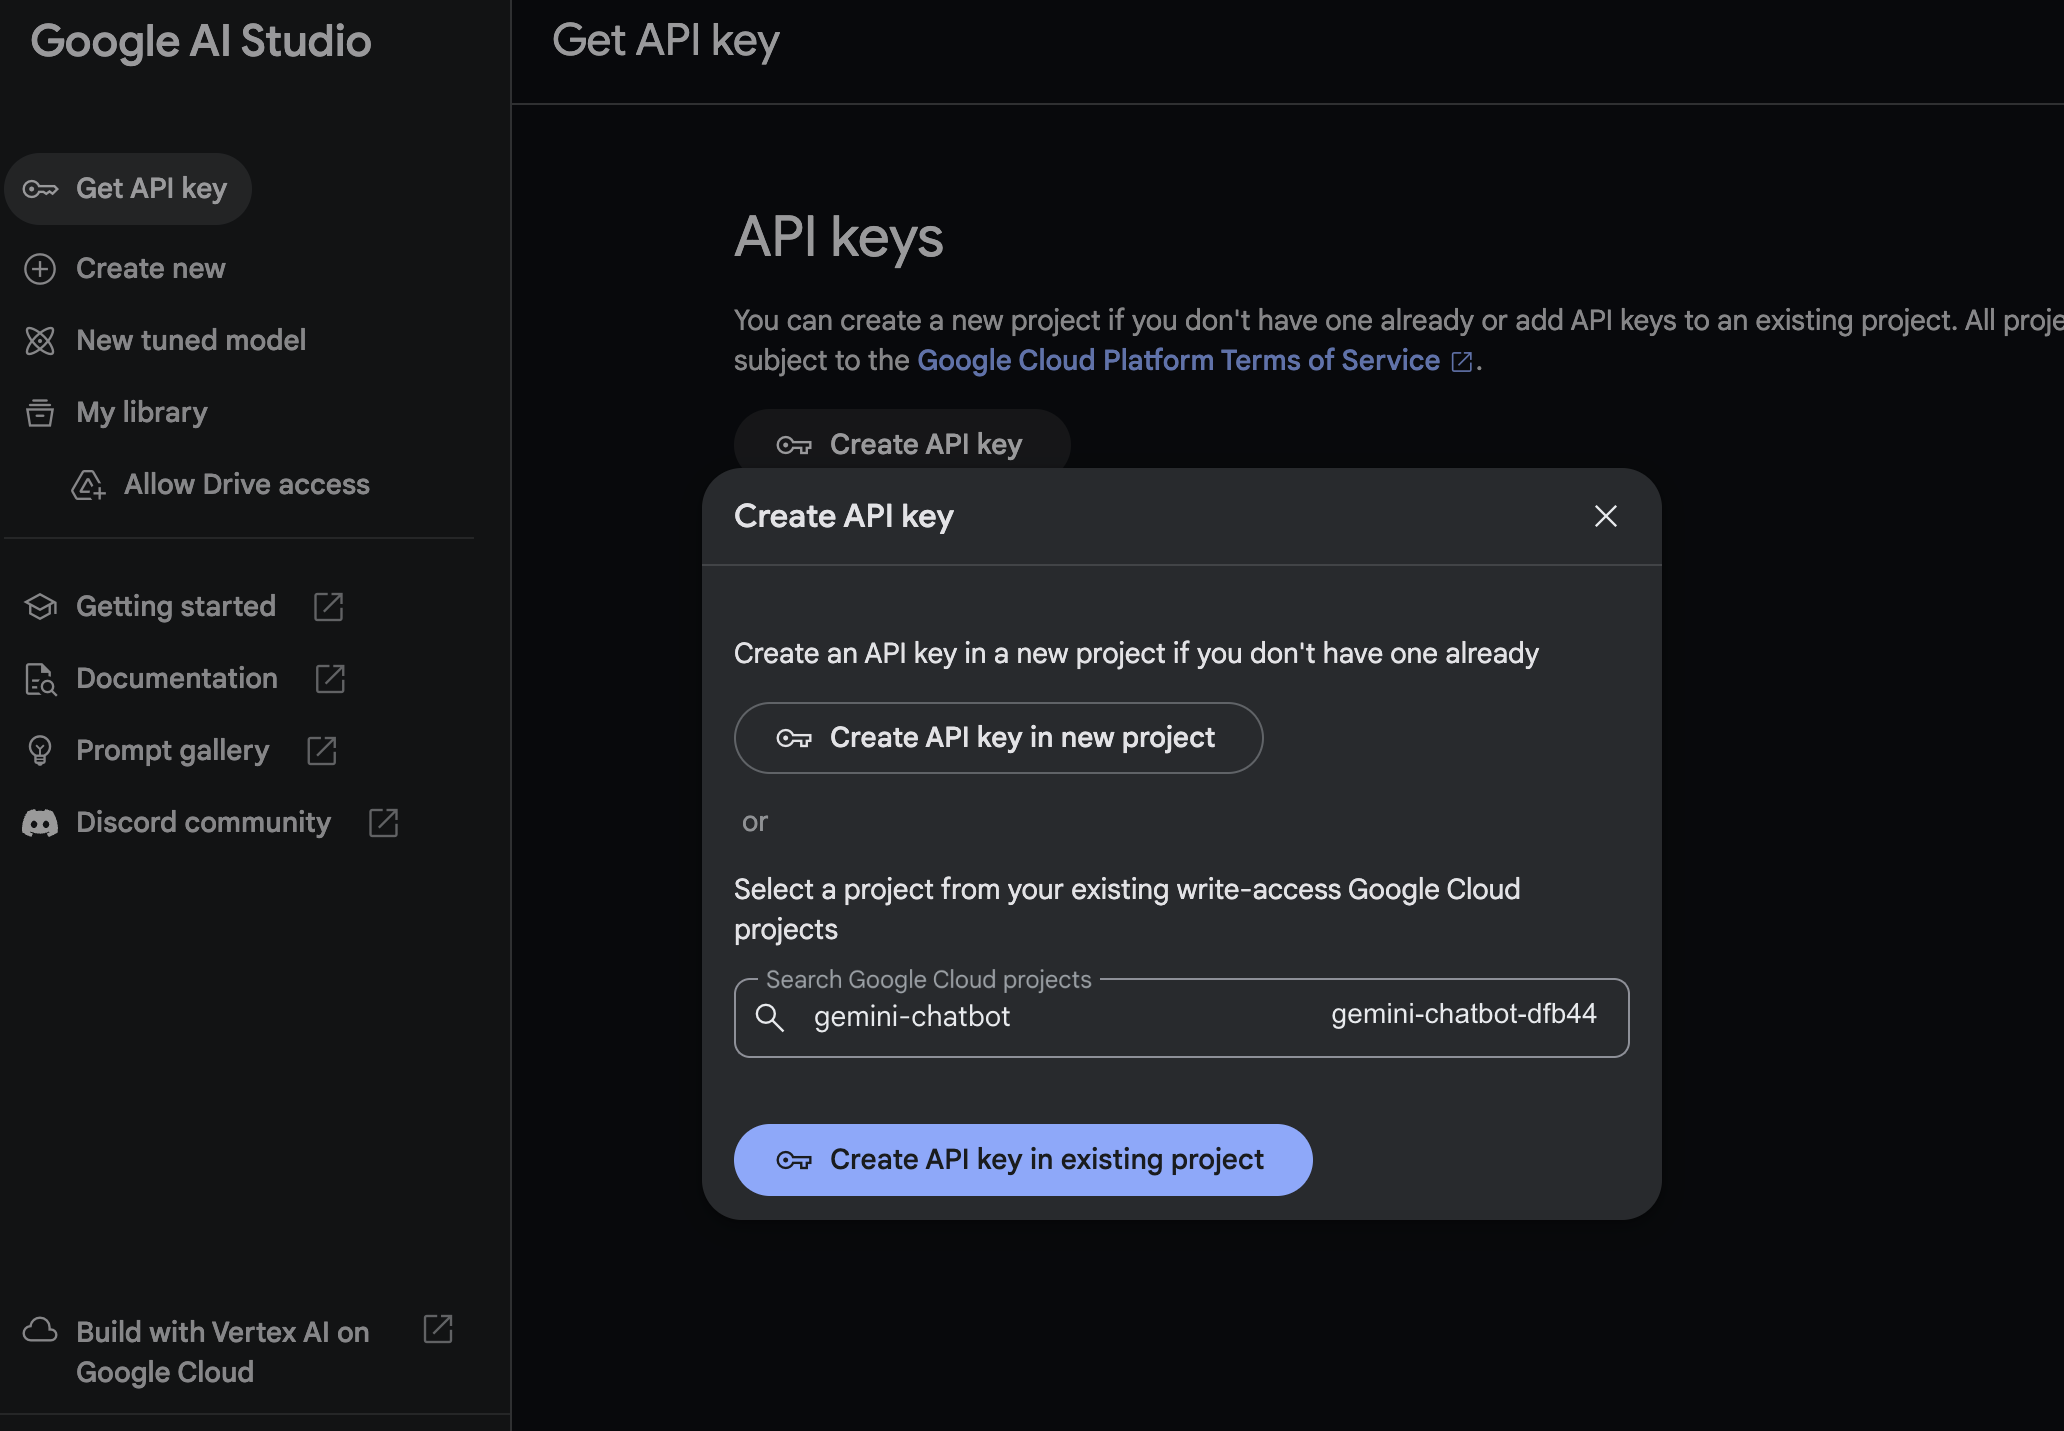
APIキーを発行できたので、Firebaseコンソールに戻りって「Google AI API Key 」フィールドに入力します。
続けてCloud Functionなどの設定値を入力していきます。
今回入力した値は以下画像のようになりました。
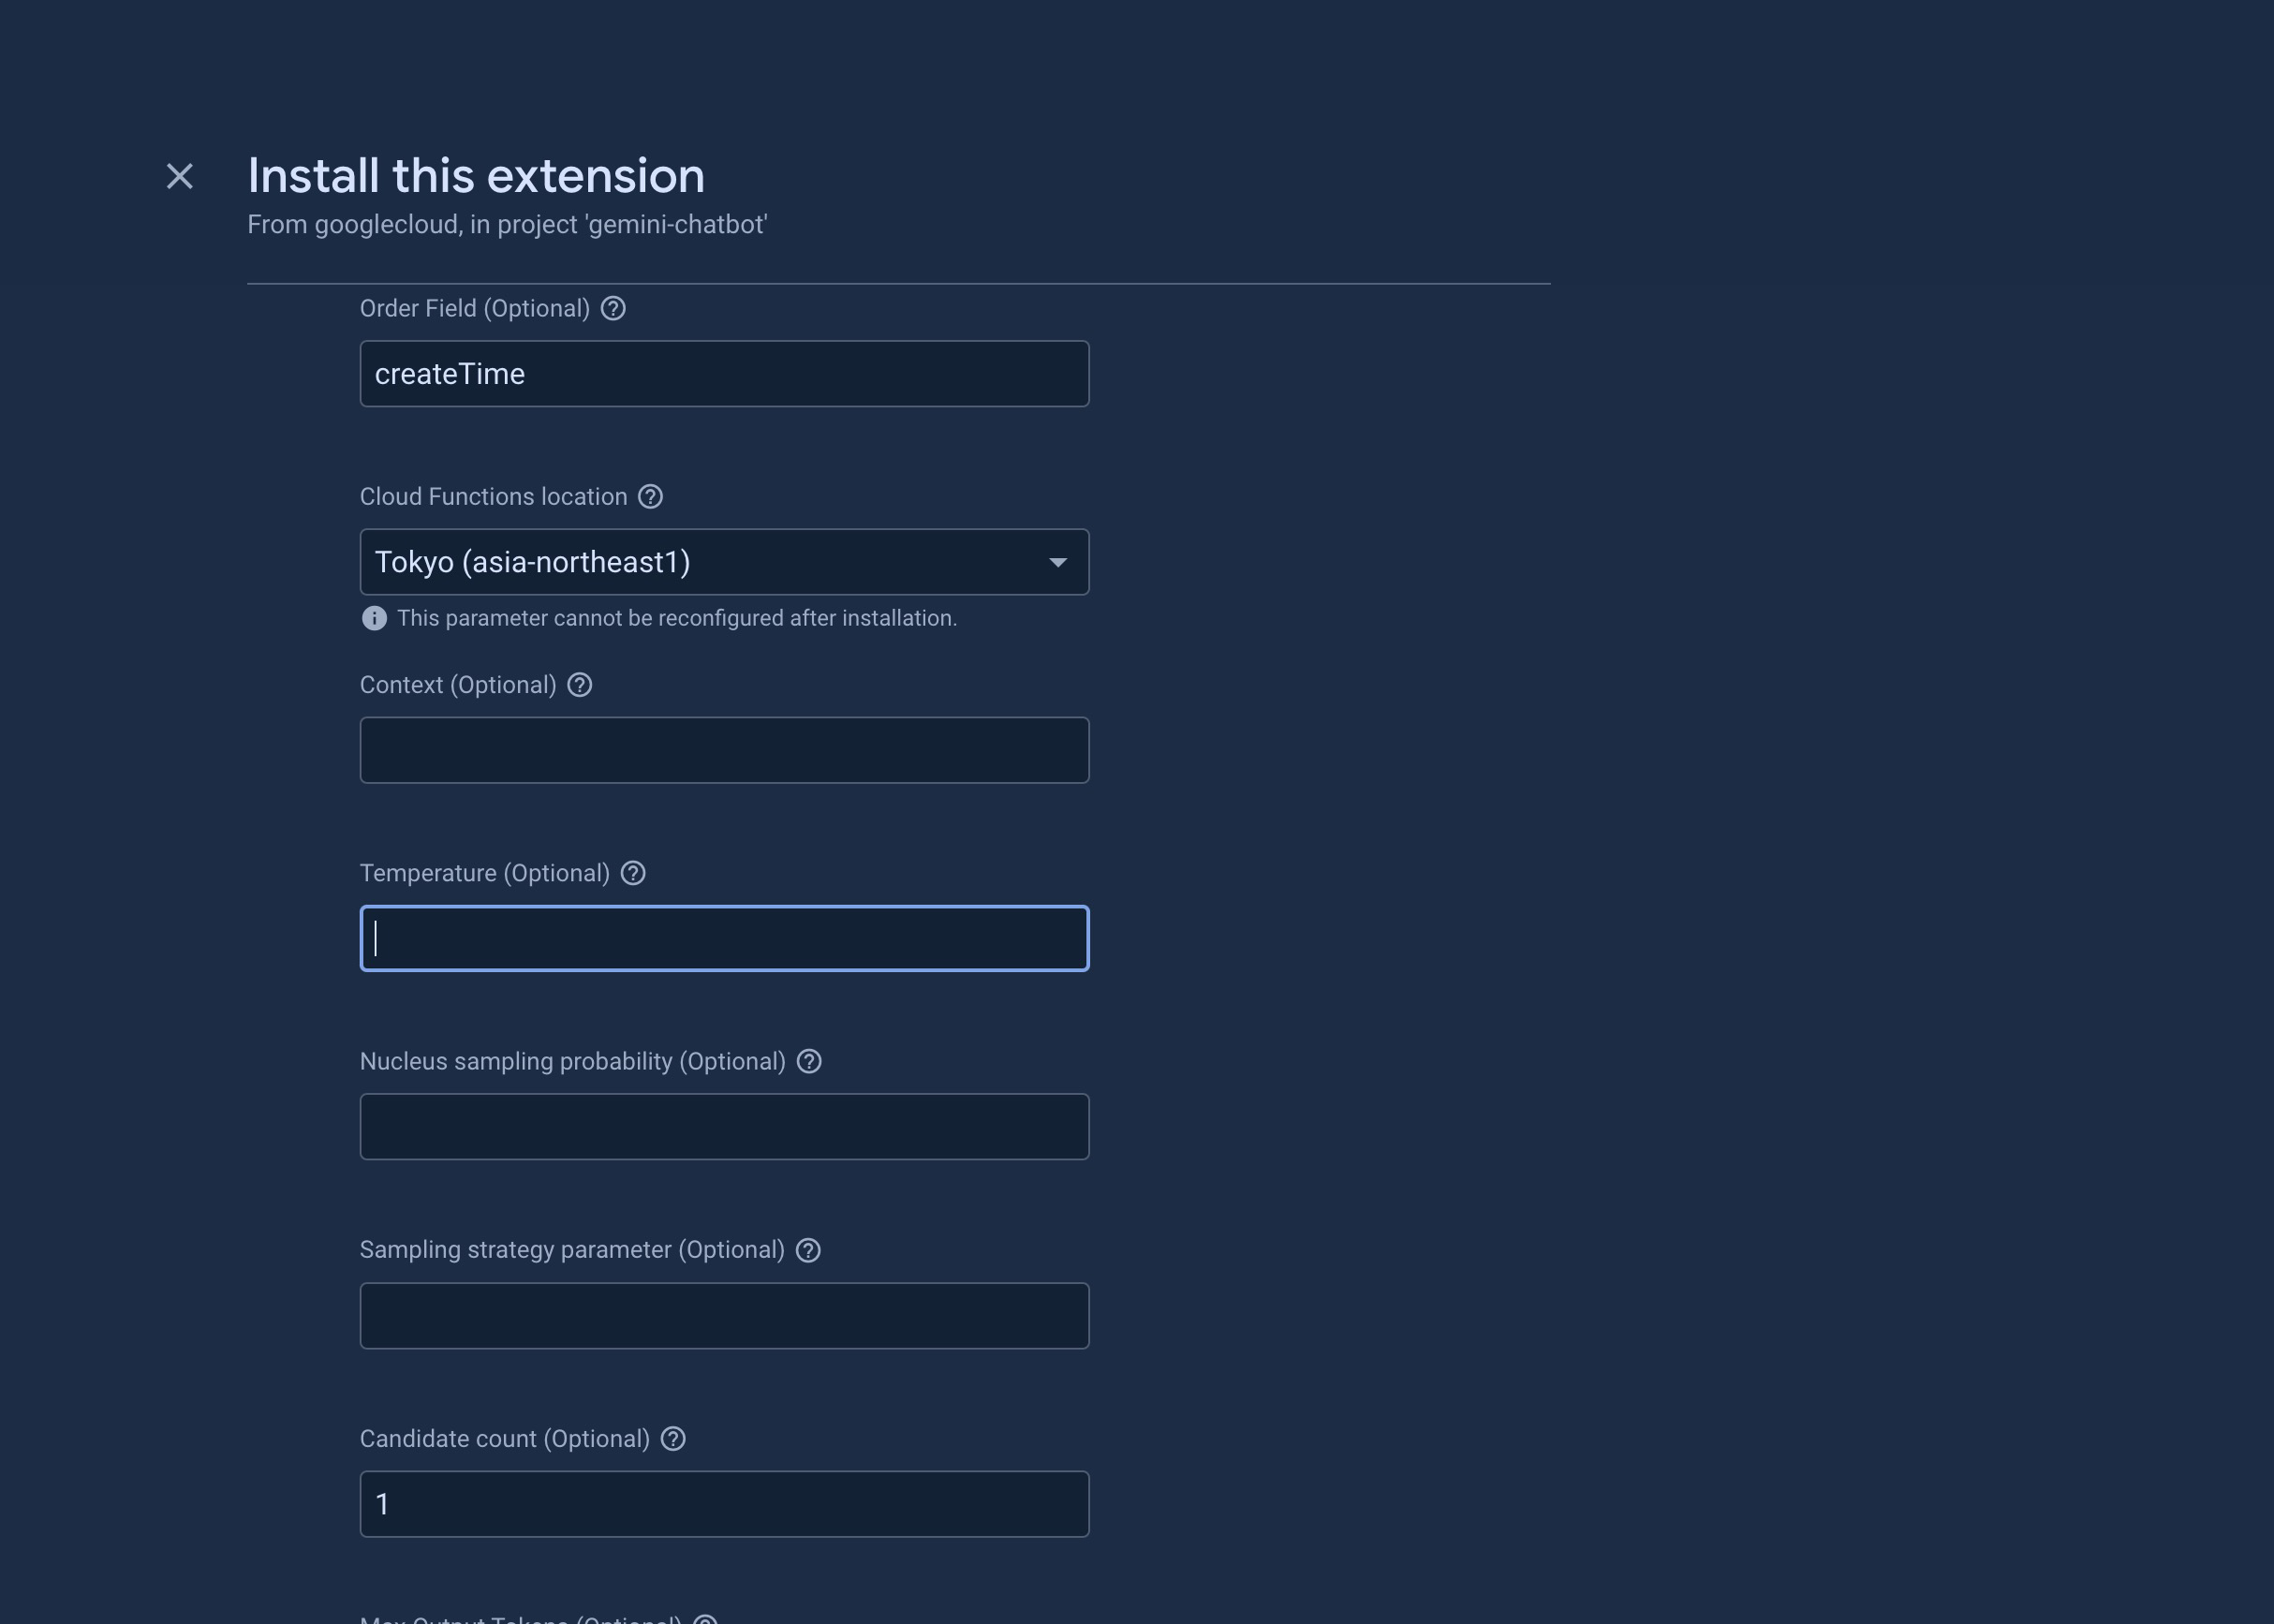
ここら辺は基本デフォルトにしました。
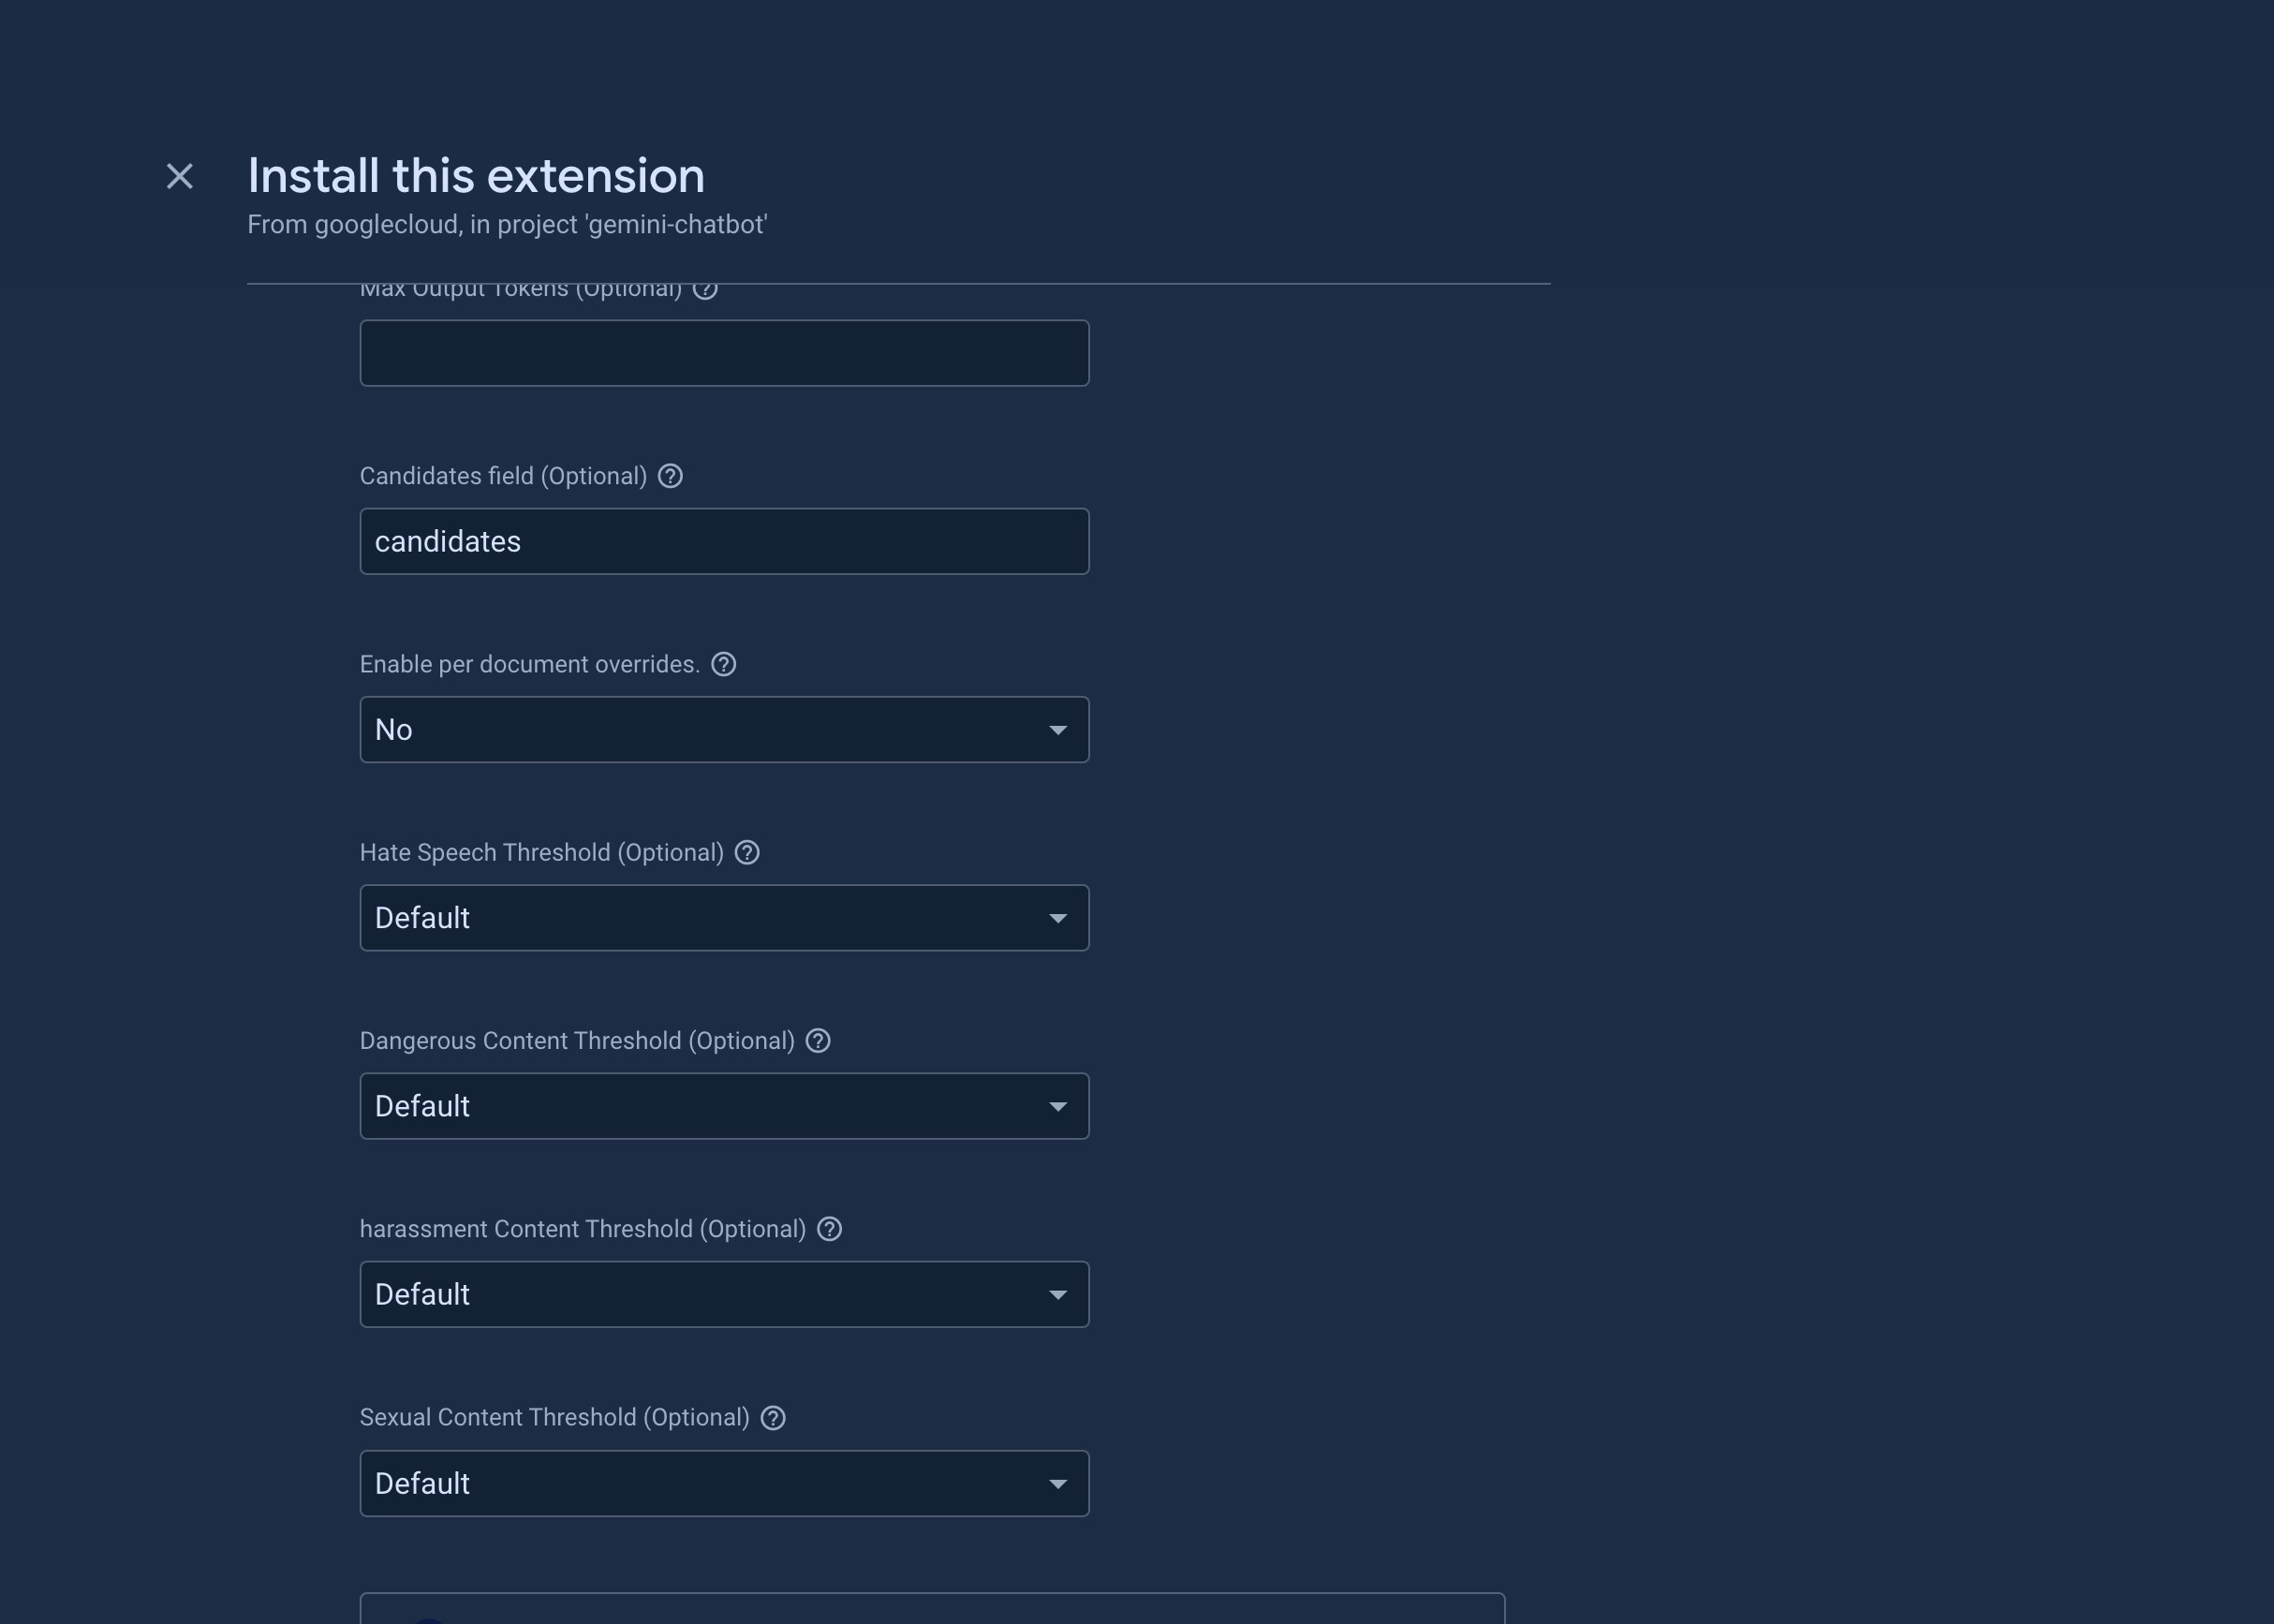
危険なコンテンツなどをブロックする設定などもできるようです。
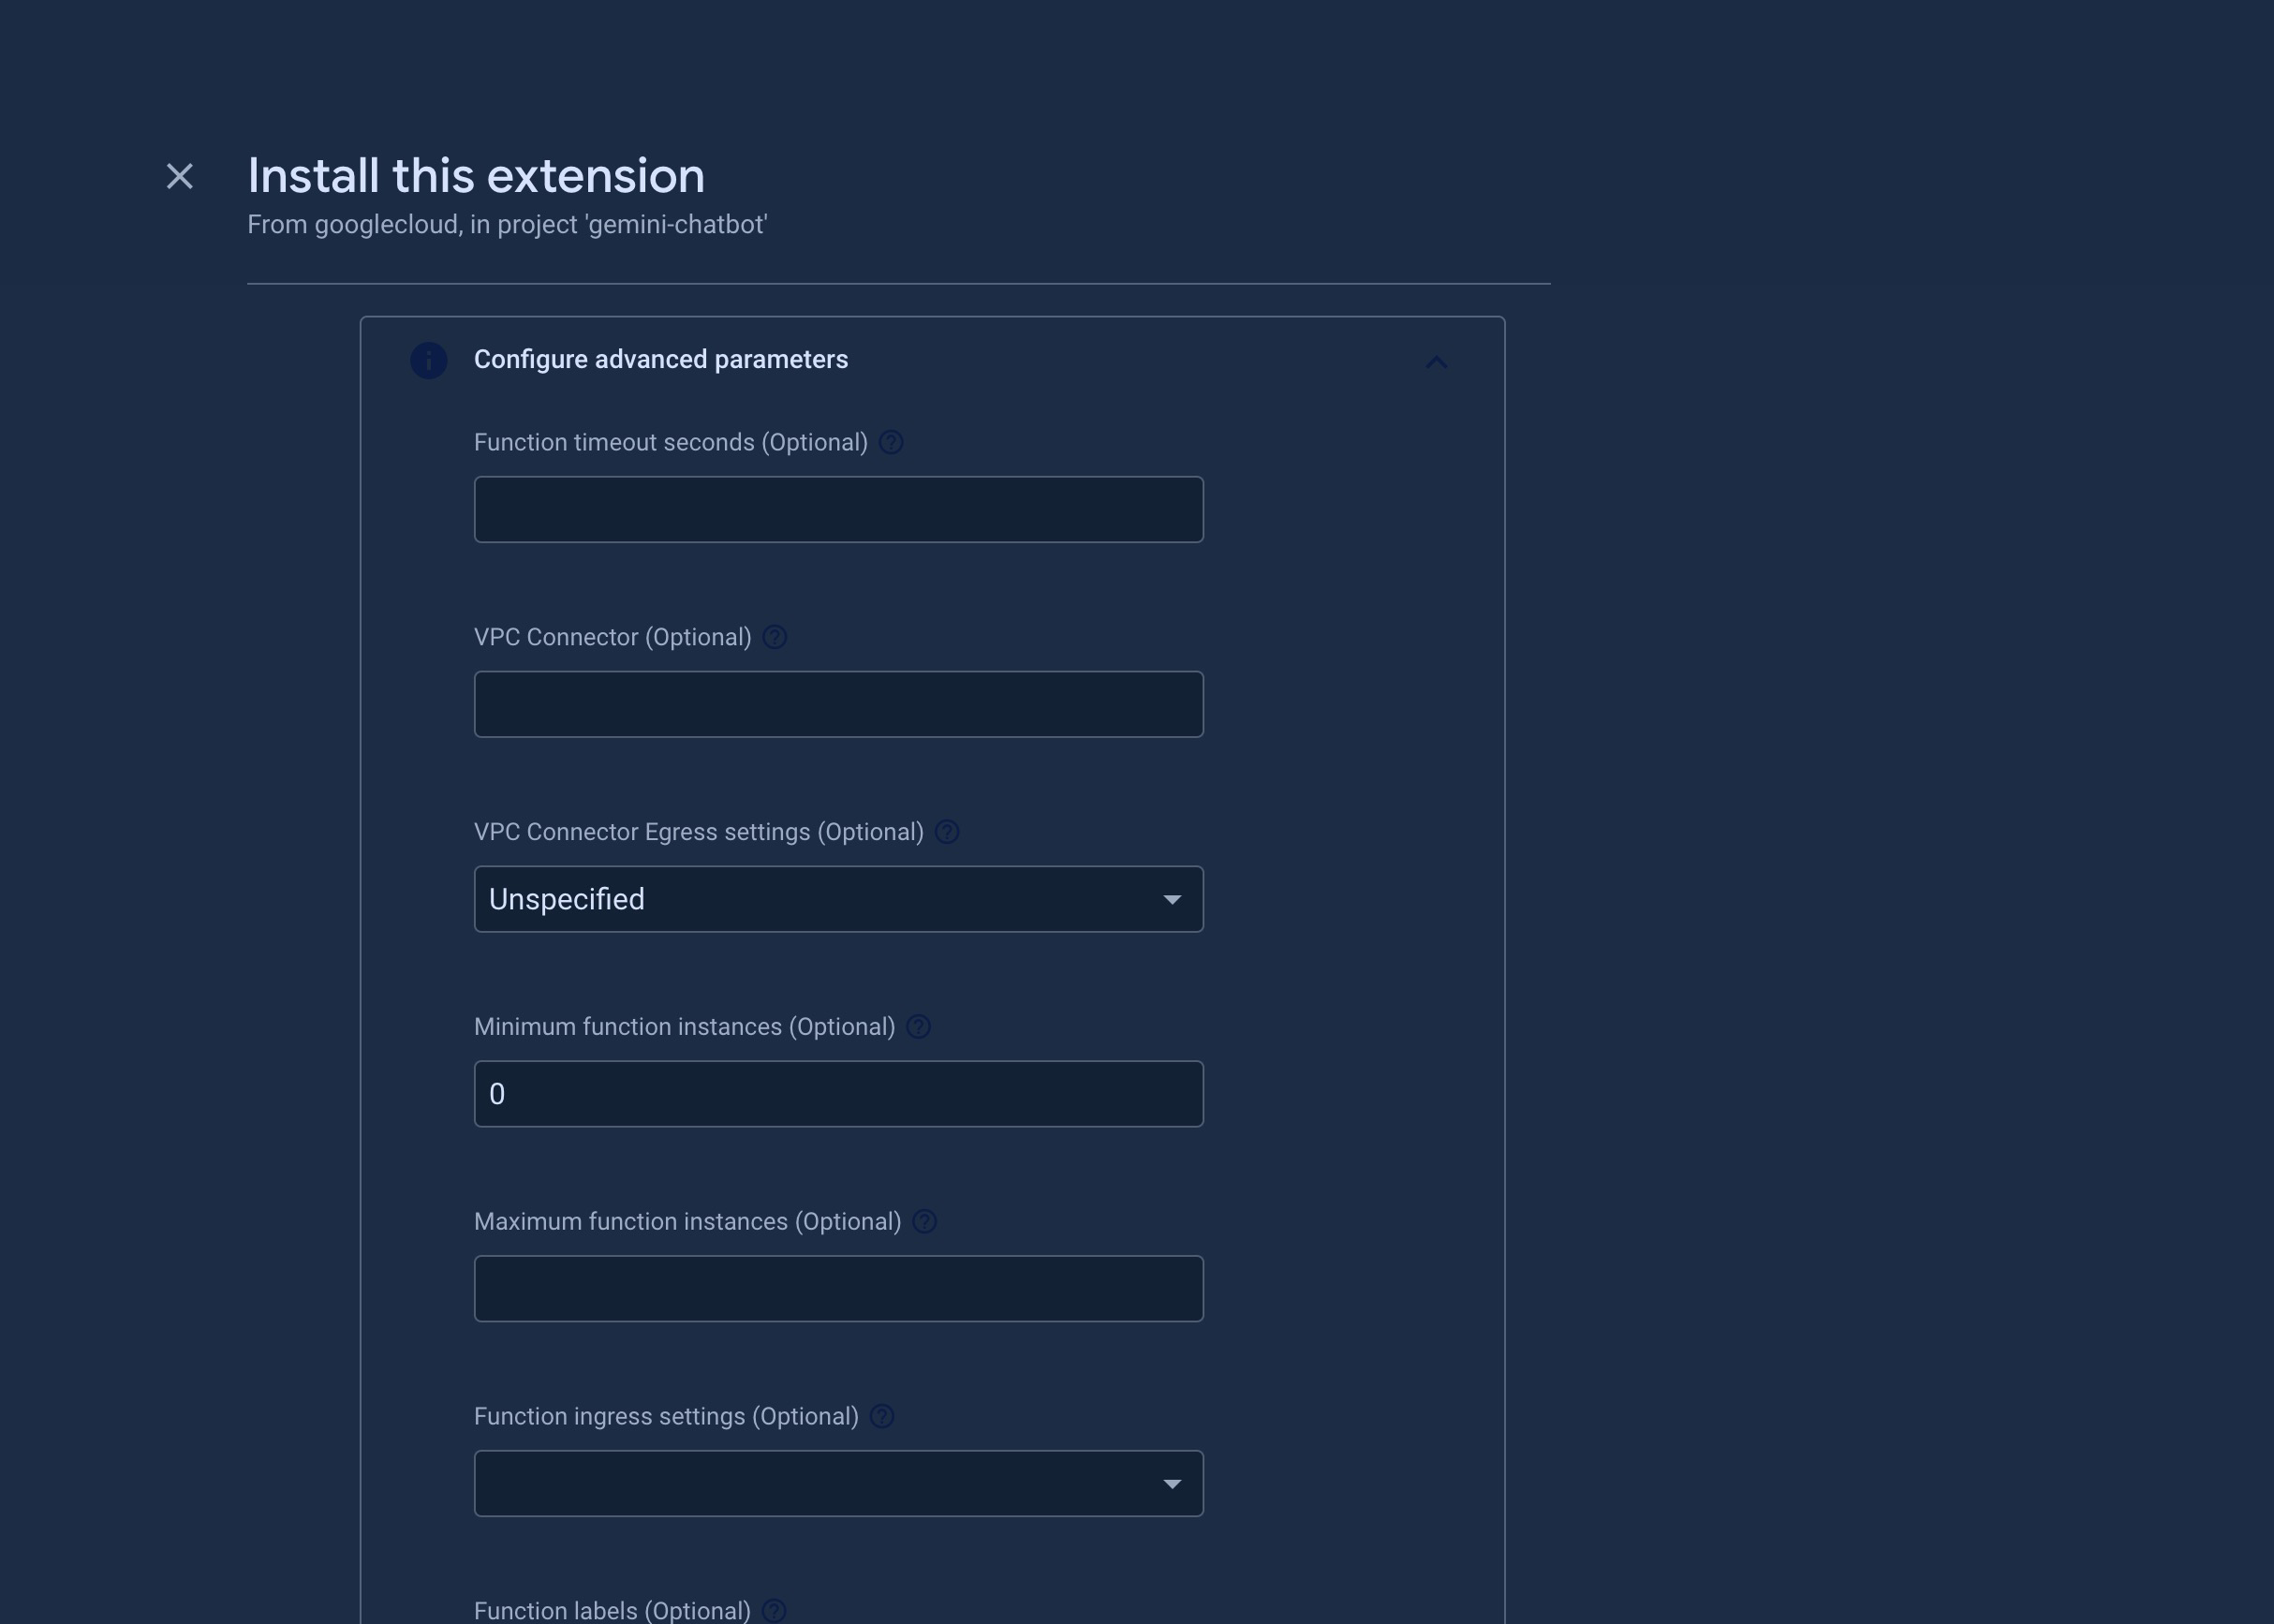
Functionについての設定などはインストール後に変更できず、再インストールが必要になりますので、気をつけてください。
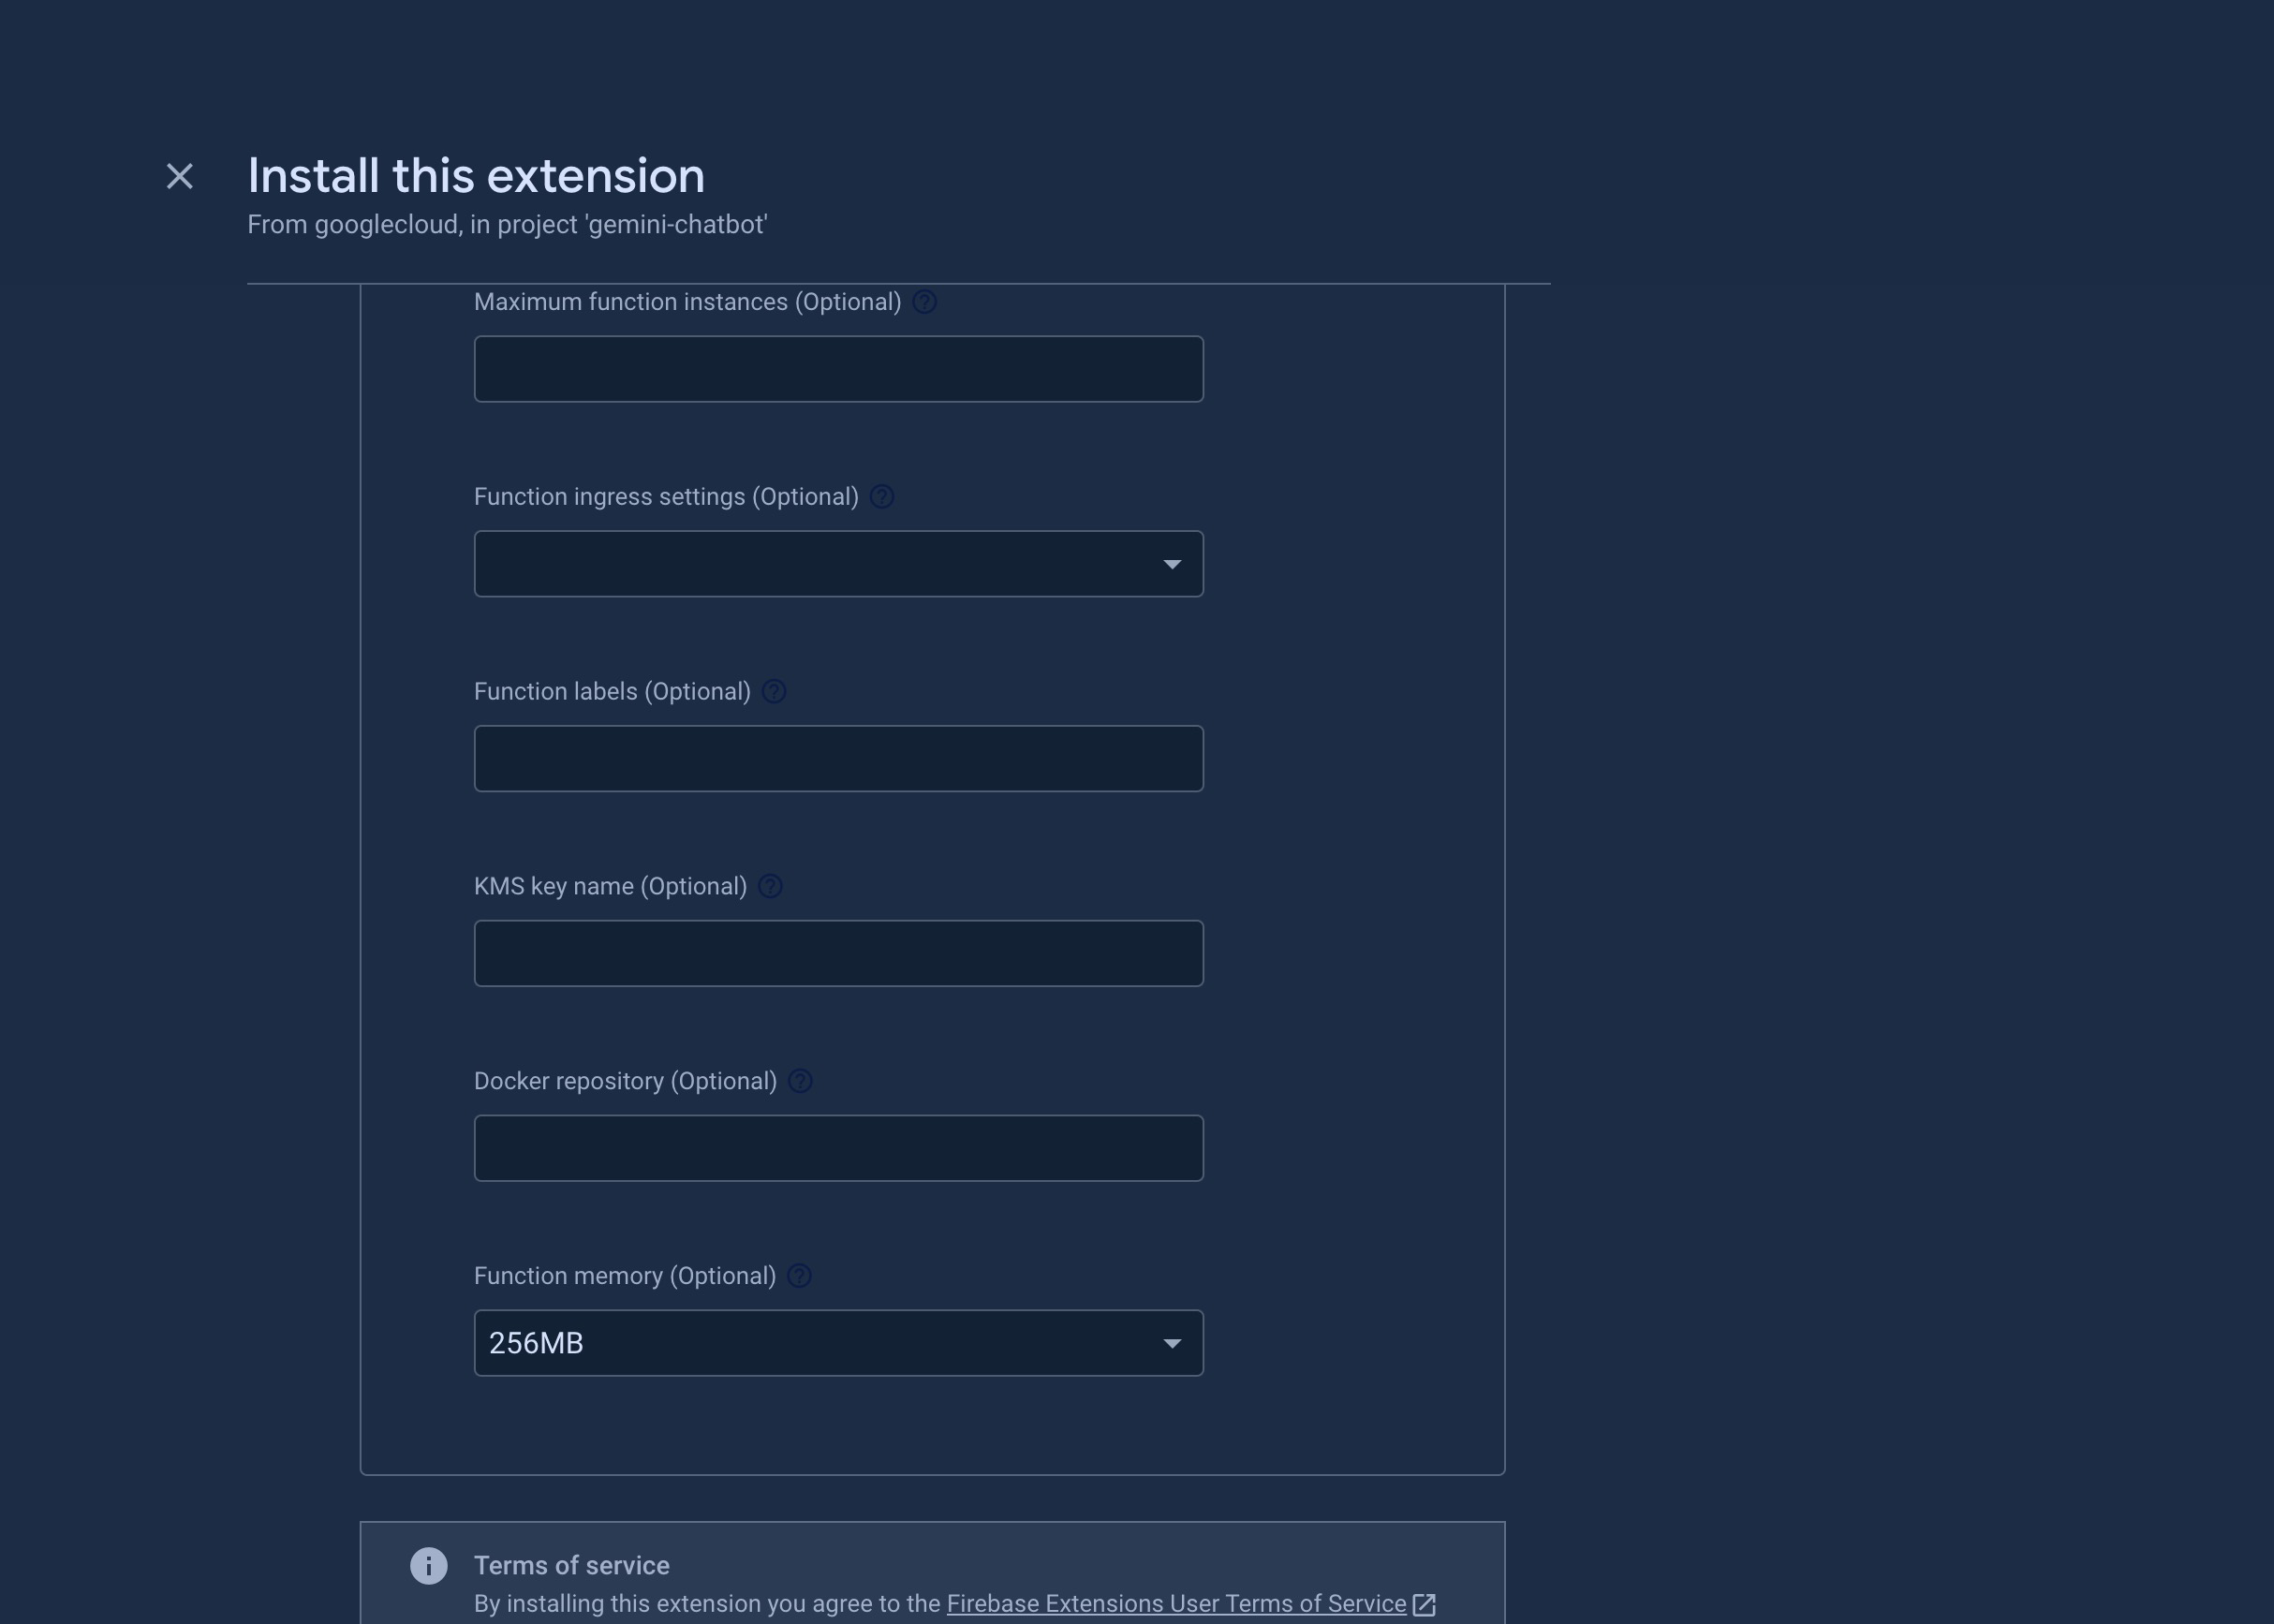
入力が完了してインストールを開始したら、数分で完了します。
Firestoreデータベース作成
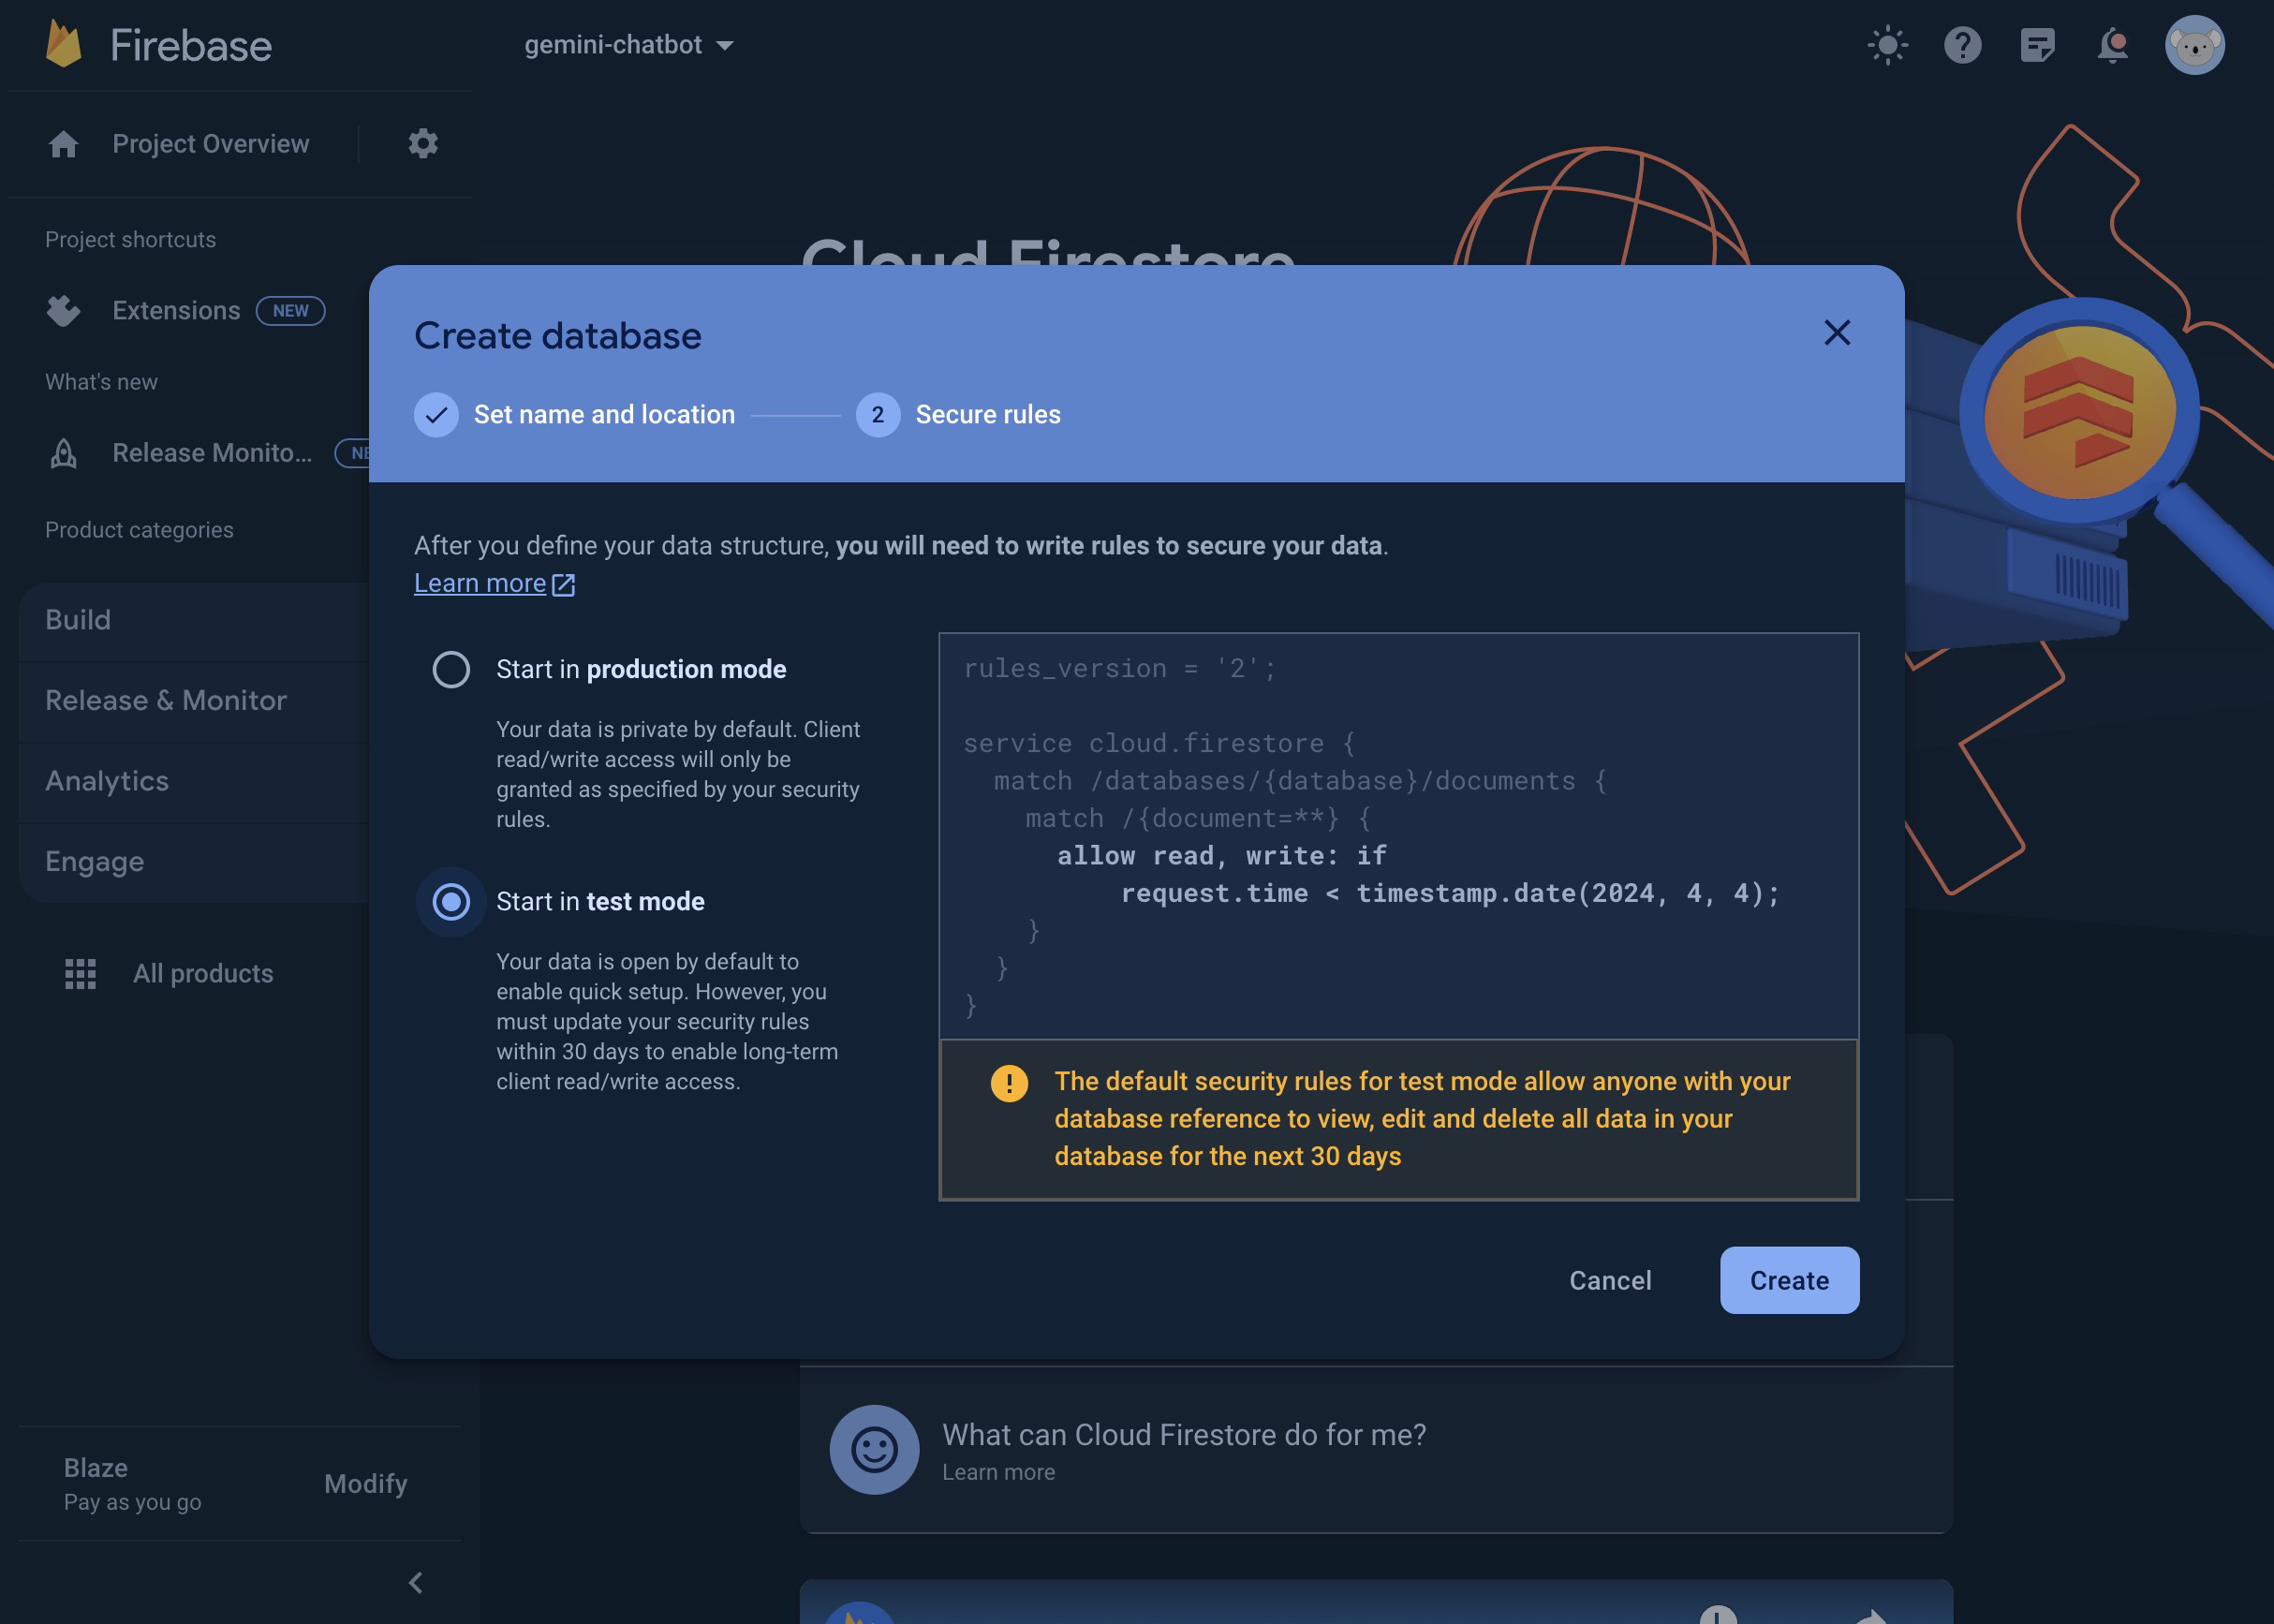
Extensionのインストールが終わったら、次にFirestoreのデータベースを作成します。
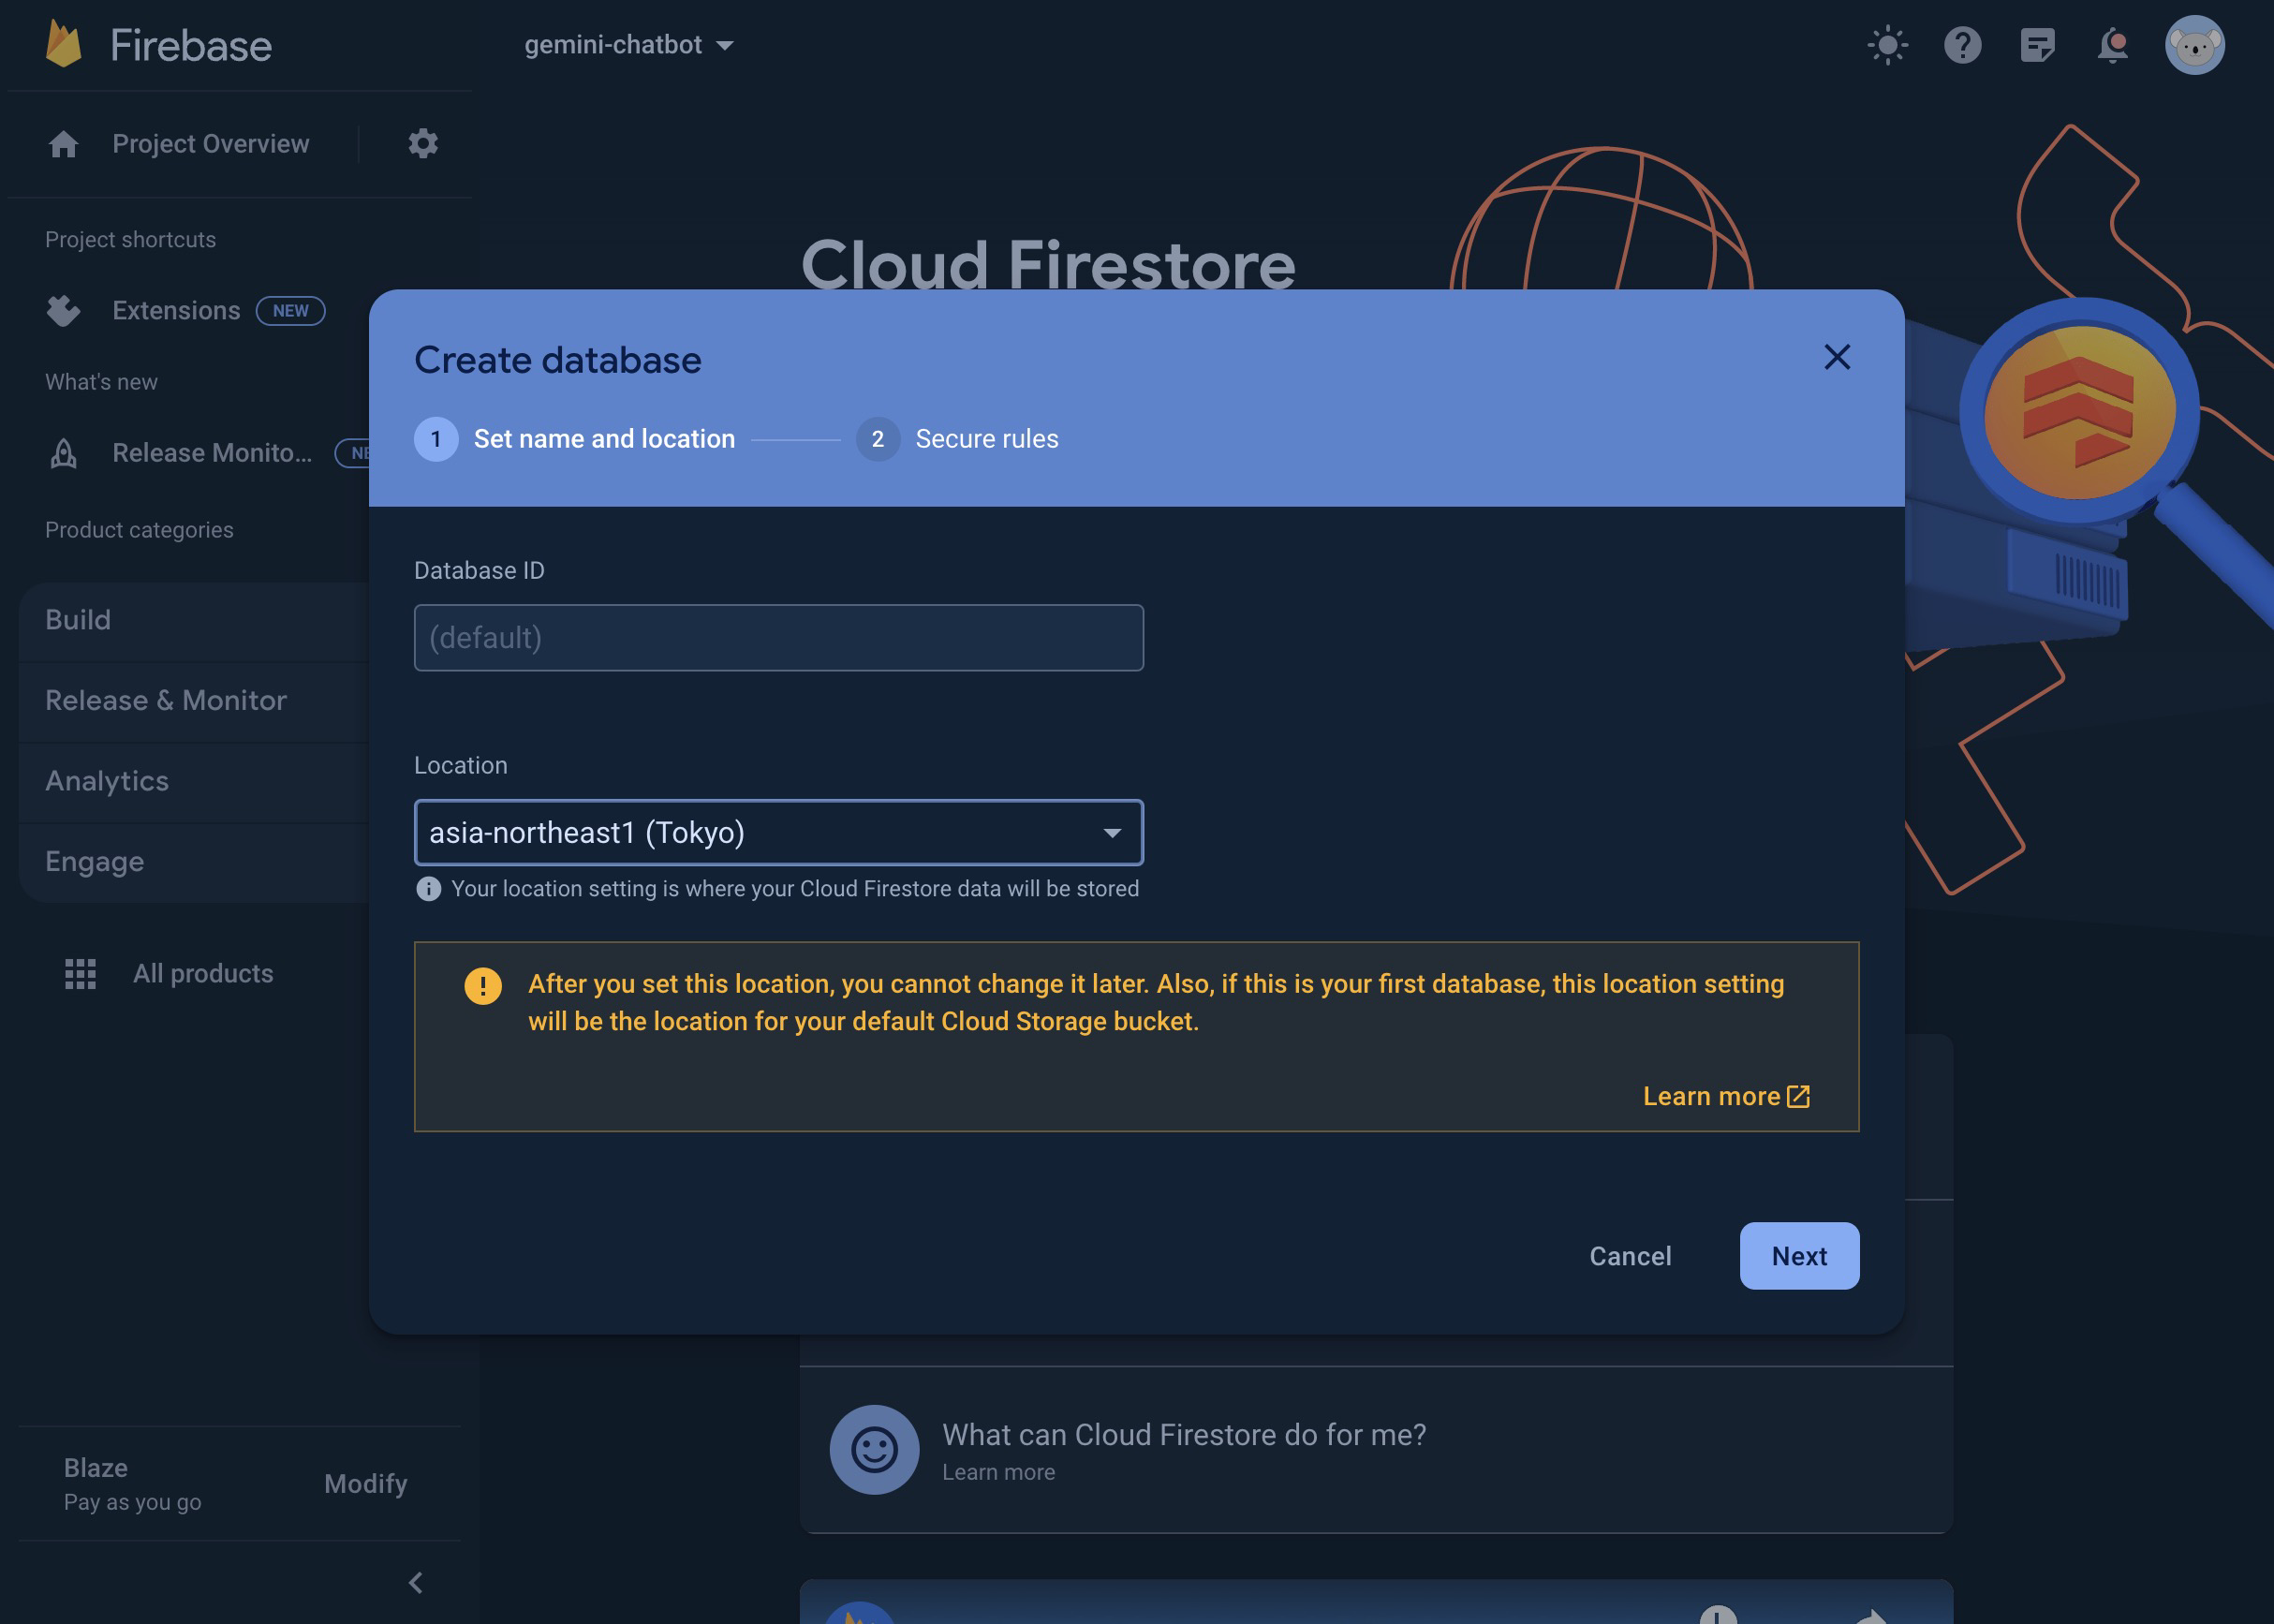
一旦動かしたいのでtest modeで作成しました。
Collectionの作成
これでインストールしたExtensionを動かす環境が整ったので、試しにコンソールから動かしてみます。
まず「Start collection」を押して、Extensionインストール時に設定したCollection Pathの generate Collectionを作ります。
その後、Documentが作れるので、prompt FieldでValueを How are you today? などと入力して保存します。
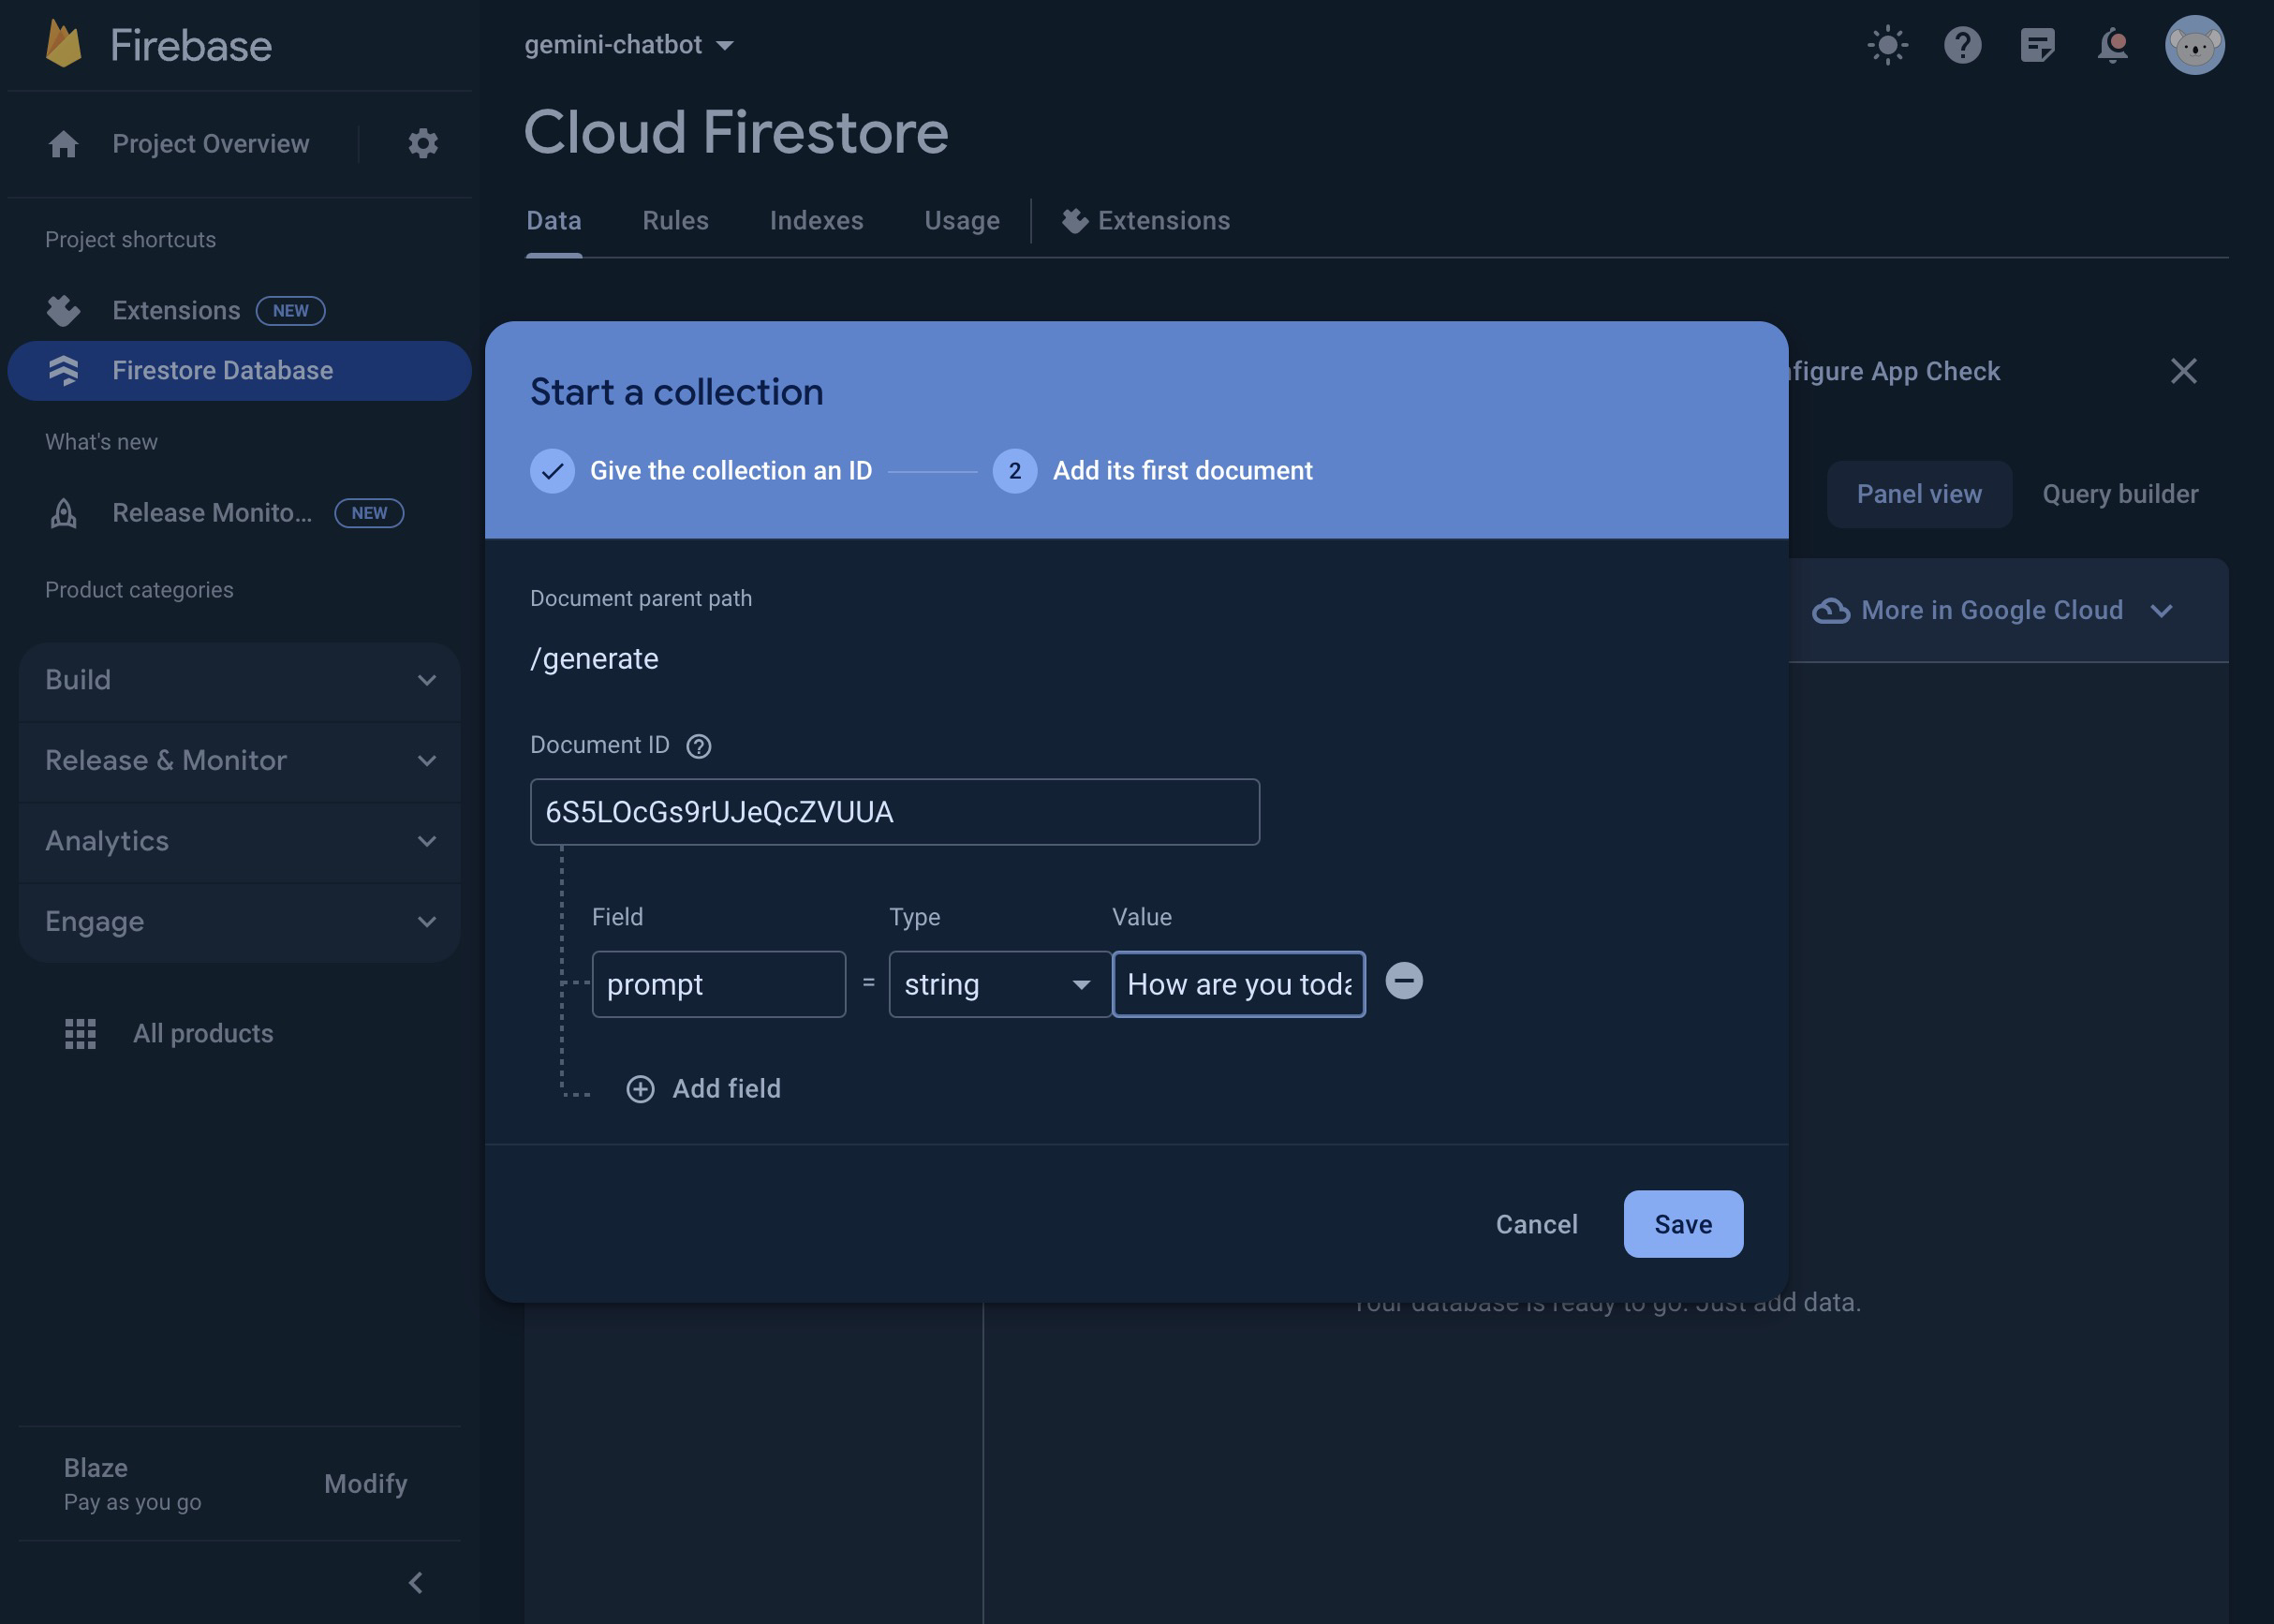
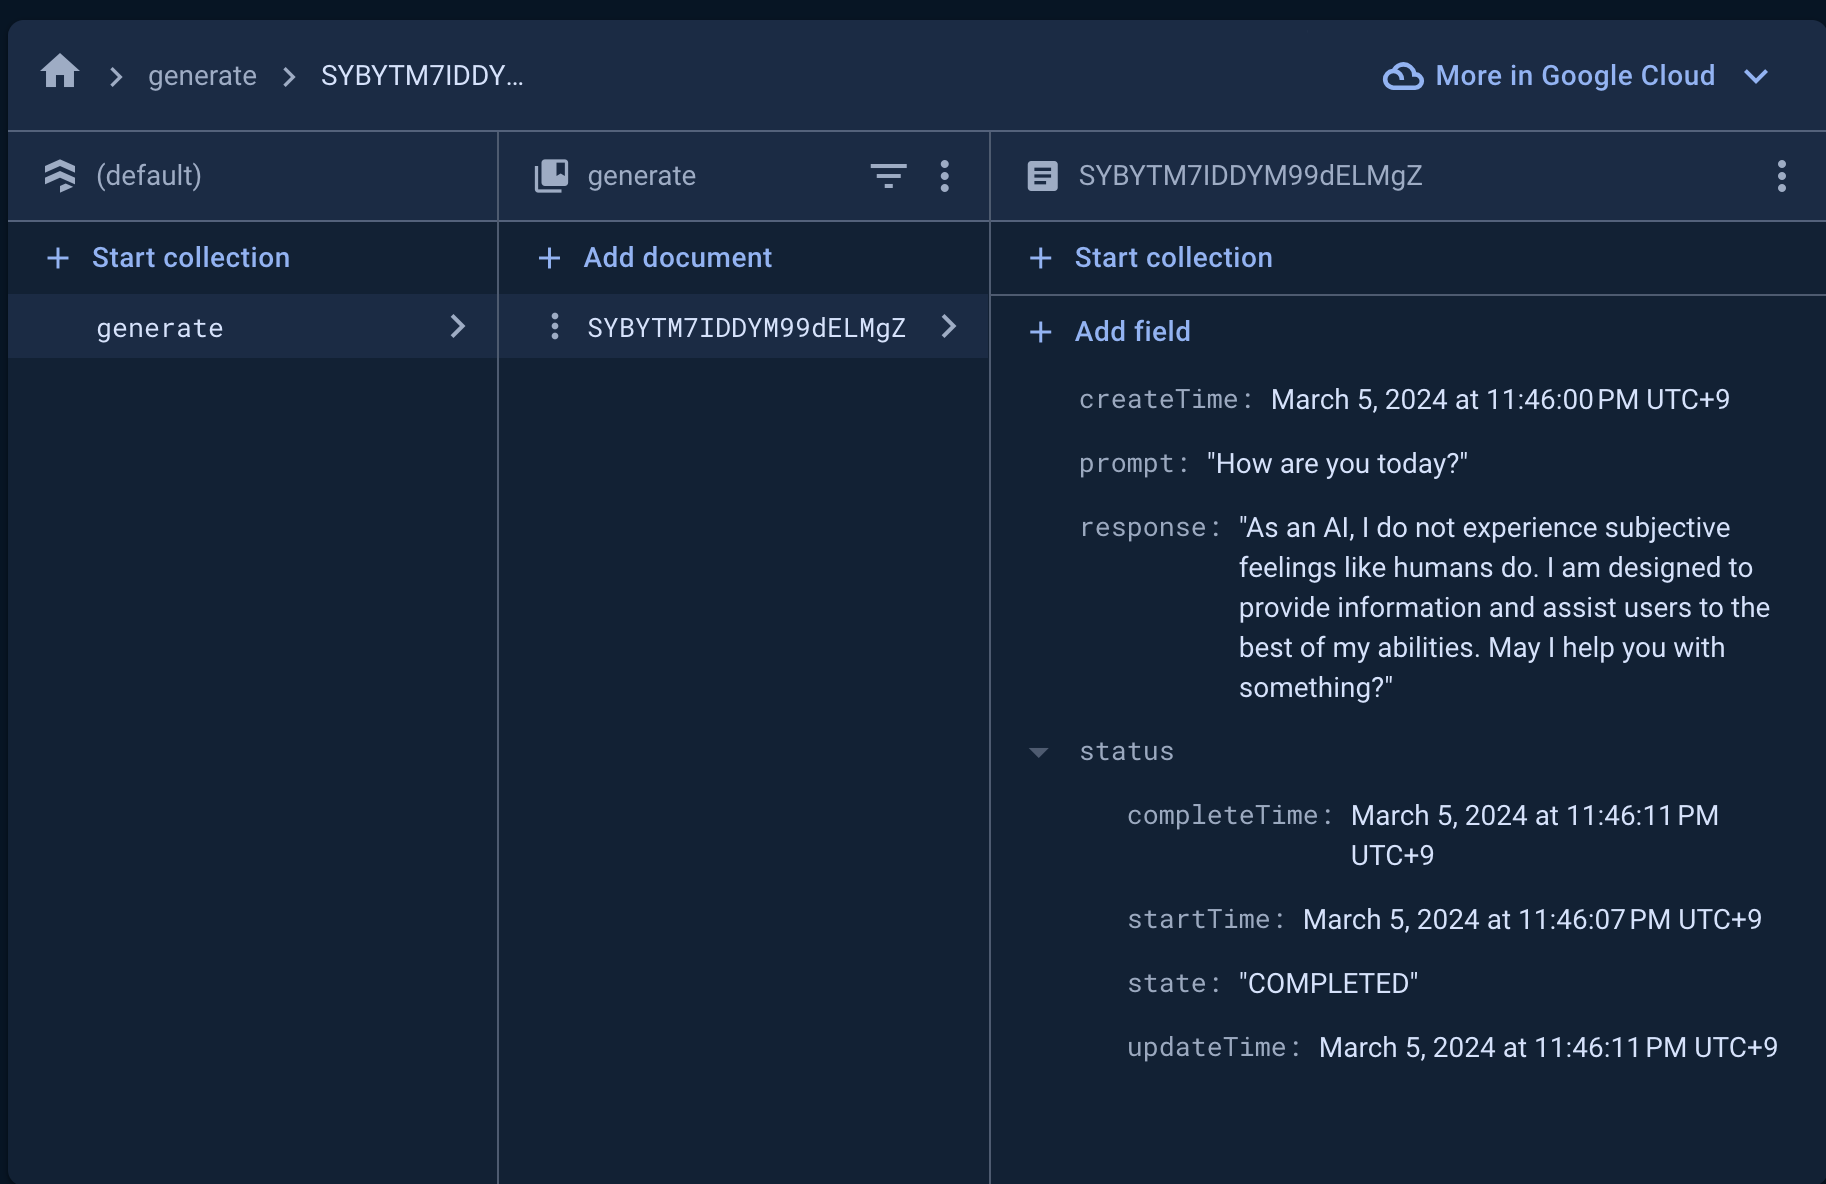
するとしばらくすると、以下画像のようにresponseやcreateTimeフィールドなどが自動で追加されるはずです。
うまくExtensionが動いて、promptに入力した質問に対してAIが回答してくれました。
セッションごとに会話できるようFirestore Collection Pathを編集する
無事にExtensionが動いていることが確認できたので、いよいよアプリに組み込んでいきます。
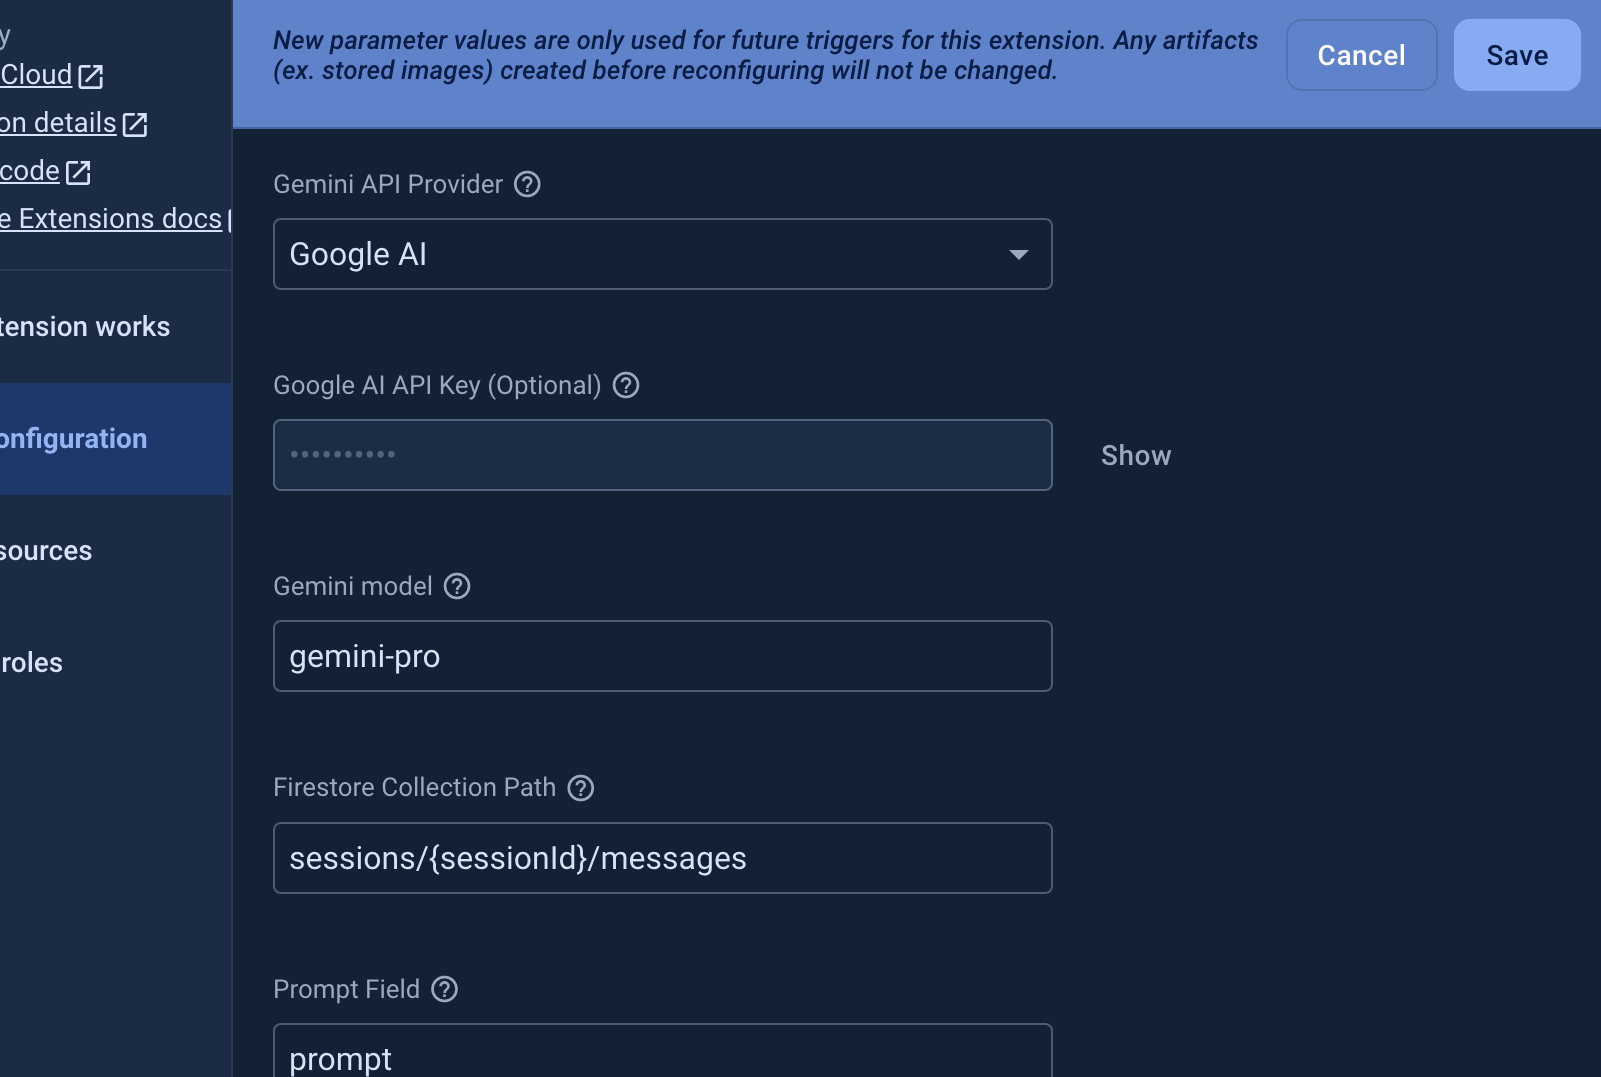
まずはExtensionの設定へ行き(サイドバーのExtensions > Build Chatbot with the Gemini API > Reconfigure extension)、Firestore Collection Pathを画像のように変更します。
デフォルトのgenerateのままだと、会話毎にチャットメッセージを分けることはできないので sessions/{sessionId}/messages のような形にします。
FirestoreのRulesを編集する
先ほど設定したCollection PathへアクセスできるようにFirestoreのRulesを編集します。
Firebase Consoleのサイドバーから「Firestore Database」> タブ > 「Rules」を開いて以下のように書きます。
rules_version = '2';

service cloud.firestore {
  match /databases/{database}/documents {
  	match /sessions/{document=**} {
    	allow read, write: if true;
    }
  	match /sessions/{sessionId}/messages/{document=**} {
    	allow read, write: if true;
    }
    match /{document=**} {
      allow read, write: if false;
    }
  }
}
これでCollection Path /sessions/{sessionId}/messages へのみreadとwriteが許可されるようになりました。
実際はここにFirebase Authでのユーザー情報を見て制御して運用することにはなるはずですが、今回は動かすことが目的なので、このままで進めます。
チャットUI作成
次にUIを実装します。
今回は簡単にチャットUIを作成できる react-native-gifted-chat を使います。
インストール
npm install react-native-gifted-chat
実装
Chat.tsxというファイルを作成、以下のように書きます。
import React, { useState, useCallback } from "react";
import { GiftedChat, IMessage } from "react-native-gifted-chat";
import { Button, View, useWindowDimensions } from "react-native";

const chatbot = {
  _id: "chatbot",
  name: "Gemini Chatbot",
};

const me = {
  _id: "me",
  name: "Me",
};

export function Chat() {
  const [messages, setMessages] = useState<IMessage[]>([
    {
      _id: "FIRST_MESSAGE",
      text: "How can I help you today?",
      createdAt: new Date(),
      user: chatbot,
    },
  ]);
  const { width } = useWindowDimensions();

  const onSend = useCallback(
    async (messages: IMessage[] = []) => {
      setMessages((previousMessages) =>
        GiftedChat.append(previousMessages, messages)
      );
    },
    []
  );

  const clearChat = async () => {
    setMessages([]);
  };

  return (
    <View>
      <Button title="Clear Chat" onPress={clearChat} />
      <GiftedChat
        messagesContainerStyle={{
          width,
        }}
        messages={messages}
        onSend={(messages) => onSend(messages)}
        user={me}
      />
    </View>
  );
}
そして作成したChatコンポーネントをApp.tsxに持ってきます。
import { Platform, SafeAreaView, StatusBar, StyleSheet } from "react-native";
import { Chat } from "./Chat";

export default function App() {
  return (
    <SafeAreaView style={styles.container}>
      <Chat />
    </SafeAreaView>
  );
}

const styles = StyleSheet.create({
  container: {
    flex: 1,
    backgroundColor: "#fff",
    alignItems: "center",
    justifyContent: "center",
    paddingTop: Platform.OS === "android" ? StatusBar.currentHeight : 0,
  },
});
これでチャットUIは完成です。
Firestoreとの通信処理
あとはFirestoreの /sessions/{sessionId}/messages に対してメッセージを送信し、返ってきたレスポンスを検知して表示するだけになります。
Chat.tsxを編集していきます。
メッセージデータの型定義
まずはFirestoreに保存するメッセージデータの型を定義します。
type FirestoreMessage = {
  createTime?: Timestamp;
  prompt: string;
  response?: string;
  status?: {
    completeTime: Timestamp;
    startTime: Timestamp;
    state: "COMPLETED" | "PROCESSING" | "ERRORED";
  };
};
prompt: ユーザーが送信するメッセージresponse: Firebase Extensionから生成されたレスポンスstatus.state: 現在の処理状態。COMPLETEDになれば画面に表示させます
セッション作成
Collection Pathの sessions に対してidを発行してセッションを作成します。
このセッション内でBotとの会話します。
const createSession = async () => {
  const res = await addDoc(collection(db, "sessions"), {});
  return res.id;
};
さらにコンポーネント内では現在セッションの状態管理します。
const [sessionId, setSessionId] = useState<string>();
そして初期描画時にセッションを開始します。
useEffect(() => {
    // Create a new session
    (async () => {
      const id = await createSession();
      setSessionId(id);
    })();
  }, []);
メッセージを送る
メッセージを入力してSendボタンを押した際にFirestoreへ保存する処理を書きます。
const onSend = useCallback(
    async (messages: IMessage[] = []) => {
      setMessages((previousMessages) =>
        GiftedChat.append(previousMessages, messages)
      );
      const collectionRef = collection(
        db,
        `sessions/${sessionId}/messages`
      ) as CollectionReference<FirestoreMessage>;

      const prompt = messages.at(-1)?.text ?? "";

      // Add a new message to firestore
      await addDoc(collectionRef, {
        prompt,
      });
    },
    [sessionId]
  );
これで sessions/{sessionId}/messages に対してメッセージデータを保存して、しばらくするとGeminiから生成されたレスポンスを含んだデータに更新されます。
レスポンスを検知する
生成されたレスポンスを検知するには onSnapshot() を使います。
useEffect(() => {
    const collectionRef = collection(
      db,
      `sessions/${sessionId}/messages`
    ) as CollectionReference<FirestoreMessage>;
    const q = query(collectionRef, orderBy("status.startTime", "desc"));
    const unsubscribe = onSnapshot(q, (snapshot) => {
      const doc = snapshot.docs.at(0);

      if (doc === undefined) return;

      const data = doc.data();
      const _id = doc.id;

      if (data.status?.state !== "COMPLETED") return;

      const text = data.response ?? "";

      // seconds to milliseconds
      const createdAt = new Date(data.status.startTime.seconds * 1000);

      const message = {
        _id,
        text,
        createdAt,
        user: chatbot,
      };
      setMessages((previousMessages) =>
        GiftedChat.append(previousMessages, [message])
      );
    });

    return () => {
      unsubscribe();
    };
  }, [sessionId]);
ここで行なっていることは、以下です。
- メッセージデータをstartTimeで新しい順にソート
- メッセージデータに更新があれば、1番目(最新)のデータを取得
status.stateがCOMPLETEDならレスポンスを取得- レスポンスをチャットUIに反映
チャットのクリア
チャットのクリアは簡単で、新しくセッションを再作成するだけです。
const clearChat = async () => {
    setMessages([]);
    const id = await createSession();
    setSessionId(id);
  };
実装結果
最終的なコードは以下になります。
import React, { useState, useCallback, useEffect } from "react";
import { GiftedChat, IMessage } from "react-native-gifted-chat";
import { db } from "./firebaseConfig";
import {
  CollectionReference,
  Timestamp,
  addDoc,
  collection,
  onSnapshot,
  orderBy,
  query,
} from "firebase/firestore";
import { Button, View, useWindowDimensions } from "react-native";

const chatbot = {
  _id: "chatbot",
  name: "Gemini Chatbot",
};

const me = {
  _id: "me",
  name: "Me",
};

type FirestoreMessage = {
  createTime?: Timestamp;
  prompt: string;
  response?: string;
  status?: {
    completeTime: Timestamp;
    startTime: Timestamp;
    state: "COMPLETED" | "PROCESSING" | "ERRORED";
  };
};

const createSession = async () => {
  const res = await addDoc(collection(db, "sessions"), {});
  return res.id;
};

export function Chat() {
  const [messages, setMessages] = useState<IMessage[]>([
    {
      _id: "FIRST_MESSAGE",
      text: "How can I help you today?",
      createdAt: new Date(),
      user: chatbot,
    },
  ]);
  const [sessionId, setSessionId] = useState<string>();
  const { width } = useWindowDimensions();
  const [isTyping, setIsTyping] = useState(false);

  useEffect(() => {
    const collectionRef = collection(
      db,
      `sessions/${sessionId}/messages`
    ) as CollectionReference<FirestoreMessage>;
    const q = query(collectionRef, orderBy("status.startTime", "desc"));
    const unsubscribe = onSnapshot(q, (snapshot) => {
      const doc = snapshot.docs.at(0);

      if (doc === undefined) return;

      const data = doc.data();
      const _id = doc.id;

      if (data.status?.state !== "COMPLETED") return;

      const text = data.response ?? "";

      // seconds to milliseconds
      const createdAt = new Date(data.status.startTime.seconds * 1000);

      const message = {
        _id,
        text,
        createdAt,
        user: chatbot,
      };
      setMessages((previousMessages) =>
        GiftedChat.append(previousMessages, [message])
      );
      setIsTyping(false);
    });

    return () => {
      unsubscribe();
    };
  }, [sessionId, setIsTyping]);

  useEffect(() => {
    // Create a new session
    (async () => {
      const id = await createSession();
      setSessionId(id);
    })();
  }, []);

  const onSend = useCallback(
    async (messages: IMessage[] = []) => {
      setMessages((previousMessages) =>
        GiftedChat.append(previousMessages, messages)
      );
      const collectionRef = collection(
        db,
        `sessions/${sessionId}/messages`
      ) as CollectionReference<FirestoreMessage>;

      const prompt = messages.at(-1)?.text ?? "";
      // Add a new message to firestore
      await addDoc(collectionRef, {
        prompt,
      });
      setIsTyping(true);
    },
    [sessionId, setIsTyping]
  );

  const clearChat = async () => {
    setMessages([]);
    const id = await createSession();
    setSessionId(id);
  };

  return (
    <View>
      <Button title="Clear Chat" onPress={clearChat} />
      <GiftedChat
        messagesContainerStyle={{
          width,
        }}
        messages={messages}
        onSend={(messages) => onSend(messages)}
        user={me}
        isTyping={isTyping}
      />
    </View>
  );
}
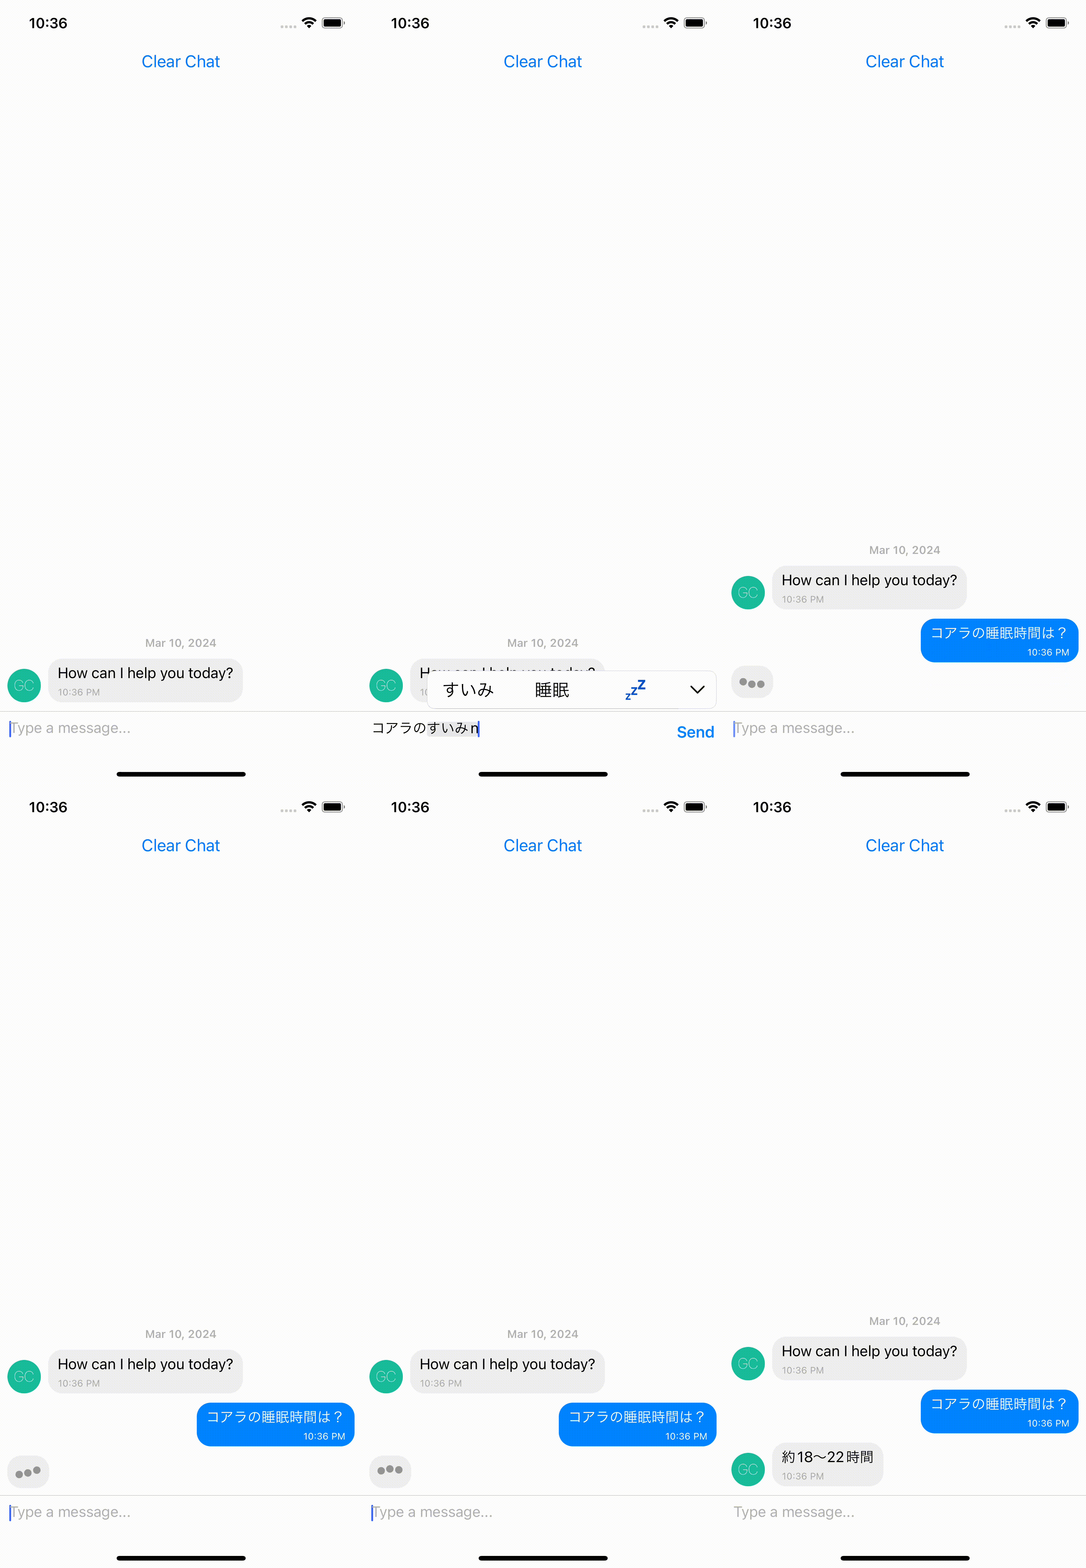
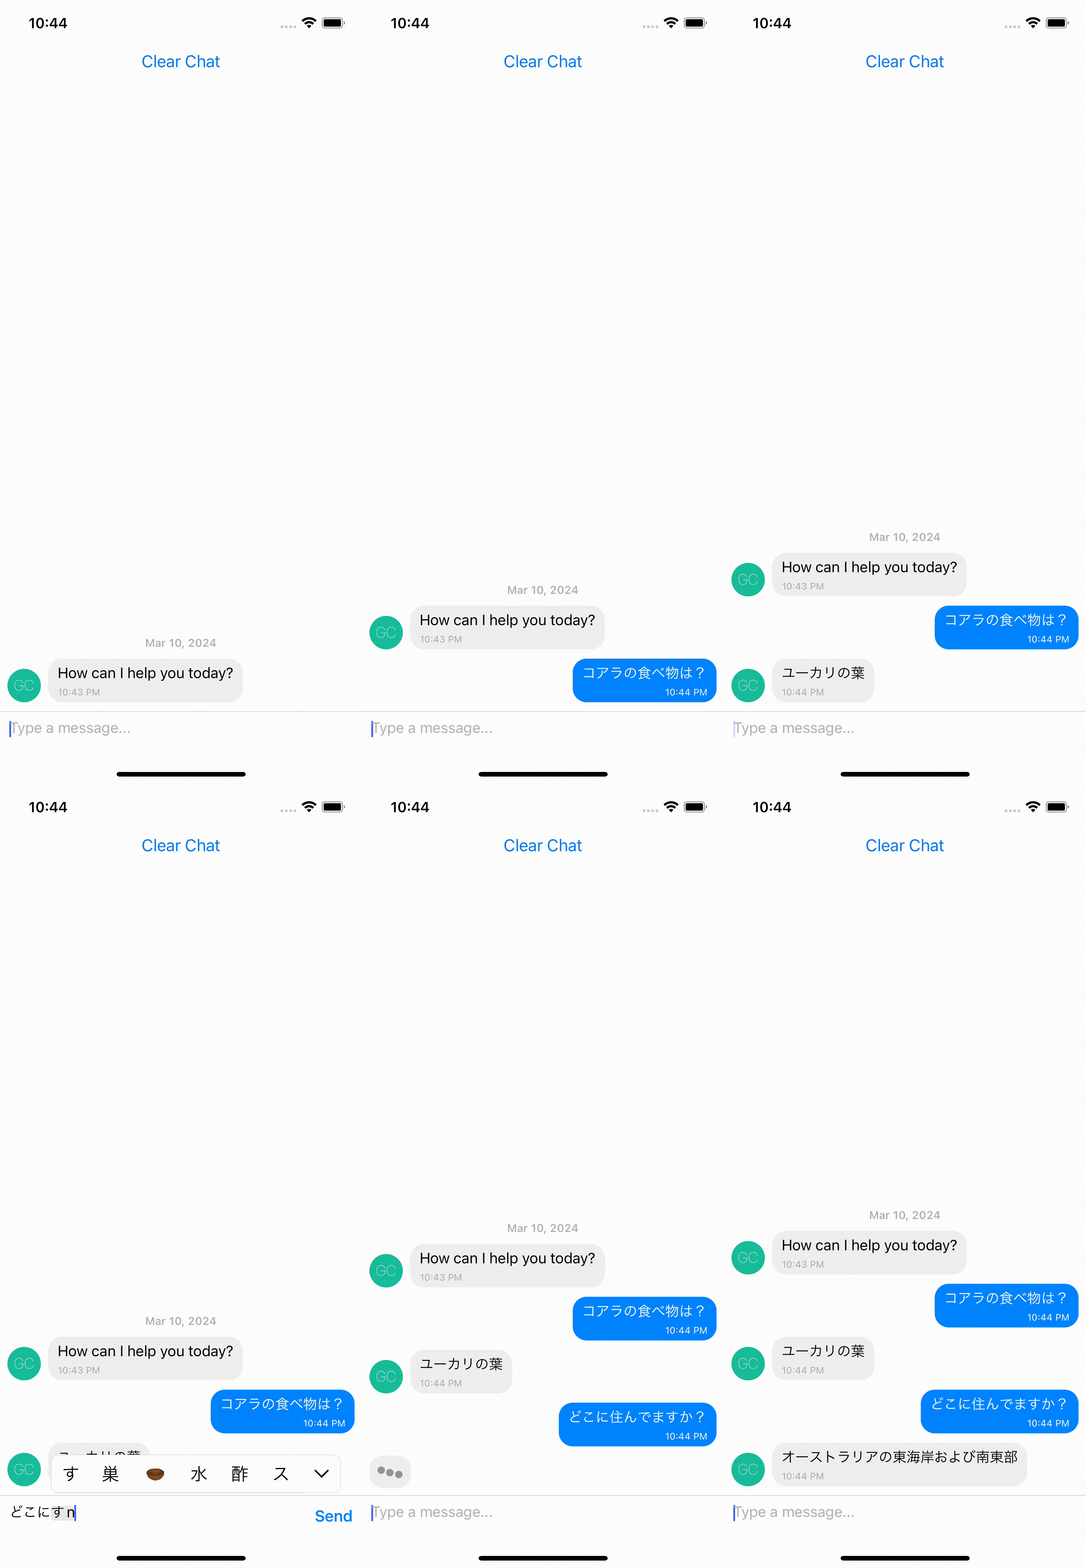
これを動かしてみると以下のようになります。
【おまけ】タイプライターっぽいアニメーションをつける
これでチャットボットは完成しましたが、おまけとしてChatGPTのようなタイプライター風アニメーションをつけてみます。
手前味噌ですが、自分で作成したreact-native-typewriter-effectというライブラリを使用します。
npm install react-native-typewriter-effect
Chat.tsxを編集します。
// 省略...
import { MessageText } from "react-native-gifted-chat";
import { StyleSheet } from "react-native";

const styles = StyleSheet.create({
  textStyle: {
    fontSize: 16,
    lineHeight: 20,
    marginTop: 5,
    marginBottom: 5,
    marginLeft: 10,
    marginRight: 10,
  },
});

export function Chat() {
	// 省略...
  return (
    <View>
      <Button title="Clear Chat" onPress={clearChat} />
      <GiftedChat
	      // 省略...
        renderMessageText={(props) =>
          props.position === "left" ? (
            <TypeWriterEffect
              style={styles.textStyle}
              content={props.currentMessage?.text ?? ""}
            />
          ) : (
            <MessageText {...props} />
          )
        }
      />
    </View>
  );
}
動かしてみると、以下のようになります。
おわりに
実際にFirebaseのExtensionを使用して、GeminiによるAIをモバイルアプリに組み込んでみましたが、実際に書いたコードはReact Native側のコードのみでした。
Geminiを利用したFirebase Extensionsは他にもMultimodal Tasks with the Gemini APIというテキストや画像の入力からレスポンスを生成できるものがあるので、こちらも後で試してみたいと思います。
参考

