
Table of Contents
デモで使いたい時などに、簡単なGraphQLでモックサーバーを用意したいことがあります。
そんなときはApollo Serverをローカルで立てたり、GraphQLのBaaSであるGraphcoolなどを使うことがあるかもしれません。
しかし、それだとローカルにCLIやモジュールのインストールなどの何かしらの環境構築が発生したり、スキーマファイルを作成して、エディタを開いて…など面倒です。
そういったことをせずに簡単にモックサーバーを立てる方法を書きたいと思います。
CodeSandboxでApollo Serverプロジェクトを作成
オンラインコードエディタであるCodeSandoboxを開きます。
「Create Sandbox」をクリックすると、テンプレートを選択する画面が開きます。
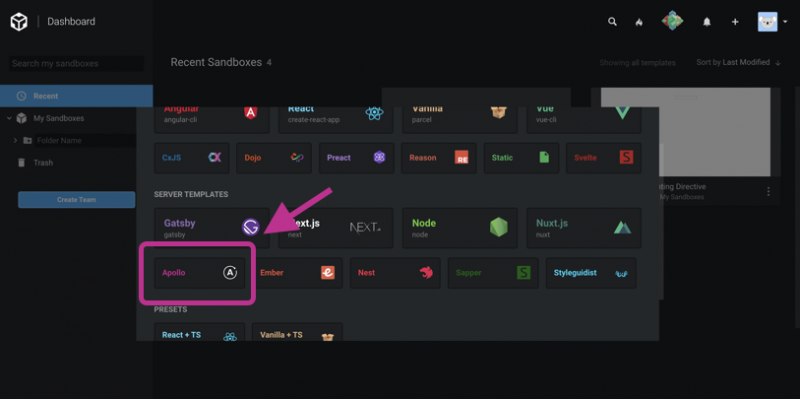
そして、「SERVER TEMPLATES」>「Apollo」を選択します。
するとテンプレートを元にApollo Serverプロジェクトを作成されます。
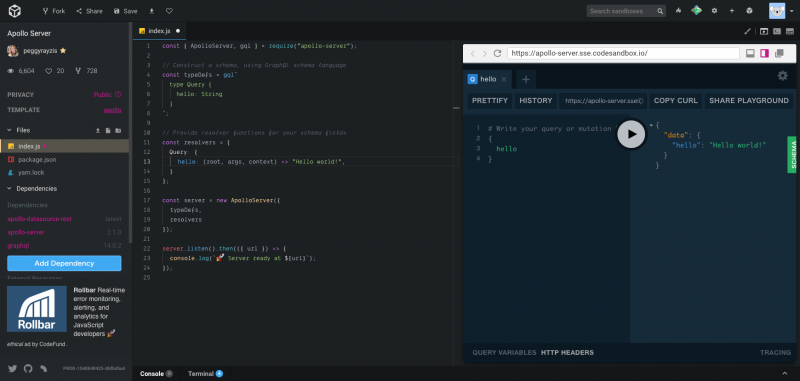
作成されたプロジェクトは、すでにクエリを投げると「Hello World!」と返すようスキーマが定義されています。
プレビュー画面ではエクスプローラーツールであるGraphQL Playgroundが表示されており、実際にクエリを投げてどのようなデータが返ってくるか試すことができます。
Query:
{
  hello
}
Result:
{
  "data": {
    "hello": "Hello world!"
  }
}
スキーマを定義する
自分でスキーマ書いて、どのようなデータを返すのか定義してみます。
// index.js
 const { ApolloServer, gql } = require("apollo-server");

 // Construct a schema, using GraphQL schema language
 const typeDefs = gql`
 type Query {
   hello: String
   posts: [Post]
 }

 type User {
   id: ID!
   age: Int
   username: String
 }

 type Post {
   id: ID!
   title: String
   body: String
   author: User
   comments: [Comment]
 }

 type Comment {
   id: ID!
   text: String
 }
 `;

 // Provide resolver functions for your schema fields
 const resolvers = {
   Query: {
     hello: (root, args, context) => "Hello world!"
   }
 };

 const server = new ApolloServer({
   typeDefs,
   resolvers,
   mocks: true // mockオプションをtrueにする
 });

 server.listen().then(({ url }) => {
   console.log(`🚀 Server ready at ${url}`);
 });
ここで ApolloServer インスタンスを作成する際に mocks オプションをtrueとすることで、定義したスキーマを元にApollo Serverで用意されたデフォルト値を自動で返してくれます。
Query:
{
 hello
   posts {
     id
     title
     body
     author {
       id
       age
       username
     }
     comments {
       id
       text
     }
   }
 }
Result:
{
 "data": {
   "hello": "Hello World",
   "posts": [
     {
       "id": "c91fd89b-4000-43a5-9d1d-1eac169ec4f5",
       "title": "Hello World",
       "body": "Hello World",
       "author": {
         "id": "772f78cc-ce13-4abe-8577-9fc89db013cf",
         "age": 3,
         "username": "Hello World"
       },
       "comments": [
         {
           "id": "7264b3fc-6907-472c-8d97-fba914dfeffb",
           "text": "Hello World"
         },
         {
           "id": "619aa745-0603-4022-99b0-f9acc8fb57c5",
           "text": "Hello World"
         }
      ]
    },
    {
      "id": "5af4a180-ce7b-4dea-adfe-b53ad07bb0f5",
      "title": "Hello World",
      "body": "Hello World",
      "author": {
        "id": "552c5b65-fa48-42ef-9074-84fcddf152c4",
        "age": 55,
        "username": "Hello World"
      },
      "comments": [
        {
          "id": "2e93945e-73c3-41b0-a4ff-bd472e553e42",
          "text": "Hello World"
        },
        {
          "id": "8e60301c-fdd8-4d38-a2e0-950565eb4b9e",
          "text": "Hello World"
        }
      ]
     }
    ]
   }
 }
このようにIntやID型のものはランダムな値が、Stringは”Hello World” が返ってきます。
たったこれだけでモックサーバーが完成しました。簡単ですね!
Resolverを定義する
String型が”Hello World” だけが返ってくるというのは実用的ではないので、Resolverを書いて自分の好きなデータを返すようにします。
// index.js
const { ApolloServer, gql } = require("apollo-server");

const typeDefs = gql`
.
.
`

const resolvers = {
  Query: {
    hello: (root, args, context) => "Hello world!",
    posts: (root, args, context) => [
      {
        id: 1,
        title: "GraphQL入門",
        body: "GraphQLとは...",
        author: {
          id: 1,
          age: 25,
          username: "山田太郎"
        },
        comments: [{ id: 1, text: "コメント1" }, { id: 2, text: "コメント2" }]
      },
      {
        id: 2,
        title: "ApolloによるGraphQLアプリ開発",
        body: "Apolloを使ってGraphQLアプリを開発して...",
        author: {
          id: 1,
          age: 25,
          username: "山田太郎"
        },
        comments: [{ id: 1, text: "コメント1" }, { id: 2, text: "コメント2" }]
      }
    ]
  }
};

const server = new ApolloServer({
  typeDefs,
  resolvers,
  // mocks: true <-削除
});

server.listen().then(({ url }) => {
  console.log(`🚀 Server ready at ${url}`);
});
このようにResolverを書いて、返したい値を定義します。
Resolverを使うときは、先ほど設定したmocks オプションを外すのを忘れないでください。
Result:
{
  "data": {
    "posts": [
      {
        "id": "1",
        "title": "GraphQL入門",
        "body": "GraphQLとは...",
        "author": {
          "id": "1",
          "age": 25,
          "username": "山田太郎"
        },
        "comments": [
          {
            "id": "1",
            "text": "コメント1"
          },
          {
            "id": "2",
            "text": "コメント2"
          }
        ]
      },
      {
        "id": "2",
        "title": "ApolloによるGraphQLアプリ開発",
        "body": "Apolloを使ってGraphQLアプリを開発して...",
        "author": {
          "id": "1",
          "age": 25,
          "username": "山田太郎"
        },
        "comments": [
          {
            "id": "1",
            "text": "コメント1"
          },
          {
            "id": "2",
            "text": "コメント2"
          }
        ]
      }
    ]
  }
}
このような結果になりました。
これなら開発に使えそうですね!
最後に
ここで用意した Apollo Serverはエンドポイントがそのまま外部からアクセスして使えるので、
GraphQLがどんなものかお試ししたい人やApollo Clientなどでのクライアントアプリを開発する際にも使えるので便利です。
参考

Daiki Urata
フロントエンド/モバイルアプリなどを主に開発しています。