Table of Contents
AR でなんか実用的なアプリ作りたい!
前回 Geospatial API で AR を試してみました。
AR は現状ゲームとかエンターテイメントで使われることが多いですが、個人的には AR はもっと実用的なものに使えると思っていて、今回、開発合宿の機会があったので、道案内アプリを作ることに挑戦しました!
概要
AR に関しては 前回の記事 とほぼ同じことをしています。 今回追加で、道案内を実現するために Places API と Directions API を利用しました。
Directions API 単体でも文字列で目的地を入力して、ルート検索できるのですが、正確に目的地を入れないとヒットしなかったため、Places API で広く検索して、候補に出てきたものを Directions API でルート検索するようにしました。
UI をどうしようか考えましたが、手っ取り早く目的地の場所まで線を引くようにしました。
ざっくり言うと、以下のようなことを実施します。
- 目的地を入力する
- Places API で入力から目的地を検索
- Directions API で目的地までのルートを取得
- ルートの緯度・経度の場所に 地形用アンカー を設値
- 各アンカー間を Line Renderer で線を引く
バージョン情報
- Unity: 2022.3.20f1
- AR Foundation: 5.1.2
- Google ARCore XR Plugin: 5.1.2
- ARCore Extensions: 1.41.0
- Newtonsoft.Json: 13.0.3
1. Directions API と Places API の 有効化と API キーの作成
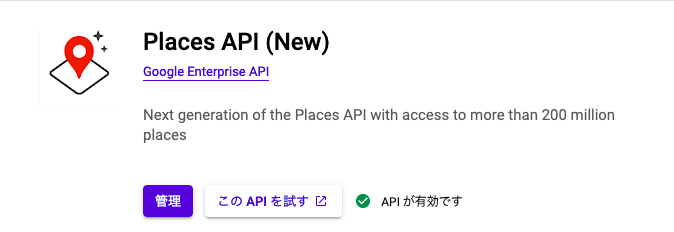
Google Cloud のコンソールから Directions API と Places API (New) を有効化します。
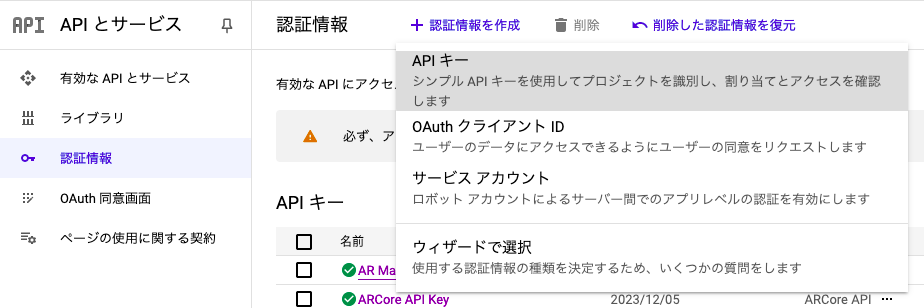
API キーがまだ作成されていないのであれば作成します。
2. Unity で AR プロジェクト作成
前回の記事 を参考に実施してください。
3. パッケージの追加・設定
3.1. JSON フレームワークの追加
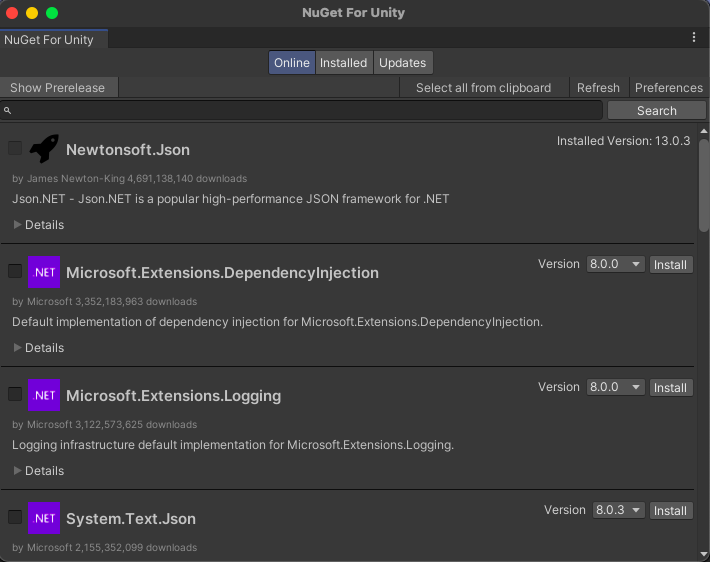
Directions API, Places API で JSON を扱うため、Newtonsoft.Json をインストールします。
Newtonsoft.Json を Nuget で取得したいので、まず、NuGetForUnity を入れます。
Window > Package Manager を開き、右上の + から Add Package from git URL... をクリックし、以下の URL を入力し Add します。
https://github.com/GlitchEnzo/NuGetForUnity.git?path=/src/NuGetForUnity
次に NuGet > Manage NuGet Packages から Newtonsoft.Json を探し、 Install をクリックします。
3.2. AR Plane Manager の追加
今回は、 地形用アンカー を使います。
地形用アンカーを使う時には、AR Plane Manager を追加したら良さそうなので、追加します。

(よく見たら Option って書いてあったので要らないかも)
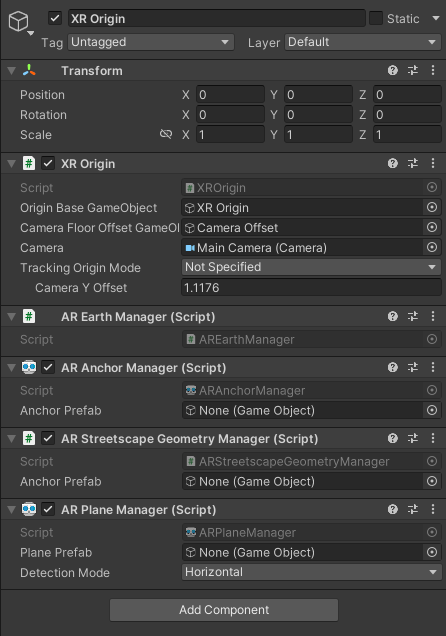
Detection Mode は Horizontal だけ設定しています。
4. シーンの作成
4.1. 入力フィールドとボタンの追加
目的地の入力に使う、入力フィールドと、ボタンを追加します。

本当は「入力中に候補を表示して候補一覧から選ぶ」とかしたかったのですが、 時間もなかったので、シンプルに、「入力して、ボタンを押して、一番目の検索結果のみ使う」にしています。
クリアボタンもまだ未実装なので、別の目的地を入力したい場合には、アプリを再起動するしかない。。。
4.2. その他、オブジェクトなどの追加
追加で以下のような Object・Material・Prefab を作っています。
- 場所情報を取得する Object
- ルート情報を取得する Object
- ルートにアンカーをセットする Object
- アンカー間に線を引く Object
- Line Renderer コンポーネントを追加
- Line Renderer に設定する Material
- 青の半透明
- 目的地を表す Prefab
- とりあえず赤い円柱を目的地に立てます
他にも、「目的地の方角を示す矢印」とか「目的地まであと何m」とか「曲がり角で矢印を出す」とか「看板を出す」とかやってみたかったけど、今回はできていません。
自分の手を認識して、地図を持っているような表示ができるとか面白そう。
5. スクリプト作成
5.1. Places API で場所情報を取得する
Places API の URL (https://places.googleapis.com/v1/places:searchText) に API キーと検索文字列を Post すれば場所情報を取得できます。
今回は道案内アプリは歩きを想定しているので、現在地の緯度・経度を中心に 500m でバイアスをかけてます。 また、全部とってくると情報が多いので、5 件のみ、取得する情報を必要な情報 (Directions API で利用する Place ID と名前と住所) に絞りました。
取得後に OnGetPlace アクションを実行して、場所情報を利用します。
using System;
using System.Collections;
using Google.XR.ARCoreExtensions;
using UnityEngine;
using UnityEngine.Networking;
using UnityEngine.XR.ARSubsystems;
using Newtonsoft.Json;


public class PlacesGetter : MonoBehaviour
{
    public Action<PlacesPlace> OnGetPlace;

    [SerializeField] AREarthManager earthManager;
    [SerializeField] private string apiKey;

    const string placesApiUrl = "https://places.googleapis.com/v1/places:searchText";

    public GeospatialPose GetPose()
    {
        return earthManager.EarthState == EarthState.Enabled &&
               earthManager.EarthTrackingState == TrackingState.Tracking ?
               earthManager.CameraGeospatialPose : new GeospatialPose();
    }

    public void GetPlaces(string destination)
    {
        var pose = GetPose();
        StartCoroutine(PostPlacesApi(pose.Latitude, pose.Longitude, destination));
    }

    IEnumerator PostPlacesApi(double latitude, double longitude, string searchText)
    {
        var request = new PlacesApiRequest(searchText, latitude, longitude);
        string json = JsonConvert.SerializeObject(request);

        UnityWebRequest webRequest = UnityWebRequest.Post(placesApiUrl, json, "application/json");
        webRequest.SetRequestHeader("X-Goog-Api-Key", apiKey);
        webRequest.SetRequestHeader("X-Goog-FieldMask", "places.id,places.displayName,places.formattedAddress");  // Place ID と名前と住所

        yield return webRequest.SendWebRequest();

        if (webRequest.result != UnityWebRequest.Result.Success)
        {
            Debug.LogError("Error: " + webRequest.error);
        }
        else
        {
            Debug.Log("Received: " + webRequest.downloadHandler.text);
            var response = JsonConvert.DeserializeObject<PlacesApiResponse>(webRequest.downloadHandler.text);
            // 取得成功アクション
            OnGetPlace?.Invoke(response.places[0]);
        }
    }
}
ここで使用している型の定義は以下です。
public class PlacesCenter
{
  public double latitude;
  public double longitude;
  public PlacesCenter(double latitude, double longitude)
  {
    this.latitude = latitude;
    this.longitude = longitude;
  }
}

public class PlacesCircle
{
  public PlacesCenter center;
  public double radius = 500;  // 中心から 500m

  public PlacesCircle(double latitude, double longitude)
  {
    center = new PlacesCenter(latitude, longitude);
  }
}

public class PlacesLocationBias
{
  public PlacesCircle circle;

  public PlacesLocationBias(double latitude, double longitude)
  {
    circle = new PlacesCircle(latitude, longitude);
  }
}

public class PlacesApiRequest
{
  public string textQuery;
  public string languageCode = "ja";  // 日本語
  public int maxResultCount = 5;      // 5 つまで取得
  public PlacesLocationBias locationBias;

  public PlacesApiRequest(string textQuery, double latitude, double longitude)
  {
    this.textQuery = textQuery;
    locationBias = new PlacesLocationBias(latitude, longitude);
  }
}

public class PlacesDisplayName
{
  public string text;
  public string languageCode;
}

public class PlacesPlace
{
  public string id;
  public string formattedAddress;
  public PlacesDisplayName displayName;
}

public class PlacesApiResponse
{
  public PlacesPlace[] places;
}
5.2. Directions API でルート情報を取得する
Directions API の URL (https://maps.googleapis.com/maps/api/directions/json) に API キーと原点、目的地、モードを指定して Get でルート情報を取得します。
現在地の緯度・経度を原点、取得した Place ID を目的地、そして、徒歩モードで取得します。
取得に成功したら OnGetRoute アクションを実行して、ルート情報を利用します。
using System;
using System.Collections;
using Google.XR.ARCoreExtensions;
using UnityEngine;
using UnityEngine.Networking;
using UnityEngine.XR.ARSubsystems;
using Newtonsoft.Json;

public class RoutesGetter : MonoBehaviour
{
    public Action<DirectionsRoute> OnGetRoute;

    [SerializeField] PlacesGetter placesGetter;
    [SerializeField] private string apiKey;

    const string directionApiUrl = "https://maps.googleapis.com/maps/api/directions/json";

    void OnEnable()
    {
        placesGetter.OnGetPlace += GetRoutes;
    }

    void GetRoutes(PlacesPlace place)
    {
        var pose = placesGetter.GetPose();
        string destination = $"place_id:{place.id}";
        StartCoroutine(GetRouteApi(pose.Latitude, pose.Longitude, destination));
    }

    IEnumerator GetRouteApi(double latitude, double longitude, string destination)
    {
        string keyParam = $"key={apiKey}";
        string modeParam = "mode=walking";  // 徒歩のルートを取得
        string originParam = $"origin={latitude},{longitude}";
        string destinationParam = $"destination={destination}";
        string uri = $"{directionApiUrl}?{keyParam}&{modeParam}&{originParam}&{destinationParam}";

        using UnityWebRequest webRequest = UnityWebRequest.Get(uri);

        yield return webRequest.SendWebRequest();

        string[] pages = uri.Split('/');
        int page = pages.Length - 1;

        switch (webRequest.result)
        {
            case UnityWebRequest.Result.ConnectionError:
            case UnityWebRequest.Result.DataProcessingError:
                Debug.LogError(pages[page] + ": Error: " + webRequest.error);
                break;
            case UnityWebRequest.Result.ProtocolError:
                Debug.LogError(pages[page] + ": HTTP Error: " + webRequest.error);
                break;
            case UnityWebRequest.Result.Success:
                Debug.Log(pages[page] + ":\nReceived: " + webRequest.downloadHandler.text);
                var response = JsonConvert.DeserializeObject<DirectionsApiResponse>(webRequest.downloadHandler.text);
                // 取得成功アクション
                OnGetRoute?.Invoke(response.routes[0]);
                break;
        }
    }
}
ここで使用している型の定義は以下です。
public class TextValueObject
{
  public string text;
  public double value;
}

public class LatLngLiteral
{
  public double lat;
  public double lng;

  public LatLngLiteral(double lat, double lng)
  {
    this.lat = lat;
    this.lng = lng;
  }
}

public class Bounds
{
  public LatLngLiteral northeast;
  public LatLngLiteral southwest;
}

public class DirectionsGeocodedWaypoint
{
  public string geocoder_status;
  public string place_id;
  public string[] types;
}

public class DirectionsPolyline
{
  public string points;
}

public class DirectionsTrafficSpeedEntry
{
  public double offset_meters;
  public string speed_category;
}

public class DirectionsViaWaypoint
{
  public LatLngLiteral location;
  public int step_index;
  public double step_interpolation;
}

public class DirectionsStep
{
  public TextValueObject distance;
  public TextValueObject duration;
  public LatLngLiteral start_location;
  public LatLngLiteral end_location;
  public DirectionsPolyline polyline;
  public string html_instructions;
  public string maneuver;
  public string travel_mode;
}

public class DirectionsLeg
{
  public TextValueObject distance;
  public TextValueObject duration;
  public LatLngLiteral start_location;
  public string end_address;
  public LatLngLiteral end_location;
  public DirectionsStep[] steps;
  public DirectionsTrafficSpeedEntry[] traffic_speed_entry;
  public DirectionsViaWaypoint[] via_waypoint;
}

public class DirectionsRoute
{
  public Bounds bounds;
  public string copyrights;
  public DirectionsLeg[] legs;
  public DirectionsPolyline overflow_polyline;
  public string summary;
  public string[] warnings;
  public int[] waypoint_order;
}

public class DirectionsApiResponse
{
  public DirectionsGeocodedWaypoint[] geocoded_waypoints;
  public DirectionsRoute[] routes;

  public string status;
}
レスポンスのサンプルは ↓ にあります。
今回は、routes[].legs[].steps[].polyline をデコードして緯度・経度を取得しています。
routes[].legs[].steps[].end_location だけでも、曲がり角の座標を取得できますが、曲線の道の場合にもちゃんと曲線に沿った経路線を引くために、polyline をデコードしました。
なお、 routes[].overflow_polyline だと全ての polyline が一括で取得できますが、将来的に step 毎に矢印を置くとか何かしたかったので、こうしています。
5.3. 経路に地形用アンカーを置く
経路の polyline をデコードして、緯度・経度を取得し、地形用アンカーを設置します。
using System;
using System.Collections;
using System.Collections.Generic;
using Google.XR.ARCoreExtensions;
using UnityEngine;
using UnityEngine.XR.ARFoundation;

public class AnchorSetter : MonoBehaviour
{
    public GameObject prefab;
    public Action<ARGeospatialAnchor[]> OnSetStepsEnd;

    [SerializeField] ARAnchorManager anchorManager;
    [SerializeField] PlacesGetter placesGetter;
    [SerializeField] RoutesGetter routesGetter;

    readonly List<ARGeospatialAnchor> anchors = new();
    readonly List<GameObject> instances = new();

    int? stepCount;

    void OnEnable()
    {
        routesGetter.OnGetRoute += SetAnchorByRoute;
    }

    void SetAnchorByRoute(DirectionsRoute route)
    {
        var leg = route.legs[0];

        List<LatLngLiteral> steps = new();

        // 現在位置を最初のアンカーに設定
        var pose = placesGetter.GetPose();
        steps.Add(new LatLngLiteral(pose.Latitude, pose.Longitude));

        foreach (var step in leg.steps)
        {
            var points = DecodePolyline(step.polyline);
            steps.AddRange(points);
        }
        // 全て終わったことを確認するために、個数を記録
        stepCount = steps.Count;

        foreach (var step in steps)
        {
            SetTerrainAnchor(step);
        }
    }

    void SetTerrainAnchor(LatLngLiteral location)
    {
        Quaternion rotation = Quaternion.Euler(0f, 90f, 0f);

        ResolveAnchorOnTerrainPromise terrainPromise =
            anchorManager.ResolveAnchorOnTerrainAsync(location.lat, location.lng, 1, rotation);

        StartCoroutine(CheckTerrainPromise(terrainPromise));
    }

    IEnumerator CheckTerrainPromise(ResolveAnchorOnTerrainPromise promise)
    {
        yield return promise;

        var result = promise.Result;
        if (result.TerrainAnchorState == TerrainAnchorState.Success &&
            result.Anchor != null)
        {
            anchors.Add(result.Anchor);
            if (anchors.Count == stepCount)
            {
                // 目的地に目印を置く
                instances.Add(Instantiate(prefab, result.Anchor.transform));
                // 全て置き終わったアクション
                OnSetStepsEnd(anchors.ToArray());
            }
        }

        yield break;
    }

    List<LatLngLiteral> DecodePolyline(DirectionsPolyline polyline)
    {
        List<LatLngLiteral> points = new();
        char[] charArr = polyline.points.ToCharArray();
        int index = 0;
        int lat = 0;
        int lng = 0;

        while (index < polyline.points.Length)
        {
            int b, shift = 0, result = 0;
            do
            {
                b = charArr[index++] - 63;
                result |= (b & 0x1f) << shift;
                shift += 5;
            } while (b >= 0x20);
            lat += (result & 1) != 0 ? ~(result >> 1) : (result >> 1);

            shift = 0;
            result = 0;
            do
            {
                b = charArr[index++] - 63;
                result |= (b & 0x1f) << shift;
                shift += 5;
            } while (b >= 0x20);
            lng += (result & 1) != 0 ? ~(result >> 1) : (result >> 1);

            LatLngLiteral p = new(lat / 1E5, lng / 1E5);
            points.Add(p);
        }
        return points;
    }
}
polyline のデコードは ↓ を参考にしました。

5.4. アンカー間に線を引く
設置したアンカーの間に LineRenderer を使って線を引きます。
using Google.XR.ARCoreExtensions;
using UnityEngine;

public class RoutePather : MonoBehaviour
{
    [SerializeField] AnchorSetter anchorSetter;
    LineRenderer lineRenderer;

    void OnEnable()
    {
        anchorSetter.OnSetStepsEnd += DrawLine;
    }

    void Start()
    {
        lineRenderer = GetComponent<LineRenderer>();
    }

    public void DrawLine(ARGeospatialAnchor[] anchors)
    {
        lineRenderer.positionCount = anchors.Length;

        for (int i = 0; i < anchors.Length; i++)
        {
            lineRenderer.SetPosition(i, anchors[i].transform.position);
        }
    }
}
これらのスクリプトを対応する GameObject に追加、設定することで、実装は完了です!
結果
作ってみたものを実際にスマホ (Pixel 6a) で実行してみました。
目的地を入力して、ボタンを押すと、AR でルートに青い線が引かれました!

道中も良い感じに線が引かれています (
横断歩道を渡っていなかったり、車道の方に線が引かれたりする事もありますが、そこは Directions API [walking モード] のさらなる進化に期待したい)。
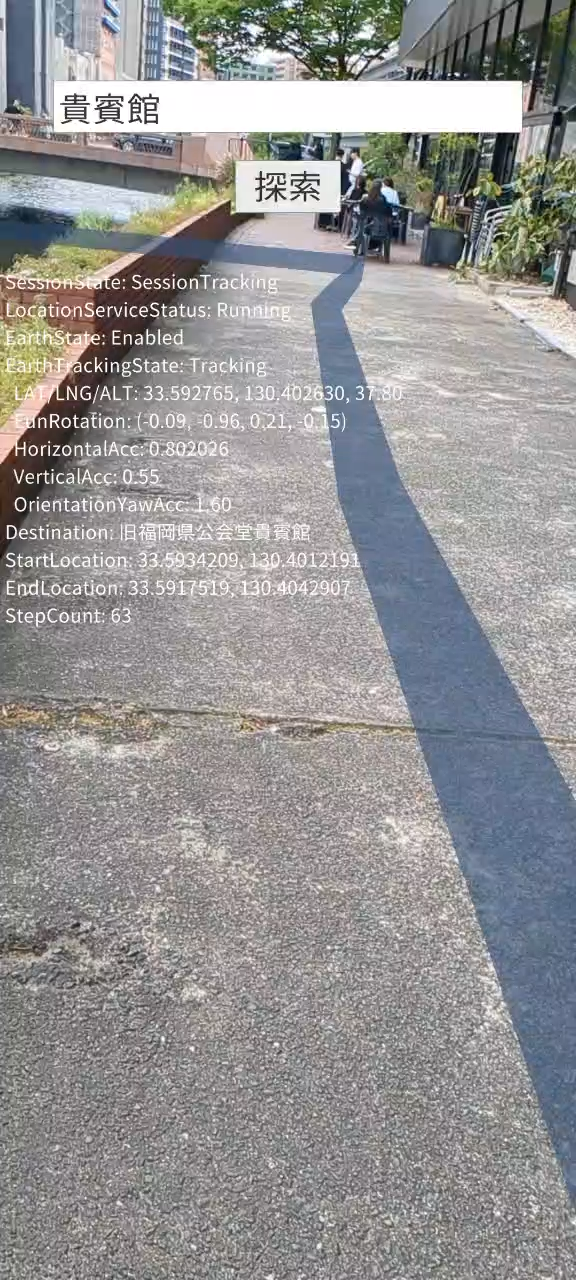
そして、目的地には赤い円柱が立っています。
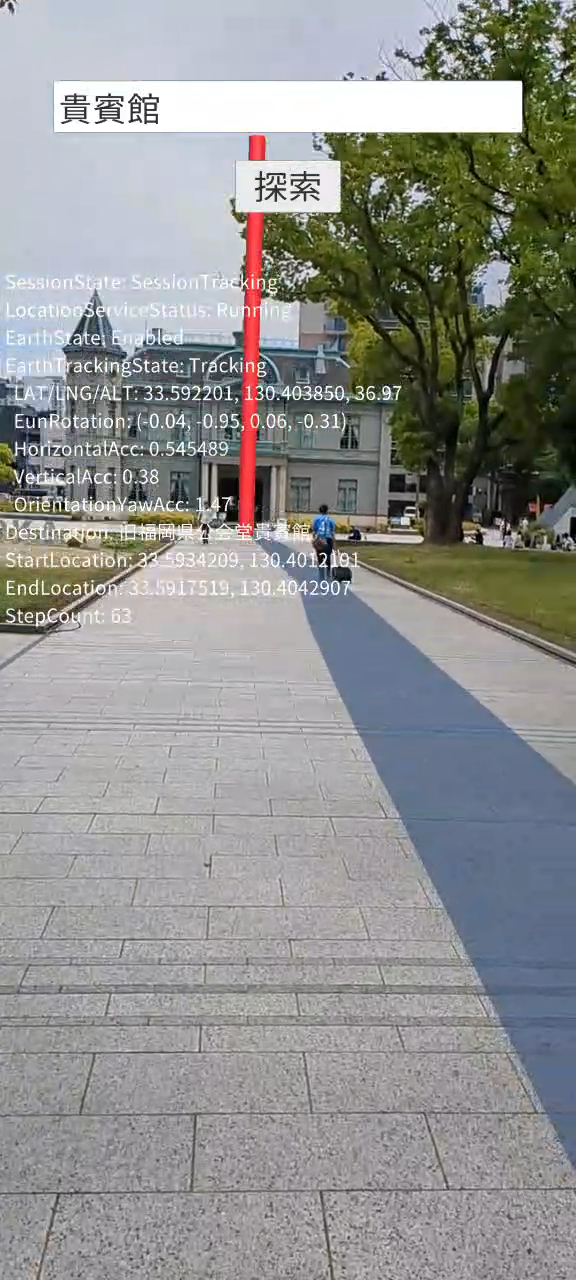
地図を読むのが苦手な人もこれなら大丈夫!
